Thursday, July 27, 2023

Mending Silk

 Hello Readers. This silk shirt I found in England had a tear in it. I think I am the one who made the tear. I was also the one who had to fix it. I wasn't sure how to fix it so I made it up as I went along.

Before and after.

I found this silk shirt while traveling and I thought it was so pretty. The silk would also be nice and light in the summer heat. I brought it home and washed it. I think I might have washed it on a regular cycle with other clothes and not in a delicate cycle. Whatever I did, it tore.

It tore right on the design in front. I wanted to save this shirt but I wasn't sure how.
 
I almost did some embroidery stitching over the floral design to strengthen it. But I hate hand sewing so much. I couldn't bear it. 

I decided to use my sewing machine. I tried to match the thread to the colors in the design.

I tried to stitch over the tears (I found a second one.) I also decided to try and reinforce the whole applique. I tried to mimic the design and sew along the shapes of the leaves and flowers. It feels a lot stronger and I think it will buy me a few years of wear. As long as I wash it gently. 

Close up view! Thanks for reading along, now go make something fun for yourself.

***Year End Update- This shirt was pretty and I am glad I could fix it. The silk is so nice to wear in summer and the floral design really appealed to me.


Wednesday, July 26, 2023

Maxi Skirt to Sundress

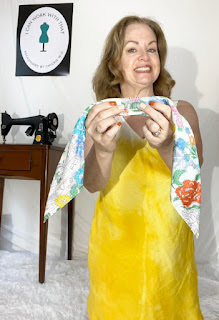
 Hello Readers. I used this very, very long maxi skirt to make a sundress. I am short so I wasn't surprised that this skirt was too long. I thought it would make a great sundress if I played around with it a little. 

 
Before and after.
 
#shortgirlproblems right here.

When I say that I tried on the dress and played around with ideas, I mean it. I wanted a top and a skirt from this skirt and I tried all different ideas to make that happen.

After a lot of thought, I cut the bottom of the skirt off. That was going to be my top. I didn't have that much fabric to work with.

I used my dress form to make a top. I used my serger to put it together.

I wanted to make some kind or ruffle strap but I really didn't have enough fabric. I had to work with what I had so I made 4 tubes and those were my straps. I needed to iron them flat and then attach them to my top. 

I sewed the straps on and the top was done. 

Well, I did some hemming and ironing, then I was done. 

My dress is perfect for the hot summer days we are having. It's lightweight and comfortable. Stay cool out there everyone. Thanks for reading along, now go make something fun for yourself. 

***Year End Update- This dress was perfect for the summer heat and I wore it a lot.


Tuesday, July 25, 2023

Making a No-Sew Stool Slipcover

 Hello Readers. I had a little seat at my desk and it got taken. It was taken by one of my kids for their room so I let it go. I wanted a new one and I had this collapsible stool just sitting in the trunk of my car. It works at my desk but it's not cute at all. As usual, I didn't want to spend money so let's make this unusual stool as cute as we can.

Before and after some easy changes.
 
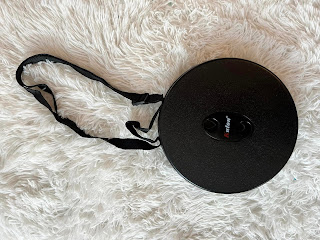
This stool has been in the trunk of my car for a few years. It has a carrying handle and is all one piece.   I think this would be great for someone that wanted to go out but couldn't stand for a long time. It would be easy to carry along. I have not been using it so let's give it a real home.
 
I wanted to show how the stool opens and closes. You spin and pull at the same time and it stands up. (This is not an ad but you can find this on Amazon.) You spin and push it closed just as easily. Some engineer/designer had fun inventing this.
 
You don't need a weird stool like I had, any round stool with a seat will work.
 
I wanted to make my stool a little more comfortable to sit on. I put this cushion on top. It had elastic around the underside to hold it in place. This isn't required, I just like to be comfortable and this made it much nicer. 

I searched in my sewing closet and found some fabric that coordinate with my room. I found this red and white fabric and went with it. The fabric needs to be one piece and it needs to cover the stool to the floor with 6-8 inches of excess all around. The taller the stool, the more fabric you will need.

I found some coordinating ribbon in my sewing stash too. I needed about 2-3 feet of ribbon. Anything that you can tie around the stool will work, string, twine, thick yarn, a shoelace, a belt...

I used the ribbon to tie the cloth around the stool, under the seat. I pulled the ribbon tight and this pulled the fabric in. This is why I needed extra fabric, when the fabric is pulled in, it pulls up some of the fabric length. 

Then I put the stool up on something so I could cut the fabric around the bottom. I wanted the fabric to just touch the floor. My stool is not pretty so I just wanted to cover the whole thing.

I used these pinking shears to cut the bottom of the fabric. These scissors cut the fabric in a zigzag and it helps keep it from fraying. The zigzag cut will keep the fabric looking nice without any sewing at the bottom edge.

I cut the fabric all around the stool and tried to make it even all the way around. It doesn't have to be perfect. The gathers of the skirt will hide some imperfections. (Perfection doesn't exist anyway.)

Here is my stool. I am sitting on this stool right now as I type this. It is great for my little desk. The desk is actually my late Grandmom's sewing table. I sit at her table and write this blog about sewing. She would love that. (After I explained what a blog is.) Thanks for reading along, now go make something fun for yourself.
 
 ***Year End Update- I still use this stool often. It is in my sewing room now.


Wednesday, July 19, 2023

The Barbie Pink Skirt

 Hello Readers. Have the movie trailers for "Barbie" have you craving pink? Is it just me? Like I want some more pink clothes in my life. I had this baggy pink floral skirt in my stash and decided now was the time.

Before and after.

This skirt would satisfy my color craving and it would be a very easy project. This skirt is pretty straight. There aren't any ruffles or gathers or pockets to get in my way. The only obstacle is a zipper on one side. That is OK. We can take the skirt in on the other side.

I tried on the skirt so I could see what I needed to change. This is an important step. This is when I can make the skirt fit my body. clothing sizes in the US can vary from brand to brand and they mean nothing. I marked the skirt where I wanted the new side seam to be. I made sure I was getting a good fit at the waist and the hips. I don't want a gaping waist and I don't want it too tight across my bum.

I used my sewing machine to make a new side seam. I sewed from the top to the bottom. I mad sure the skirt was flat and smooth while I was sewing and I got a nice looking seam when I was done. 

My pink skirt fits so much better now. It only took a few minutes to make this change but it really improved the skirt. Are you planning to see the "Barbie" movie? Will you wear pink? Thanks for reading along, now go make something fun for yourself.

***Year End Update- I didn't wear this to see the Barbie movie but I did wear it and loved it. It is cheerful and easy to wear.


Getting a Scarf to Stay On My Head

 Hello Readers. It is really hot and humid where I live and I can't even deal with my hair. It makes me so hot when I leave it down so I have been putting it up. The only problem is my head must be a weird shape because it is hard to get a scarf to stay on my head, Do I have weird head? Maybe. I have an idea to deal with it though.

You just need a scarf or bandana, a hair comb, a needle and thread.

I folded the scarf into a triangle and then kept folding so the ends were tucked in.

I used the needle and thread to sew the scarf together and attach it to the comb at the same time.

My comb and scarf combo is sewed together. 

I put the scarf on my head and the comb is hidden underneath. The comb gives the scarf a little grip and it stays on top of my head. 

I tied the scarf under my hair. I can leave it like this.

Or if it is going to be really hot and miserable I can put all my hair in a pony tail and just forget about it. The scarf keeps the little baby hairs for getting loose and getting in my face. I hate that. Thanks for reading along, now go make something fun for yourself.

***Year End Update- Summer heat and humidity are not great for my hair. I just turn into a frizz ball. Sometimes covering my hair is easier.


Tuesday, July 18, 2023

Laundry Room Organization With a Coatrack

 Hello Readers. Summertime is for relaxing but it's also the time I do my deep cleaning, decluttering and organizing. I wanted to tackle the laundry room because it seemed out of control lately. I needed to organize and keep the things we needed easy to access. 

Before and after.

Here is look at my laundry room before I got to work. It is a place that people leave "stuff" and it is a storage spot as well as the place we do laundry. I needed to have a better storage plan and I needed to get rid of all the "stuff" that did not need to be in there. (Like the game and the hair products!)

I started by doing some laundry. It helped get some of the mess out of the way and I needed to do it anyway.

I decided to take almost everything out to start with. I definitely needed to remove this table. I thought it would be handy but it sticks out too far and it doesn't hold much. Whatever I put in that little cabinet gets forgotten, "Out of sight, out of mind". Sometimes storage ideas don't work. That's OK.

Taking everything out made it so much easier to clean. I vacuumed the floor and around the baseboards.

I mopped while I had the chance. It felt so much better when it was cleaned up. 

Now we can get to the storage. This inexpensive coat rack is actually for an entryway but it is going to be great in the laundry room. The 3 open shelves will hold more than the table I was using. And I can see everything through the open wire shelves, no more forgotten items. It also has 8 hooks to hang things on. This is the laundry room and sometimes I need to hang up special clothes to dry instead of putting them in the dryer. The bar on top can hold hangers and/or clothes as needed. 

I moved the coat rack in and put it next to the vacuum. The vacuum has to stay plugged in so that isn't going to move. That spot isn't ideal but the outlet is there to charge it. I had to work with the space I had.I couldn't let it put me off my plan to organize.

I needed a shelf to store all the extra toilet paper. Clearly I am not over the Covid toilet paper shortages.
 
I put the dog food on the top shelf so everyone can find it and feed the dog. I also put all the vacuum cleaner attachments together in one bin on the bottom shelf. The vacuum is there so I think it will be easier for everyone if the attachments should be right there too. 
 
   Here is a high speed video of what I did in case you want to see some speed cleaning. 
 
When I washed this bag I had an easy way to hang it to dry. 
 
It was also perfect for all the wet things we had when we came home from the pool. 
 
The whole room looks much better. The big blue baskets above the washer ans dryer hold pool towels, sunscreen and toys, light bulbs, lanterns and flashlights, cleaning supplies and dusting cloths. Those bins were working for us so I didn't move or change them. I try to store like items together. It helps me stay organized best that way. Thanks for reading along, now go get organized. 

***Year End Update- This coat rack is still helping keep the laundry room organized. I am glad I put it in there.