Monday, November 30, 2015

Old Pillow Snowman

Hello Readers. Here is a quick decorating project you can make from an old pillow and other items you most likely have sitting around the house. I saw this recently on Facebook. It was faster and easier than I thought it would be and it cost me nothing. This fluffy guy is sitting on my front porch waiting for Santa.


I started with this king size pillow. It isn't as comfortable as it used to be.


I tucked the four corners in so it looked more round, like snowmen should.


I found some mittens, a hat, and I cut an old T shirt to make a matching scarf. I pinned the hat on the top from the back so it won't get lost in the wind. The scarf will be tied tight around the "neck" to divide the snow man into two parts.


I glued the buttons on for eyes and chest buttons. You could sew them on if that is easier for you.


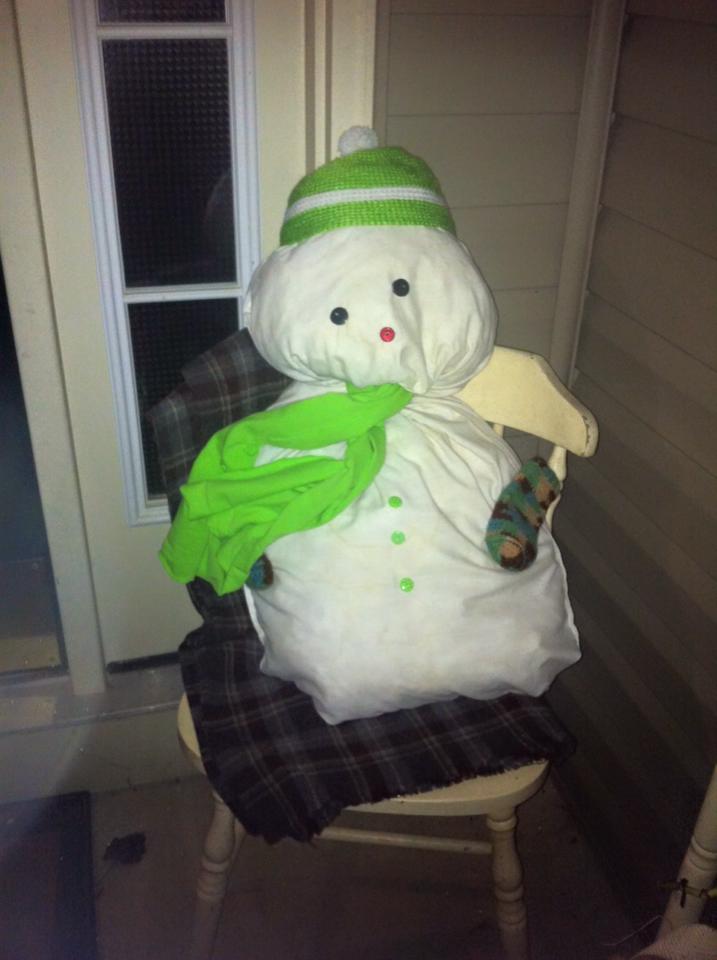
Here he is, guarding the front door. The blanket under him is helping him stay upright on the chair. The chair is a bit slippery.


This was 10 minute project that brightened up my entryway a lot. Thanks for reading, now go make something fabulous. And free.

Saturday, November 28, 2015

The Mt Everest T

Hello Readers. Most of my refashions are making a larger item smaller, but not always. Did you ever have a T shirt you liked but couldn't get into? This is a quick casual project to enlarge a favorite shirt. I am going to use a couple small pieces of a second T to add some needed room.


This shirt is brand new but too small. I love the Mt Everest theme. I am never going to climb Mt Everest, but now I don't need to. I have the shirt! It says 2015 on it and this year has been a big year at my house. (Pregnancy, bed rest, hubby's car wreck, hubby's cardiac scare, more bed rest, new baby, recovery, staph infection, more recovery...blah, blah, blah) It's like I climbed my own little Mt Everest here in Small Town, USA.


I have no before pictures because it was that small. I couldn't get it on and neither could my dress form. My first step was to cut the neckband out to open it up and cut the arms off at a slight angle. I cut 2 long thin pieces from the patterned shirt. I made them 2 inches wide and the same length as the body of the T. This will vary depending on your shirt.


I cut straight up each side of the Everest T, stopping at the seam under the arm. I inserted the extra fabric and sewed them in.

Front view, back view and my finger on the camera. Oops!

Here is a close up of the finished shirt. It has this patterned "stripe" on each side.


I wore it when I sampled some holiday baked goods.

Mmmm, cake.

Thanks you very much for reading, now go make something fabulous for yourself. Or go climb a mountain if you want. 

Friday, November 27, 2015

Pink Plaid Even A Teen Girl Could Love

Hello Readers. Today's project was a soft warm pink plaid shirt. It wasn't for me, it was for my daughter. She liked the material and colors of this shirt. It has great shades of melon and pink.


She didn't like how it fit. It was too loose and baggy. It was big in the arms too. She asked me to fix it for her and keep her identity a secret. 


I took the shirt in through the body and the arms.


It came out very well. I measured and pinned carefully because I know she wouldn't be happy if I messed it up.


It skims over the hips and the wrist doesn't hang over her hand anymore. Once I took the shirt in, I didn't need to shorten the arms.  It has taken years for me to learn to take in the piece before I shorten it. Things seem to get shorter when you narrow them. If you shorten them first, they will get too short when you narrow it after.


This is her saying, "Mom, it's cold! Enough with the pictures".


Thanks for reading. Now go make something fabulous for yourself. (Or your daughter!)

Monday, November 23, 2015

The Floral Sweater Refashion Disaster

Hello Readers. Today's project was a great idea that didn't survive my carelessness. It started with these two tops. A floral sweater and a pleated green blouse.


The sweater is just lovely. The flowers are very pretty and well done. The dark navy background keeps it from being too cute. It has one problem, it is a little short.


The green blouse is a nice match to the sweater. It is just waiting to be made into a ruffle to lengthen the sweater. I cut the bottom 6 inches off the blouse.


I pinned it to the sweater.


I narrowed the sweater around the waist. (Canine Supervisor - KC)


I was ready to iron out those pleats. This is where things went wrong. I didn't check the setting on the iron and this blouse sort of melted. It was not salvageable. I was sad but wanted to share the the idea with you. You can try something like this with your own sweater. 


I didn't damage the sweater, so I removed the melted green ruffle. I am just wearing it with a shirt under it. It works but it wasn't as fun as the green blouse would have been. Oh, well.

What a sour puss!

Thanks for reading, now go make something fabulous for yourself. And be careful with your iron!

Thursday, November 19, 2015

The Green Robe Part 2

Hello Readers. Remember this beauty of a robe? It is time for the second half of this project. 


The string ties and the length gave me the idea of a wrap skirt or pareu. I sewed the raw edge along the top cut. 


I made a couple darts along the back to bring in the waist a little. And I cut off the inner ties. I didn't need them.


Oh look, a dart up close!


That's it. I just wrapped it around my waist and I was finished. I couldn't decide whether to go long or short. What do you think?


What to do with the scrap? A scarf?


Thanks for reading, now go make something fabulous for yourself.


Wednesday, November 18, 2015

The Green Robe Part 1

Hello Readers. I found this robe at a clothes swap. It had an Asian look to it and it was a very pretty green. I love green. I could have kept it as a robe, but where is the fun in that?

It's a bit windy out today.

Just look at the pretty navy blue design. It is a cotton polyester blend that will be easy to work with.


I started by cutting the robe, just above the string ties it had already built in. I have a plan for the bottom piece. Today we are working on the top. If you look at my cut it is a bit longer in front. That's part of the plan, just go with it.


I narrowed the arms by about half. I used the excess to make a long thin piece of fabric to use as a waistband. I pinned it on and sewed it together. The extra length in front helps it fit around the bust.

What is the dress form wearing? It's padding to make her my size. 

Here is the front. It needed something. I added the buttons to break up all that green. 


I don't want button holes. I want to connect the two buttons with a cord of some kind. (Technical name- Unknown at this time.) I settled for this. It's a hairband that I stole from my daughter. Actually, I stole two. I tied it in a knot and pulled tight, that gave me a 8 shape.


Here is a close-up of the buttons. The bands are black, navy would be better. But you can see what I did to connect the buttons.


Here is a picture that would be good except for my son's finger.


Thanks for reading. Next time will be The Green Robe Part 2. Now go make something fabulous for yourself.


Tuesday, November 17, 2015

Just Dye It!

Hello Readers. As you can see from these pictures, it isn't very cold yet. Not when I took these pictures anyway. Is it cold where you are? I always wonder where you are and what you have been working on lately. 


My project today is a pair of white jeans. There isn't anything wrong with them, they're great. I love white jeans. They were $3 on the clearance rack, they fit well and are not too long. I am really short so everything is too long. When I tried these on and they were the right length, I thought it was meant to be. They won't stay white though. My big black dog getting in mud or my 7 month old baby boy eating and spitting baby food at me will take care of that.


My idea is to dye them to a darker shade with this Rit dye. I chose Pearl Gray. That will be a safer color for me and my real (messy) life. If you have a top loading washing machine you can dye clothes in it. I have a front loader so I need to use a bucket.


I followed the directions for cotton material. I stirred and waited. I stirred and waited again. It seemed like a LONG time. (I hate waiting.) I wound up putting the baby to bed, forgetting this and going to sleep. Oops!


After I washed them, I got this result. It wasn't what I expected. It has variations in the color that are easier to see up close. When I use dye I never know exactly what will happen. Every garment reacts a little different to the dye. That is the fun part.


From a distance they look more uniform in color. It is darker and more dog/baby proof. I really like the color. It is different, but not too crazy.


If you haven't tried to dye something, try it soon. You'll love it. It can brighten things up, it can cover a stain, or it can just be a fun way to refashion something you already have into something new. Thanks for reading, now go make something fabulous for yourself.

***BONUS TRACK***

After further wear these jeans stretched and stretched. They were seriously saggy. I narrowed them a little and they got too short. So, in the end they became skinny jeans.


The End