Friday, October 29, 2021

The Last Minute Dragon

 Hello Readers. How are you doing? I am late, behind schedule and just all over the place in general. My mom had a stroke. She is recovering well but there has been a lot of back and forth so my schedule is a little off. I am happy and relieved my mom is doing better and everything else will work itself out too. But there is a little guy who wants to be a dragon. I am the sewing mom and I needed to get something together. 

I started with a red sweatshirt that was a hand-me-down and some red sweatpants. These are easy to find basics.

 I had to paint over the logo on the sweatshirt. I used a little acrylic paint to hide the white printing. 

The red paint will help hide that logo and so will the yellow chest I stitched on the front of the shirt.

The dragon from a favorite book, "There's No Such Thing As Dragons",  also has a yellow chest/belly so that is my inspiration. 

I added a couple horns to the hood of the sweatshirt. I cut out 4 horn shapes. I sewed 2 pieces together and added it to one side of the hood and then I did the same on the other side. 

I also made a little mask to attach to the front of the hood with Velcro. Do dragons have teeth? I assume yes.

You can see the Velcro on each side of the hood. There are pieces of Velcro on the back of the mask. The Velcro will let him take the mask on and off.

Now we get to the part where I cheated a little. We already had this dragon tail blanket/sleeping bag thing. This was ready to go and saved a lot of time. You can find them on Amazon. 

I filled it with balloons to fill out the tail and attached it to the sweatshirt. It has wings and spikes down the back. 

 It has wings and spikes down the back.


He said I sewed it very nicely and he just wanted some candy. I did give him some M&M's for taking these pictures.

I was happy I got it done before the weekend. I hope you are all well and I hope you get a lot of candy. 

***Chickie's Year End Review-He got candy and got to be a dragon. Win-Win!


Wednesday, October 27, 2021

T-shirt to Treat Bag

 Hello Readers. Halloween is coming. I don't like creepy spooky stuff. It freaks me out. I do like candy and so do my kids. I usually try to find something fun and candy related for my kids to do. My youngest wants to be a dragon and he would definitely like some candy. Where is he going to put all that candy? In this fun bag that he helped make. 

I started with a black t-shirt. Any t-shirt will do. 

I cut the neck area and the sleeves off the shirt. It won't fray so I just got to the cutting. Those narrow shoulder pieces are the handles of out new bag. 

The next thing I did was very important. I used my sewing machine to stitch across the bottom of the shirt. The bag needs to be closed because it needs to hold all that important candy. If your child is planning on really loading this bag up with candy make sure you make this seam very strong and secure.

Now, it was time for some fun. We wanted a jack-o-lantern on our bag. I used some chalk to give my child a pumpkin shape to work with. 


 I put newspapers inside the shirt to keep the paint from bleeding through the fabric and I let my son fill in the pumpkin with orange paint. He loves to paint so this was a fun project for him.

I added a stem to the pumpkin and let it dry for a few hours. 

Our pumpkin needed a face and I planned to let my son paint black eyes, nose and a mouth on the pumpkin. As usual, my plans are useless. My son wanted this character to be our inspiration. It was his bag so that is what we did. I drew this face with a small tube of acrylic paint. 

Here is a close up of our inspiration. His name is Goomba. He is from the Mario game. 


I wish you lots of fun and yummy candy no matter where you are or what you are doing. 

Thanks for reading along, now go make something fun for yourself.

***Chickie's Year End Review-My son got free candy in this bag so it was truly loved.


Wednesday, October 20, 2021

Corduroy Joy #1

 Hello Readers. It is getting colder. That means it's time for warm fabrics like corduroy and flannel! I love them both, they are so warm and cozy.

 I got this tan pair of corduroys as hand-me-downs and I am so glad I did. I thought maybe they would be a good match for this cozy flannel shirt. (I have no idea where I got the flannel shirt..) I did not like this outfit as it was. I look like a basic suburban dad. I look like my dad. (No offense to dads. I just don't want to dress exactly like my dad.) Let's get to work. 

The first thing I did was customize these corduroy pants to my size. This was easy. I just stitched my way down each side and gave them a new hem. Quick and easy!

I still wanted to do something to jazz up this flannel shirt. I wanted to try a bleach effect. I mixed a cup of bleach into a gallon of water and soaked the bottom of the shirt and sleeves in the water.


I let it sit about 45 minutes and I got a surprise. It turned pink! I did not expect pink. I thought it would get lighter and tan colored. I thought it would match the tan corduroys in color. Things don't always go the way we think they will. That's just life.

I liked the pink but I didn't like it with these tan corduroy pants. It just did not look the way I thought it would. 

I put the flannel shirt with some off-white pants and I think it worked better. 

And as for the tan corduroy pants... maybe a plain off-white top? When in doubt, I grab something off-white.


 Thanks for reading along, now go make something fun for yourself. 

***Chickie's Year End Review-These corduroys are good but that flannel is a true favorite.


Friday, October 15, 2021

Mother-Son Matching

 Hello Readers. It is the last of what I am calling, "Second Summer". It is always warm here until suddenly, it is winter. I decided to take advantage of this time to make a matching mother and son outfit for myself and my youngest.

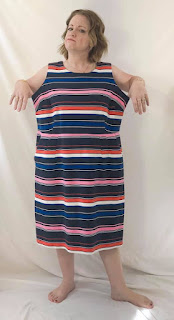
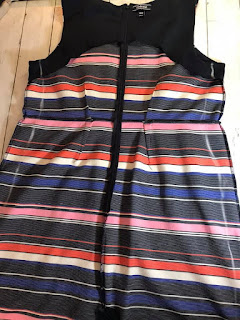
 This dress was really cute. I found it at a swap and loved the stripes. I thought it would match a shirt that my son had. It isn't an exact match but it is close enough for me. Mother and son outfits are not easy to find so I really wanted this one.


 The knit dress was a little big but it is easy to alter the size of a dress like this.


 I tried the dress on inside out and marked where I wanted to make new side seams. I marked it with chalk so you could see it. Some people like to use pins to mark the new side seams but I always prick myself and it just makes me so mad.


 You can see the new side seams and I also shortened the dress. It was a knit cotton, did not fray at all and it was easy to work with.  I wanted a shorter more casual dress.


I liked the new dress. It was easy to wear and the knit fabric was very comfortable in the heat. It is 83 degrees outside! 

 
My son got tired of taking pictures very quickly. I only took 2 pictures of him and then he got some chocolate caramel cookies. Yes, bribery was involved in the making of this blog post. 
Thanks for reading along, now go make something fun for yourself.

***Chickie's Year End Review-I loved this matching look but my son? Not so much.


Wednesday, October 13, 2021

A No-Sew Remake

 Hello Readers. How is fall in your part of the world? Mine is still a bit... summery. It is really warm where I live. Ugh, it is not sweater weather yet. That brings me to this dress. It is great weather for a dress. And this refashion does not need any sewing. Just scissors.

This dress was brand new and it was soft and stretchy but it had some problems. It was SO long. It was a maxi length but as you can see, I am not a maxi length person. These was so much extra fabric hanging on the floor. I could have shortened it and it would have been a cute dress but sometimes that maxi length is nice to wear. So how can we restyle with no sewing?

I decided to cut this dress apart. The top half fit pretty well and I am messy so I could always use another t-shirt so I cut the dress into the length I wanted my new shirt to be. I used a favorite shirt to get the length correct. This is the only cutting I did. I just followed the hem of the black t-shirt with my scissors. I cut slowly and carefully and that was it. The material won't fray so I didn't need to hem it.

This new t-shirt is great with jeans for going where ever and doing whatever. 

What about this long skirt? Now that I cut the shirt off, the skirt was not as long as it was before, but it was still very full cut. I thought of a way to alter it without any sewing at all. 

If you can tie a knot, you can do this refashion. 

This knit material was stretchy so it was easy to tie a knot on each side to make the waist smaller. It made the loose skirt fit and stay up around my waist. The best part about this is you can make it any size you need and adjust it whenever you want. Skinny? Tie it small. Just ate Thanksgiving dinner? Tie it bigger. Pregnant? Change it as your baby belly grows.

I liked wearing the skirt and the shirt together because it still had the feel of a dress, it just fit better now. It has a more flattering shape as well. There is a waist and I have ankles too. The knit material won't fray. I just tied the knots and I was done.


Thanks for reading along, now go make something fun for yourself. 

***Chickie's Year End Review-I like this 2 piece maxi dress outfit. It has been put away all fal;l and winter.

Friday, October 8, 2021

Puffy Sleeves

 Hello Readers. Sometimes you have to dress up a little. It can't be pajamas all day every day. Let's get dressed!

This shirt and skirt were hand-me-downs. The fall colors were fabulous. The skirt fit at the waist but the length was not good for me. The shirt had so much going on. The puffy sleeves and the neck tie. It was a lot all at once. 


Let's get to work. The skirt was an easy fix. It just needed to be shorter. It fir perfect at the waist already. Some cutting and some hemming took care of this skirt.

Let's move on the the burgundy shirt. It was a little big but that was good because there was room to fit and move around. I made the sides a little smaller and cut the sleeves off.

I thought cutting the sleeves made such a pretty ruffle sleeves. The shorter sleeves looked better on me. I was lost in those puffy sleeves. I will look more in proportion with some arm showing.


 I did not like tie around the neck. I cut it off and connected the 2 pieces. 

I thought it would make a much better waist tie to tie around the shirt. It worked perfectly as a little belt. It gave the shirt a more flattering shape at the neckline and at the waist.

I could tuck it into the skirt and wear the belt as a headband too. 


Thanks for reading along, now go make something fun for yourself. 

***Chickie's Year End Review-This blouse is a favorite of the year. I wore it a lot. I couldn't wear the skirt as much. I have to wear pants to work so my time to wear skirts is limited.