Friday, September 29, 2017

Mommy's Not Really Getting Dressed Today

Hello Readers. I know I am not the only mom that has trouble keeping up with everything I am supposed to do. I do not have it all together. I wish I could say that I got up with the sun everyday so that I could be awake, dressed, organized, and cheerfully ready to face the day. That sounds like the ideal and mature way to live but, it is not how I live.
I heard a term to describe clothes, "athleisure". Exercise clothes that are worn whenever, not just for working out. These kind of clothes are comfortable so, I usually sleep in my athleisure clothes. That way when my 2 year old son (Cute stick of dynamite.) wakes up early in the morning I am already sort of dressed. I can start the day a little bit ready to go. I am dressed enough to exercise, go to the play-ground, or go to the store if I really need to.  No one really knows what I am doing, (Wearing my pj's.) I could be on my way to the gym. 


If I can, I get dressed in real clothes for the day, but if I can't, the neighbors won't see me outside looking crazy. A problem arises when I can't find clothes to fit my very short arms.

Mom's in leggings and hoodies, my solution to crazy mornings.

I could have just cut the sleeves to the right length. But I wanted real long sleeves for the cooler days ahead. I turned the cuff over to see how much I wanted to take off. That pin is marking where I want to make my new seam.


I took the shirt off and stitched a new seam all the way around the sleeve. Then I cut off the excess fabric. I removed about 2" from each sleeve.


Here is the finished sleeve. The length is right and the cuff still looks nice and neat.


I fixed the sleeves of the jacket the same way. The wrist cuffs of this jacket have little thumb holes to keep my hands warm when I am outside. I was able to keep them intact on the cuffs. I removed about 3" of fabric from the jacket sleeves. 


 I could wear it now and use my hands. I like the little thumb holes too.


The shirt and the jacket both fit now and I am feeling the bright pink. I am ready to jog, or watch TV, or go to bed. No one knows for sure, and I'm not telling.


Thanks for reading, now go make something fun for yourself.


Wednesday, September 27, 2017

Too Low, Too Big

Hello Readers. It is almost October but it feels like August in the Washington D.C. area. I am not wearing any clothing for cool weather yet. Today's project is an outfit for the time in-between seasons. I liked this striped top. It was soft and had a nice loose fit with a flattering drape to it. The problem was that the open neckline was very revealing if I leaned down or if someone stood over me. (I am 5' tall, everyone stands over me. You can see my problem, right? hahaha)


You can see the open neckline in the photo below. I could have worn a shirt under it, but sometimes that is just annoying. When the weather is super hot, I don't want to wear 2 shirts. That is a lot for some mornings.I could be to tired to find 2 shirts.
 I used my sewing machine to stitch the neckline closed. It was super simple and fast. The new round neckline was more modest and easier to wear.


The skirt I wore with it was so difficult to photograph. These are over-exposed so you can see the skirt. It was a simple, classic, navy blue knit that was great with the shirt.  It was just too big and baggy.


I took a little off the sides and the problem was solved. The skirt is a knit so there were no fraying seams to worry about.


These clothes were perfect for the mom of an active toddler/tiny marathon runner. I wore this to the open gym at my local rec center. 


The staff sets up all this equipment and for $5, they let little kids go crazy. They are running, climbing and screaming. That is my husband watching out 2 year old run around


I chased my son all over the gym and didn't get very good pictures. He didn't stop moving for about 2 hours. We went home after this and we were all exhausted. Who needed a nap more that day?


Thanks for reading, now go make something fun for yourself.


Friday, September 22, 2017

A Shirt Skirt

Hello Readers. I have been sewing and refashioning when I can, as usual. It was and is with some success and some failure. Today's post is 50% success and 50% failure. 


I started with these two shirts. They were both in great shape but they were a little big. The gray T-shirt was too low in the front and the colorful top was a little too big all over.


I started with the colorful top. It had cute ruffles at the bottom. (Is it leopard print? I think it is, but I am not 100% sure.) I cut the arms and shoulders off. The body of the shirt will make a great skirt.


I used this wide black elastic as the waistband. I used a zigzag stitch to attach it to the shirt. It only took a few minutes.


The finished skirt looked like this. It was simple but it worked. That was good enough for me.

This is pretty good. I'll take it.

The gray shirt was too low and I wanted to raise the neck line. I thought if I gathered and overlapped the neckline it would cinch together. I figured this would raise the neckline up and it would fit better. I sewed it in place but when I was done, I didn't think the neckline was laying very flat.


I tried to attach these little snaps to distract from the wonky neckline of this shirt. They had little prongs on the back. I hit them with a hammer and the prongs attached and dug into the fabric. They seemed to help a little.


Well, the neckline did end up higher than it was before. The failure was that I didn't foresee that the gathering would just make the shirt cling to my chest in an obscene and tight manner. It was really not a good style for me. I was really uncomfortable with how much of my chest was being emphasized.

This is not very good. This is not very good at all.

So, the gray shirt was not working for me, but I really liked the skirt. I think when I wear it I will pick out a different top, like this simple black sweater. I found this cashmere sweater at a clothes swap and it was missing a button. I was going to replace all the buttons but when I looked inside there was a spare button. It was such a simple fix, and now I had a great cashmere sweater.

This works for me. 

Thanks for reading, now go make something fun for yourself.
And don't worry about occasional failures, they happen to everyone.


Wednesday, September 20, 2017

To Sleeve Or, Not To Sleeve

Hello Readers. Sometimes I get an idea for a refashion and that's it. I just stick with the idea. And then sometimes the plan evolves and changes as I work. Today's project is one of those. I had new ideas as I worked and just went with it.


I started with these 2 shirts. I liked them but they were both a little big, not a lot, just a little. A few small tweaks would have fixed them. But the color schemes were so similar that I wanted to put them together somehow. I decided to make a dress. The sleeveless top fit well through the body, it just needed to have shorter shoulder straps. I fixed that with out taking pictures. It would have made a tight skirt so it was an easy decision to use the paisley top as the skirt.


This patterned top was looser so I thought it would make the best/loosest skirt. I didn't want a tight skirt. I cut the body of the shirt off right under the arms. 


I took some thin elastic and threaded it through the bottom, factory-made hem of the shirt. 


It looked like this with the elastic inserted. I will flip it over and that elastic is now the waistband. It was easy. It just needed a hem along the raw cut edge.


It looked like this. It was perfect for the warm weather we had that day. I really liked the pattern mixing and it was super comfortable. I started thinking that without sleeves, it wouldn't really work in cooler weather. 


And since I still had those sleeves......


I decided to attach the sleeves to the sleeveless shirt and see how it looked. I just stitched over the armhole seam of the striped top.


 I think I could wear it into the cooler days ahead now. What do you think? Should I have added the sleeves or not?


Thanks for reading, now go make something fun for yourself.

Friday, September 15, 2017

The Cactus Pillow That Scared My Kids

Hello Readers. I really wanted to make a cute pillow for my daughter, she likes anything with cacti on it. I had this colorful, wool, zip-front sweater with a lot of green in it that I thought would make a cute cactus shaped pillow.
 I was wrong dear readers. So wrong.


I washed the sweater in hot water and dried it in the dryer on high. That caused the sweater to shrink a little and tightened the weave of the sweater. It is easy to cut and create new things with wool sweaters like this.
I cut out a cactus shape. The zipper is still down the front.


Here is my cactus shape. I eventually made the limbs a little shorter and stitched all the way around the edges. The raw edges were a little rough so that it would look like the needles of a cactus.
It was at this point my older son said it looked like a scarecrow reaching out to grab someone. 


I stuffed it with all of the cut off scarps and put it on my daughters bed along and I couldn't get the scary scarecrow idea out of my head. I asked my daughter what she thought. She said she hoped she didn't wake up in the night to see it leaning over her in a threatening manner. She also saw the limbs reaching out to get her. 


This was a fail with everyone but the dog, he seems unafraid of the scary pillow. The projects I make can't all be winners. And this pillow proves it. Oh, well.

Friday, September 8, 2017

Maxed Out Four

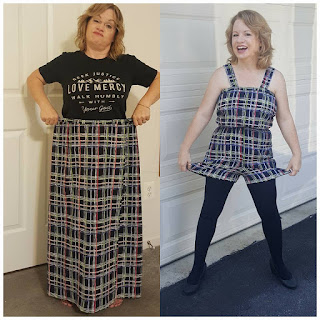
Hello Readers. Today is the 4th and last of the maxi-skirt/dress series. I found this plaid rayon skirt quite a while ago. I thought the long plaid skirt was OK, but I didn't love it. It just seemed dowdy. I thought it would be a challenge to make it into something more fun. 


This just OK skirt was actually a fake wrap skirt. That gave me some extra fabric to play with. It was also in great condition and made of good quality fabric. It had a lot going for it, it just needed help coming out of it's shell a little.


I started by spreading out the skirt and I had enough fabric to make some loose fitting shorts. I thought shorts would be a fun way to use this plaid print. I used a lot of the fabric from the bottom of the skirt but that left the top of the skirt untouched.


I used the top of the skirt to make a matching top. I also made two shoulder straps and stitched them in place. You can see in the picture below the waistband with the button still intact. I used it as my new top but decided sew the wrap part closed. It was not a real wrap skirt so it wouldn't fly open but it needed to lay flat to be a top. 


This was an easy outfit to make because it had such a loose relaxed fit. I wanted it to look like a fun little romper but I didn't have a pattern for that. I also don't like to remove ALL of my clothes to use the bathroom the way you need to with a romper. It is just a little inconvenient to completely undress so many times through the day. 


I love this outfit. I wish I had made this outfit ages ago, it is as comfortable as pajamas. It turned out very chilly this morning so I had to winterize it with some tights and a sweater but I still love it.


Thanks for reading, now go make something fun for yourself.

Wednesday, September 6, 2017

Maxed Out Three

Hello Readers. Today is part 3 of my Maxed Out series. The maxi skirt I am going to show you today is a very pretty cream color skirt with a light sheer overlay. It was SO long. I couldn't even walk around in it. If you check the before picture below on the left, it looks like I have no feet. I don't know who was intended to wear this, but they are a lot taller than me. Even high-heels wouldn't have fixed this.


I decided to go shorter (Much shorter!) with this skirt because it was so delicate and light in color. I thought it was pretty but not very practical for a mom of a toddler.
I had to cut the whole thing to a shorter length. I decided to cut it so the sheer layer was just a bit longer than the lining underneath. This would make it about knee length and I thought that would be good for me. Now I just needed to hem the skirt.

(Oh, look, I do have feet.)

I didn't do any sewing to make a new hem. I used a lighter. Before I used the lighter I got the fire extinguisher and put it close by. I was trying to be safe because I was literally playing with fire.
I also researched how different fabrics/fibers burn. You can check this video for more information.
BE CAREFUL WITH FIRE!


I went to an area that was open and well ventilated. With out any small children, pets or flammable substances around.
I used the lighter and "brushed" the flame along the raw edge of the fabric. This is polyester so it caused the edge to melt in on itself. I tried not to keep the flame in one spot too long, or it would melt too much of the fabric and take a little bite out of the edge. You can see in the picture below on the right where I overdid it on one spot.


I really liked the finished look. It made a very light hem. It stayed light weight because I didn't make a traditional hem by folding the fabric under and stitching the layers of the hem down. It has a lot of movement and I felt a little like a ballerina while I was wearing it. 


Thanks for reading, the next time will be the final Maxed Out post.
Go make something fun for yourself.