Showing posts with label Sweater. Show all posts

Wednesday, February 1, 2023

Crocheted Blanket Shrug

 Hello Readers. Have you ever tried to crochet? I tried for about 5 minutes and I just didn't like it. My daughter is great at it and she decided to make a blanket. She made part of the blanket and never finished it. I kept it because it was something she made but what could I do with it? Long story short- I made a shrug. 

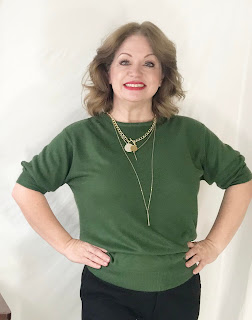
I went with these colors from head-to-toe. Is it too much?

My daughter made it about 18 inches before she stopped. The stitches are nice and she did really well. The whole piece is about 5' wide. This is really handy because my arm span is about 5'. This would be perfect as one of those sweaters that is just arm and shoulders. I would call it a shrug, you might call it something else, but this is size I had to work with.

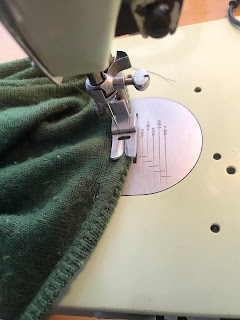
I turned the ends in and clipped them in place. This would be the arm hole. 

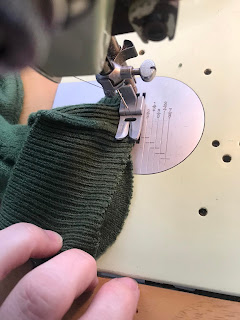
Here is a look at both armholes turned in twice and clipped in place. Now I will turn it all inside out and stitch it together from the inside. 

With the arm holes and sleeves stitched together the whole thing sits on my back, across my shoulders and down my arms like a shrug. The fit is easy because there really isn't much to fit except the width from one wrist to the other. 
 
I love how it turned out. I had a shirt and a pair of jeans in the same colors so I threw it all together. This was such an easy project because my daughter did all the crochet work for me. (Thanks H!) Thanks for reading along, now go make something fun for yourself.
 
***Year End Update- This is cozy and colorful. I wear it I the winter to stay warm. 


Wednesday, September 21, 2022

Filling in a Low Neckline.

 Hello Readers. Look at this wild dress. I loved all the colors and the fit of the dress was great. I didn't like the neckline and I wanted to fill it in with something. I really wanted it to blend in though. That dress really wants to be the star of the show. 

Before and after.

I had a plan to solve this problem, it involved part of a cowl neck sweater. I cut the cowl neck right off. I just cut around all the way around the neck of the sweater and it was ready for the next step.

It was made of 2 layers so I used my serger to connect the two layers at the cut end. I thought it would keep it nice and neat. I didn't want it to shift around while I was wearing it.

Here is a sweater tube top. It wouldn't work for me as a shirt but it will be perfect under my wild dress.


I like how the color of the tube top and the colors of the dress work together. The neckline is filled in and I can wear the dress without worrying about the low cut neckline. I didn't want to put on a cleavage show.

I will show you what I did with the rest of the sweater next time. Thanks for reading along, now go make something fun for yourself.
*Year End Note From Chickie- I loved this crazy dress. It's really lightweight so I will get it back out in spring. The top I made is perfect under it. It totally solved the low-cut problem but blends in with the dress so well.


Friday, August 12, 2022

Yellow Sweater

 Hello Readers. I am back again with a sweater that just does not fit anymore. What is the deal? Is it Covid snacking? Is it turning 50? Is it my love of chips? Something is making me bigger and I can tell when I get dressed. Some of my clothes are too tight. But I like some of them a lot and I want to save them. Like this sweater. The bright color... the fun stripes... I loved it!

Before and after.

This sweater was too tight. You can see that. I was going to give it away but...

 
It sounds a little crazy but I am a hardcore Crocs fan. I am almost obsessed. When I was yunger I worked in an office and wore high heels everyday. Now, I have old tired feet and when I wear Crocs my feet do not hurt at all. (This is not an ad. They do not know me. I just love them.) I found these fun yellow Corcs on clearance and bought them right away. When I wear them at work, my feet are happy. Do you see how the yellow color matches the sweater? I needed to save the sweater because I probably wouldn't be able to find anything else this shade of yellow ever.
 
I decided to enlarge this sweater. It is much faster to make the sweater larger than it is to make myself smaller.

Now that the sweater is open I can put some kind of fabric in the sides.

I searched around in my sewing stuff and decided to use this wide sheer ribbon. It would be almost clear and would not distract from the yellow stripes. I didn't have anything else that seemed to match. This is an unique color.
 
I used my serger to connect the ribbon and the side seams.
 
 You can see the side seams here.
 
I also used my serger to finish the the ribbon along the hemline and wrist cuffs.

I thought the fit was much better now that the sweater was a little bigger. This is an easy project that takes only a little while. Thanks for reading along, now go make something fun for yourself.
*Year End Note From Chickie- This was a great summer sweater and I wore it to work a lot. It was light and fit so much better after adding the ribbon.


Friday, May 20, 2022

Denim Days-Capris

 Hello Readers. It is getting hot and sunny and cropped jeans are perfect, a really high waist would be even better. I didn't have any jeans like that. I did have these tan Capri style denim jeans. Let's refashion!

Before and after. 

I wanted to change the look of these tan Capri's and I had a fun idea for the sweater too. Let's start with the jeans first. 

I have been wanting some more brown in my wardrobe so I got a bottle of brown Rit dye. (Not an ad. They do not know me.) I put the denim jeans and the dye in my washing machine. There are very detailed drections on the bottle. I always follow them.

The color came out great. I took a little out of the waist to make them fit a little better. I also took the stitches out at the cuffs. The jeans were rolled up and stitched down. I wanted them a little longer so unrolling the cuffs gave me more length. Instead of Capri length I had more of a cropped pants length.

This was a very simple refashion. The tan jeans were now changed into cropped brown jeans. But what about the sweater?

 
The sweater was such a loose knit that it was a little see-through. I had an idea to fix that though. 
 
Here is a view of the inside of the sweater. Adding this ribbon filled in the holes and it was a fun way to add some color to the sweater. 
 
I used a zigzag stitch to secure the ends of the ribbon to the side seams of the sweater.
 
I liked how the ribbon looked. It was easy to weave in and out of the sweater. It only took about 10 minutes. I used ribbon that I had on hand. This turned out to be a one of a kind piece. You could use ribbon in your favorite colors and customize it for yourself.
 
This outfit was a great spring/summer combo for me. Thanks for reading along, now go make something fun for yourself. 
*Year End Note From Chickie- These brown pants are cropped and I liked them in summer and into fall. I wore them a lot. I wear the sweater a lot too. The added ribbons made the sweater fun and it seemed to match so much with the extra colors in it.


Wednesday, April 13, 2022

Too Tight Sweater

 Hello Readers. It's April and I decided to focus on florals all month. I know, florals for spring. Groundbreaking. Miranda Priestly wouldn't be impressed but let's make this sweater fit again. This is a very easy beginner sewing refashion project.

Before and after.

I really liked this sour apple green-yellow sweater. I liked the knit flowers on the front. But it didn't fit anymore. I seem to have out grown it. (Did anyone else use Covid as an excuse to snack a lot? Was it just me?) It's OK. I can fix this.

I cut the side seam open. I just started cutting at the waistband and followed the seam all the way up. The seam ends at the wristband. Once it is all open you can fill the gap in with something to make the sweater bigger.

I thought I could use this ribbon. I liked the flowers and the different shades of green together. Ribbon is not stretchy and because it is so stable it will be easy to work with. The best part is that you can pick any ribbon you like. The wider the ribbon the bigger your sweater will be.

Always measure to make sure you have enough length for your project. I had just enough to finish both sides of this sweater. Like just enough. If  I messed up somewhere I was going to be in trouble.

I clipped the right sides together. I wanted all the parts to stay in place while I was sewing.

The ribbon added some extra room in the sweater. When the ribbon was sewn into the sides of the sweater it added about and inch and a half to each sleeve 3 inches to the body of the sweater. That was just enough for me to wear the sweater comfortably again. I could have chosen a much wider ribbon and made my sweater much bigger.

I like how the ribbon peeks out from the side. It is fun but it is simple enough that I can wear it to work.

Here is one last picture of the sweater so you can see the ribbon. It is one piece of ribbon that is sewn into the side seam to make the sweater larger. It won't be any longer than it was before, just bigger.

I made a basic white woman trip to Target. Yes, I got Starbucks too. It was great. Thanks for reading along, now go make something fun for yourself. 
*Year End Note From Chickie- I really like this acid green color. It's a weird shade but I can't get enough.


Wednesday, March 9, 2022

The Tight Turtleneck

 Hello Readers. I am going to refashion all green pieces in March because it is going to be St. Patrick's Day this month. I am Irish so I am into it. I thought it would be a fun sewing challenge for myself. I had also collected a lot of green pieces in my stash so this is a good way to make sure I get some "new" green clothes for myself.

Before and after. 

This turtleneck was so small it was difficult to pull over my head. It was so tight it wiped all my make-up off. I don't like turtlenecks that much anyway. I knew this one would have to go.

I cut the turtle neck off. I left about 1/4 of an inch of fabric. This is important. I need the extra so I could sew it down later. 

I found a small hole in the sleeve and I thought short sleeves would be great for spring so...

I cut the sleeves into a short sleeve length. I made sure the hole was cut off when I cut the sleeves.

I also cut the wrist bands off and saved them for later. I will use them to finish the sleeves.

I got some matching thread and stitched the neck band down. I tucked that 1/4 of an inch of extra fabric under and into the sweater. I stitched on the outside of the neckline and from the outside it looks like a round shaped neckline was always there.

I used the wristbands at the ends of my new short sleeves. I put the right sides together and used a zigzag stitch to stitch the edges together. The sewing will be hidden inside. The zigzag stitch means the sleeves would have some give and stretch. That will make them more comfortable to wear. 

My new short sleeved NON-turtleneck sweater was ready to go. It could be worn anytime but it also works for St. Patrick's Day. Thanks for reading along, now go make something fun for yourself. 
*Year End Note From Chickie- This sweater is still a favorite even after a year. It worked for Christmas too.


Friday, February 4, 2022

Valentine Elbow Patches

 Hello Readers. I wanted to jazz up this striped sweater and Valentine's Day is the perfect time. Bright pink elbow patches sounded like an easy and fun project to me.

 Heart shaped elbow patches.
 
I have had this cotton sweater for quite a while and I love the cheerful colors. Any sweater would work for this idea. Just grab one from your closet. The pink stripes on the sweater gave me an idea. 

I had some pink some scrap fabric. This pink T-shirt sleeve would work well to decorate my striped sweater. 

I cut out heart shapes from fusible interfacing and ironed it onto the pink fabric. The pink fabric is very soft and the edges would curl under making it difficult to work with. The interfacing makes the pink fabric a little thicker and stiffer. I am going to sew these hearts on my sweater and this will make it easier to do that. You might not need to use interfacing if you make hearts out of thicker fabric. If you use interfacing, follow the directions on the package.
 
I cut out my hearts and made sure they were the same size. I wanted them to be identical. I was ready to start hand sewing them onto the elbows of my sweater. 
 
 
Hand sewing is not my favorite thing to do but it's not hard and you have a lot of control when you sew by hand. I wanted a decorative stitch made of embroidery floss but you could just sew them on with tiny stitches and regular thread. Do what ever works for you. 

My sweater was ready to go shopping for Valentines. It is almost February 14th. Go get a card and a box of chocolates for your special someone or even yourself ASAP!

I liked how the blanket stitch looked. It had a hand-made, home-spun look. But remember you can use any kind of stitching you like. Thanks for reading along, now go make something fun for yourself.  
*Year End Note From Chickie- These heart shaped elbow patches are a little cutsie but I love them very much. This gets a lot of wear.