Friday, November 26, 2021

It's a Funny Story

 Hello Readers. In the beginning of the year I decided to try and refashion for free all year. I wasn't going to buy anything, even from thrift stores. All the clothes and trims, zippers and hardware had to be from my stash or free somehow. I was only going to buy needles and thread. It is amazing but so far I have done it. I have gotten hand-me-downs. I have worked through my stash. And, strangely enough, I actually found some clothes hanging on a fence when I took my youngest to the dentist. 

Before and after.
 
 Does this happen to other people? Is it just me? There were various clothes hanging nicely on hangers and of course I saw the sign that said "FREE". I took the jeans you see hanging second from the left. 
 
I also got 3 pairs of Banana Republic dress pants. New.With.Tags! I forgot to remove the tags before putting the pants in the washer. Oops!
 
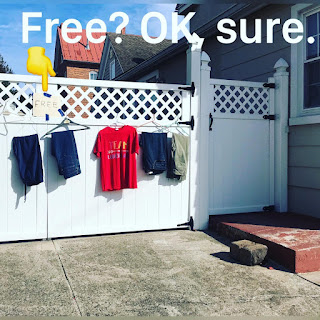
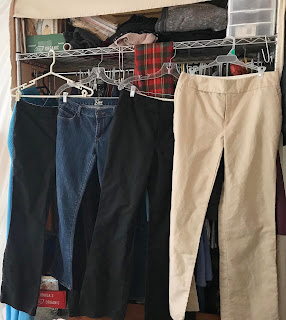
I took my son to his dental appointment and then I took these pants down from the fence, went home and put them in the washer. I am all about the "free" life style but I wash everything right away! Like immediately. Warm water, soap, extra rinse. Every time. 
 
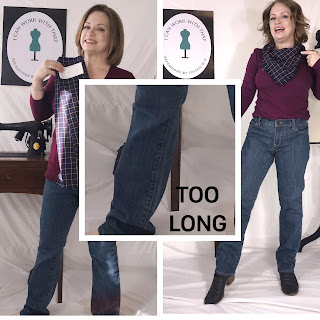
Well, let's talk about today's project. It was quick because I am a 
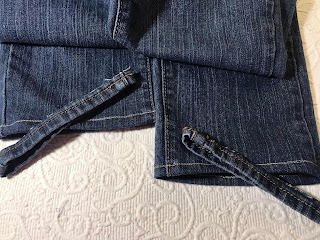
crazy busy woman lately. (I had to make pumpkin pies!) I liked these straight leg jeans because they fit pretty well in the hips but they were too long. I did some cutting and hemming. 
 
 
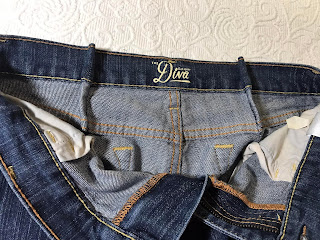
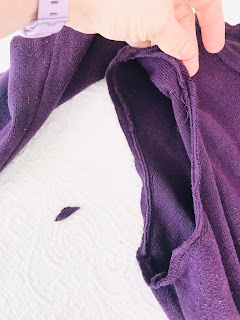
I also made 2 tucks in the back of the waistband to get rid of the gaping waistband in the back that some times happens with jeans. It wasn't a huge change but it is the small things that make you feel good in your clothes.

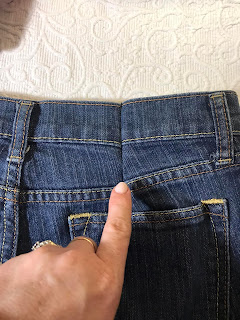
 Here is the outside view of one of the the tucks I made. .

 
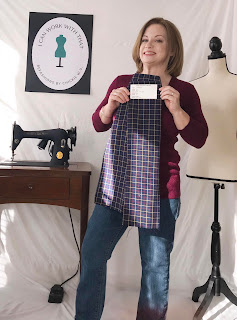
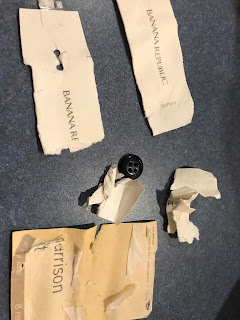
This fabric sample was from my mother-in-law's stash. I wanted to make another scarf. I wanted to use the fabric and it was a small piece. A scarf is all I could think of.

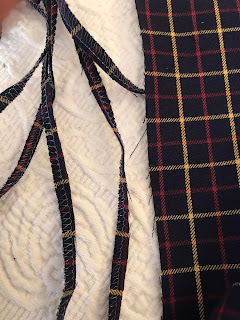
I cut the edging off the fabric. It was nylon thread to keep the edges from fraying. I wanted to make fringe so, it was in my way.  

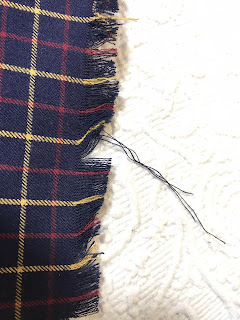
I pulled the treads off the edges a few at a time until I had fringe all the way around. 
 
 
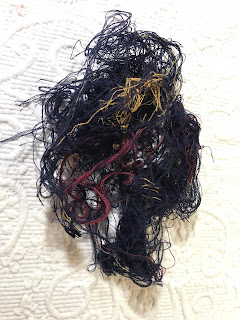
The threads piled up quickly. It took quite a while.
 

That is it for today. Go make something fun for yourself. 
 
***Chickie's Year End Review- The jeans and scarf were fine basics but didn't change my life.


Wednesday, November 24, 2021

Sequins to Dye For

 Hello Readers. Are you a fan of sequins? I am. They are fun, sparkly and seem perfect for holidays. I like fun dressy clothes but I also want to be comfortable. This outfit hit all the marks. 


Before and after. 
 
  I recently took my youngest to the dentist and saw this at the house next door. (Yes, I live in a very small town.) It was like a mini clothes swap for anyone who wanted to help themselves.

I obviously helped myself to these dress pants from Banana Republic. They still had the tags attached. I took them home and washed them right away. When I tried them on I found that the waist and hips fit perfectly. (This never happens for me. I was super happy.) You can see the legs did not fit well at all. I am really short and these are not working on my short legs. 

 
 I did some cutting and hemming to make them fit. I liked the wide leg style a lot and I could wear heels but these pants still needed to be shorter. I serged the edge and turned it under to make the hem. I didn't want to turn it under twice because the hem would have gotten thick and heavy. I thought it would make the fabric too thick at the hem. 

This sequin shirt is just a long sleeve t-shirt. I were t-shirts almost everyday. This is fun and dressy but also easy to wear. The light gray parts of the shirt just look old, dingy and washed out though. The sad color just brings the whole shirt down. I can fix that.

This is my last bottle of dye. I have used what I had stockpiled through this year and this is the end. It is just what I need right now. Fabric dye is a great way yo refresh an piece of clothing.

My new dyed shirt looks fresher with a new wash of dark gray color. The sequins can be the star now that the whole shirt is the same background color. It was a great match to the dark pants. Thanks for reading along, now go make something fun for yourself. 

***Chickie's Year End Review-I love, love, love these pants and shirt.

Friday, November 19, 2021

The Fabric Sample Scarf

 Hello Readers. My mother-in-law gave me tons of fabric over the years. She worked at a fabric store that specialized in home decor fabrics. It is great for making curtains and sometimes I can find a way to make clothing too. She passed a lot of fabric samples on to me as well and today's project was made with one of those sample pieces.

 
Before and after. 


This orange and green fabric was wool or a wool blend. (It photographs a little red, but it is really a dark orange. It seemed perfect for fall. It was really small and a piece had been cut out of it. What could I make out of it? I had an idea. A scarf.

I cut the uneven side off so that I had an even square. Well, it was almost a square but not quite.
 
  Then I cut this edge off. This edge was to keep it from fraying at the fabric store but I want it to fray. That's right, I want fraying. I am actually going to make it fray.

I made a tight stitch all the way around the square. I wanted to stop the fraying at some point if it got out of control. I don't know if I needed to do this. It seemed later that it was not necessary.

I just started pulling the threads out so I had fringe. It took a long time but it wasn't difficult. 

 
After a while I had some nice fringe on all 4 sides of my scarf. 
 
It went with this great green dress really well. (It has pockets!) This dress is loose and that's OK. I just wanted a little more shape at the waist.

I marked a new side seam in soap. You can use chalk or whatever marking tool you like.

I used my serger to make these new side seams. 

You can see the new shape in the midsection and it looks great with the scarf. 
 
 
I added a jacket because it is fall. 
 
I was happy with the sample scarf and the new dress. I think I just found my Thanksgiving Day outfit. Thanks for reading along, now go make something fun for yourself. 

***Chickie's Year End Review-I love this dress more than I expected. The green was great for Christmas season. I still don't know if the scarf is orange or green. haha

Wednesday, November 17, 2021

Fall Dress to Jacket

 Hello Readers. I love the change of seasons. I love fall colors. I like new beautiful scenery to look at. I was given a dress that had all the fall colors in it. Check out this dress!

Before and after.

This dress had all the wonderful colors of fall. It was long and felt like a lot was going on all at once though. 

I decided to start by removing these shoulder pads. They came out easily.

I decided to shorten the dress quite a bit. It was so colorful that it didn't need to be long to make a impact. It would still make a statement if it was shorter. 

It also had a tie in the back. I left that in place because it seemed like a handy feature to have. I could wear the dress full or pull it in to give it some shape. 

I did some hemming to make the shorter dress nice and neat. 

I liked this dress more as a loose open style jacket than I did as a dress. The colors still catch your eye but its not as over powering. The neutral clothes under the jacket help calm the whole look down just a little as well.

My new jacket was a fun casual layer to add on.

What about the extra fabric that got cut off? It was just enough to make a little pillow for the front porch. It looked great with the red chairs I got at a swap last year. That's right, free chairs. 

Thanks for reading along, now go make something fun for yourself. Happy fall to you!

***Chickie's Year End Review-This dress to jacket refashion was easy and I wore it a lot.


Friday, November 12, 2021

Sweater>Vest

Hello Readers. This simple cardigan is not very exciting, Let's make it into a cropped vest.  

I started with this purple cardigan sweater. It was a simple style and I thought it was a nice pop of color combined with this long shapeless plaid shirt. If I made it into a cropped or short vest, then more of that plaid shirt would show. And the vest will make the outfit less shapeless.

I started by cutting the sleeves off the sweater. I made my cut on the outside of the armhole seam.  I left that arm seam in place so that the armhole did not stretch out and get out of hand. I just need to get rid of the sleeve, not the seam.


 I turned the edge in and stitched it down with my machine. 

My next step was to make the new vest more narrow around the waist. I made new side seams using a zigzag stitch. 

The zigzag stitch will keep the new side seam from fraying when I cut off the excess fabric. 

I tried the vest on and realized it needed to be shorter. I folded the waistband up and pinned it. I stitched all the way around the waistband, also using a zigzag stitch.

I cut the excess fabric off and I had a shorter fitted vest. I top stitched the new waist seam and ironed  my new vest. 

My new vest was ready to go. The vest gave some shape to the loose white plaid shirt. It added a little fun color to the outfit. 

This vest will be a nice little layer as it gets colder outside. Thanks for reading along, now go make something fun for yourself. 

***Chickie's Year End Review-I like this sweater vest a lot. I haven't had one in 20 years or so.