Showing posts with label Scarf. Show all posts

Thursday, January 30, 2025

Purple Palooza

 Hello Readers. I like to sew and that means there are a lot of fabric scraps. My daughter and my Mother-in-law also like to sew. That means there are even more fabric scraps at my disposal. I always want to try and use them. I don't like to be wasteful and fabric is expensive. Let's make a scarf from some pretty  purple scraps. 

I went on a purple binge. 

These were the scraps I had to work with. This was a very soft knit material. I really liked it but it was small and oddly shaped. 

This soft purple fabric was a bit gauzy and my serger had a bit of trouble with it. My sewing machine would have torn it up completely. As it was I broke 2 needles working with this fabric. I connected the pieces of fabric with the right sides facing each other. 
  
It kind of looked like this, 2 long narrow pieces. I wanted to connect them into one long narrow piece because scarfs are usually long and narrow. I sewed 2 short ends together but left an opening to flip it all right side out.

I wiggled the right sides out of the scarf. 

I sewed the opening closed by hand with a needle and matching thread. 

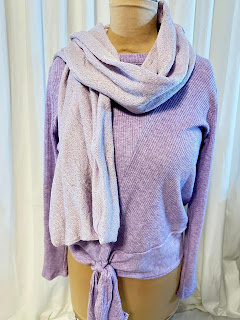
The material has a nice drape so it makes a great scarf. 
 
 I thought this shirt matched the scarf. The shirt had a tie at the waist that would be in the way if I tried to tuck the shirt in. I always tuck in my shirts so I needed to change this. 

I could cut off both pieces of this tie and I could sew this opening closed.

I clipped the sides together. 

This was easy to sew closed. 

I could wear the finished shirt untucked but I can tuck it in if I want. 

I loved the color of this belt with this shirt and scarf but the length of the belt was way too long on me. That's OK, I had a plan to fix it. 

So I cut it. That's right. I just cut it with a pair of sharp craft scissors and left the cut edge. It was leather so it wont fray or fall apart. The belt buckle will hide this cut end anyway so it won't really matter how it looks.

I used sharp scissors with a tip and made a hole at the right spot for me. It doesn't look as nice as the original but this buckle will hide the hole I made too. I kind of stabbed the belt and turned the tip of the scissors in a circle until I had punctured the belt. It was not difficult. I just had to apply a little pressure. I had the cutting mat under the belt so I did not damage the table. 

The design of this buckle hides all my cutting a hole making. The buckle fits in the hole I made and the belt looks just like it should when it's worn. No one knows I cut it and made holes in it. well, no one but you. (Shhh, don't tell.)

I was really feeling all this purple. The belt was great with this shirt and vest. (Yes, I have purple sneakers. Don't judge.) Thanks for reading along, now go make something fun for yourself.


Tuesday, August 15, 2023

Summer Shorts

 Hello Readers. It is August and I really want to get all my summer refashion projects done. I have a few summer items that need to get finished before fall sewing starts. (Fall sewing?? I can't believe fall is coming that soon!) Let's focus on hot weather and summer clothes while we can.

Summer shorts!

These shorts were great. They just needed a little adjustment. Because they were a little big I could make them fit the way I wanted.
 
I tried the shorts on inside out and then...
 
I marked where I wanted the new side seams to be. I stitched my new side seam with a straight stitch and cut off the excess fabric from the side. 

Actual cutting! 

I used a zigzag stitch to close the cut edges and keep my shorts neat inside. This cotton fabric will fray over time. I don't want that.

I had this vintage scarf that seemed to coordinate well. I decided to use it as a belt.

I threaded the scarf through the belt loops like a belt.

Then I tied the scarf in a knot in the front where I would buckle a belt. 

The shorts fit better, they are perfect for the heat of August and I really liked the scarf with the shorts. Thanks for reading along, now go make something fun for yourself.

***Year End Update- I wore these shorts in warm weather and I love the scarf with them.


Wednesday, July 19, 2023

Getting a Scarf to Stay On My Head

 Hello Readers. It is really hot and humid where I live and I can't even deal with my hair. It makes me so hot when I leave it down so I have been putting it up. The only problem is my head must be a weird shape because it is hard to get a scarf to stay on my head, Do I have weird head? Maybe. I have an idea to deal with it though.

You just need a scarf or bandana, a hair comb, a needle and thread.

I folded the scarf into a triangle and then kept folding so the ends were tucked in.

I used the needle and thread to sew the scarf together and attach it to the comb at the same time.

My comb and scarf combo is sewed together. 

I put the scarf on my head and the comb is hidden underneath. The comb gives the scarf a little grip and it stays on top of my head. 

I tied the scarf under my hair. I can leave it like this.

Or if it is going to be really hot and miserable I can put all my hair in a pony tail and just forget about it. The scarf keeps the little baby hairs for getting loose and getting in my face. I hate that. Thanks for reading along, now go make something fun for yourself.

***Year End Update- Summer heat and humidity are not great for my hair. I just turn into a frizz ball. Sometimes covering my hair is easier.


Wednesday, March 15, 2023

Make an Easy Peplum Top

 Hello Readers. Do you celebrate St. Patrick's Day? I do a little something every year. I love a holiday theme and I am Irish so I was in the zone.

 
Before and after.
 
This green t-shirt was not very exciting on it's own. But it was a great place to start a St. Patrick's Day project. The scarf is actually covered in green hearts, not shamrocks but It's going to be perfect for my new shirt.

This shirt was a freebie from a swap and I used green paint to cover the logo of the business. It didn't have to cover 100% it just had to tone down the white of the business name. (This isn't a business I am trying to give free advertising to. Let's just paint over the name.)

When the paint was dry, I put the shirt on my dress form to work on the fit a little. I cut the neckband off the shirt. This opens up the neck and chest a little and makes it more comfortable. 

I wanted some cute puffy sleeves so I cut the hemmed edge from the ends of the sleeves.

I cut a slit in the top of the sleeve to separate the sleeve into 2. I cut along the outside of the sleeve up to the shoulder seam.

I stretched the cut edges to make them longer. T-shirt material had a lot of give and stretch in it so this was not hard to do. 

I took the 2 ends and tied them into a knot. This made the sleeves more interesting and gave them a little more fullness. 
 
Let's talk about this scarf. It is very thin and a little sheer. That is OK for what I am going to do with it.
 
I cut out a small piece from one edge of the scarf. I wanted to make a pocket. Remember that logo I was painting earlier? This will cover the company name perfectly. 

This scarf is made of very thin lightweight material. I decided to add some fusible interfacing to strengthen the pocket and make it easier to sew. 

I ironed the bumpy side of the interfacing to the inside of my pocket fabric. The interfacing was cut smaller than the pocket so I could fold the edges in. This will give me a nice finished edge all around the pocket when I sew it to the shirt.

You can't see the logo anymore at all. I pinned the pocket in place on my green shirt.

I sewed the pocket to the shirt on the sides and bottom. I left the top of the pocket open, so I could use it like a real pocket. The top of the pocket is the finished edge of the scarf. It looks nice and neat. 
 
I cut about 6 inches from the bottom of the t-shirt. I pinned the scarf around the bottom of the shirt. Every body is different so your desired shirt length might be different from mine. Measure to see how long you want your shirt to be.
 
I put the right sides of the scarf and the shirt together and used a zigzag stitch. I gathered the scarf fabric together a little as I stitched. The scarf was just a little bigger than the shirt. The fullness of the scarf will make the big ruffle around the hips.
 
 The scarf was a long circle but I cut it to make my pocket. I connected the circle again to make the big ruffle/peplum around the bottom of my t-shirt. 
 

My St. Patrick's Day shirt is done. It is fun for the holiday and I like the white and green together. I think I have a bit of Miss Frizzle in me. Her clothes always matched the show topic. I love making clothes like this. Thanks for reading along, now go make something fun for yourself.

***Year End Update- I have been saving this for March. It is a holiday shirt and it will come back then.