Showing posts with label St. Patrick's Day. Show all posts

Wednesday, March 11, 2026

Make a Fun Tie Necklace

 Hello Readers. St. Patrick's Day is coming. Are you Irish? Do you celebrate this holiday? I am and I do. I don't go overboard but I play Irish music, eat some Irish foods and always wear something green for good luck of course. 

  Let's make a fun necklace with a men's tie. I used a shamrock tie because of the holiday but you can do this with any tie you like, whenever you like. You can use a solid color or a pattern, whatever style you like. No holiday is needed.  

 You just need a tie, rubber band and a strong necklace or ribbon to fit around your neck. This tie is perfect for St. Patrick's Day but a different tie would make a dressy accessory for any occasion you are celebrating. 

 I am using a strand of pearls, no they are not real. You can use any necklace or string of beads that can hold the weight of this tie. A dainty chain necklace is NOT going to work here. The delicate chain could snap. Use a strand of beads of even a length or ribbon that is long enough to tie around your neck and shirt collar comfortably. 

 I folded the tie on itself. The top folds need to stay together and even in length at the top but the lower folds should be shorter and shorter so you can see the different layers of the tie on top of itself. The short end of the tie is in back and it is a couple inches longer than the whole folded tie.

 I wrapped a rubber band around the folded part of the tie, about 1/3 from the top. (It doesn't need to be exact.) The rubber band gathers the tie together and make it look very full and eye catching. It also holds the whole folded tie together securely. I left the small end of the tie hanging down in the back of the tie. 

Next, I wrapped the narrow end of the tie around the front to cover the rubber band. The narrow end of the tie covers the rubber band because the rubber band is important but it is not cute. 
 
After I wrapped the end of the tie around the front I wrapped it to the back as well. I tucked the very end into the rubber band in the back. This will hold the whole thing together. I want that small tie end to stay in place hidden in the back. The rubber band will keep it in place.

I slipped the necklace into the widest top fold of the tie. It will lay against my neck and under the shirt collar best that way. 

I added this necklace around the collar of my button-up shirt. The necklace slipped right under the collar. The tie necklace is a fun piece that adds a lot to this outfit. I liked the look but I can always take it apart and wear the tie normally if I want. 
 
I added this faux pearl earring through the front layer of the tie just for fun. You can add a pin or something like this to the front of your tie if you like, but it is not necessary. I just liked the look of it. 

 Thanks for reading along, now go make something fun for yourself. And Happy St. Patrick's Day to everyone. Erin go bragh! 

Thursday, March 13, 2025

Quilted Placemats

 Hello Readers. St. Patrick's Day is coming and I had some shamrock fabric in my fabric stash. Let's make some quilted place mats for the table. It wasn't difficult and didn't take a long time but they looked super cute. And you can choose any fabric you like, not just shamrocks.

You don't need the luck of the Irish to make these cute quilted place mats. 
 
 To start I got my fabric and some batting for the middle. I made a "sandwich" of fabric on the bottom, batting in the middle, and fabric on the top. Both pieces of fabric have the right sides facing out. That makes the place mats reversible. 
 
I trimmed all 3 layers to make them the same size all around the 4 sides. The fabric layers and the batting should match in size. 
 
I used a yard stick  and chalk to mark diagonal lines on the fabric. I marked with the chalk in 2 directions to make a grid pattern. I tried to make each line evenly spread out but this isn't rocket science. Don't stress about it too much. It will look great once it is sewn together.
 
I stitched across the fabric on the white lines. This made a grid pattern of stitches across the place mat. The stitches make a nice quilted look on the the place mat.
 
 I wanted to use bias tape to finish the edges of my place mats. I chose green because it went well with my shamrocks. Your color choice is up to you.
 
The bias tape fits around the edge of the place mat. The bias tape is like a taco shell and the place mat is the taco filling. I sewed carefully to attach the bias tape to the place mat on top and on the bottom at the same time.
 
These place mats are a great start to having a fun St. Patrick's Day dinner. (You can see I haven't cooked anything yet. But I will get to it, I promise.) Thanks for reading along, I hope your day is wonderful and lucky.


Wednesday, March 12, 2025

A St. Patrick's Day T-shirt

Hello Readers. St. Patrick's Day is coming soon. I'm not sure if you celebrate or are into this holiday but I am. I am mostly of Irish decent. (Like you couldn't tell from the pale skin and freckles right?) Anyway, I made a shirt to wear for the special day.

I didn't have a spare t-shirt to use so I decided to use this dress. It fit fine but it was too clingy and heavy. The dress was full cut but somehow thin and heavy at the same time. I didn't like to wear it, even over leggings or tights. This dress would be better as a shirt.  

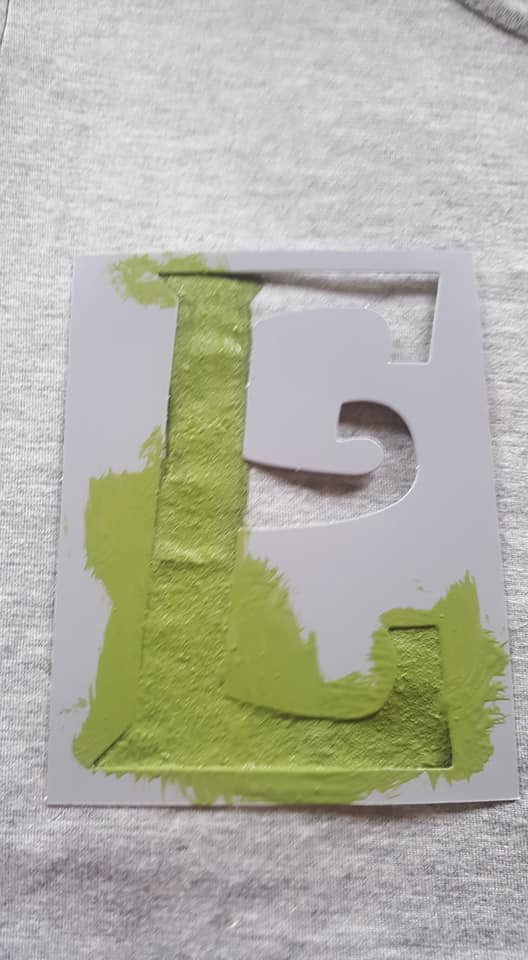
I got out my handy dandy stencils. I should have checked to see if I had green paint. I didn't. I decided to mix some yellow and blue and make my own. I put some cardboard inside the dress so the paint wouldn't bleed through to the back. 

 LUCK!
I was also missing the letter L. I used a 1 and a letter E to make the L I needed. Was I getting annoyed that I didn't have the things I needed to make this shirt? Yes, and it made me more determined to make the shirt than ever! I would not be stopped!

I did not have a shamrock shaped stencil either. I used this little foam shamrock. I painted it and used it as a stamp to get the shape. I filled in the paint where it needed it and I was done. It just needed to dry.

  I cut the bottom of the dress off. I used a shirt I liked as a guide for length. I didn't hem it because I planned to tuck it in anyway. 

I let it dry overnight and it was ready to go. Everyone has heard of the luck of the Irish, may you have a lucky and happy St. Patrick's Day too.  


Wednesday, March 15, 2023

Make an Easy Peplum Top

 Hello Readers. Do you celebrate St. Patrick's Day? I do a little something every year. I love a holiday theme and I am Irish so I was in the zone.

 
Before and after.
 
This green t-shirt was not very exciting on it's own. But it was a great place to start a St. Patrick's Day project. The scarf is actually covered in green hearts, not shamrocks but It's going to be perfect for my new shirt.

This shirt was a freebie from a swap and I used green paint to cover the logo of the business. It didn't have to cover 100% it just had to tone down the white of the business name. (This isn't a business I am trying to give free advertising to. Let's just paint over the name.)

When the paint was dry, I put the shirt on my dress form to work on the fit a little. I cut the neckband off the shirt. This opens up the neck and chest a little and makes it more comfortable. 

I wanted some cute puffy sleeves so I cut the hemmed edge from the ends of the sleeves.

I cut a slit in the top of the sleeve to separate the sleeve into 2. I cut along the outside of the sleeve up to the shoulder seam.

I stretched the cut edges to make them longer. T-shirt material had a lot of give and stretch in it so this was not hard to do. 

I took the 2 ends and tied them into a knot. This made the sleeves more interesting and gave them a little more fullness. 
 
Let's talk about this scarf. It is very thin and a little sheer. That is OK for what I am going to do with it.
 
I cut out a small piece from one edge of the scarf. I wanted to make a pocket. Remember that logo I was painting earlier? This will cover the company name perfectly. 

This scarf is made of very thin lightweight material. I decided to add some fusible interfacing to strengthen the pocket and make it easier to sew. 

I ironed the bumpy side of the interfacing to the inside of my pocket fabric. The interfacing was cut smaller than the pocket so I could fold the edges in. This will give me a nice finished edge all around the pocket when I sew it to the shirt.

You can't see the logo anymore at all. I pinned the pocket in place on my green shirt.

I sewed the pocket to the shirt on the sides and bottom. I left the top of the pocket open, so I could use it like a real pocket. The top of the pocket is the finished edge of the scarf. It looks nice and neat. 
 
I cut about 6 inches from the bottom of the t-shirt. I pinned the scarf around the bottom of the shirt. Every body is different so your desired shirt length might be different from mine. Measure to see how long you want your shirt to be.
 
I put the right sides of the scarf and the shirt together and used a zigzag stitch. I gathered the scarf fabric together a little as I stitched. The scarf was just a little bigger than the shirt. The fullness of the scarf will make the big ruffle around the hips.
 
 The scarf was a long circle but I cut it to make my pocket. I connected the circle again to make the big ruffle/peplum around the bottom of my t-shirt. 
 

My St. Patrick's Day shirt is done. It is fun for the holiday and I like the white and green together. I think I have a bit of Miss Frizzle in me. Her clothes always matched the show topic. I love making clothes like this. Thanks for reading along, now go make something fun for yourself.

***Year End Update- I have been saving this for March. It is a holiday shirt and it will come back then.


Friday, March 13, 2020

Going Green

Hello Readers. I decided to do a little more prep work for St. Patrick's Day. Why? Well, I am of Irish decent and I love the color green. And I am all about a holiday that is just full of fun.

I found this green and blue shirt at a clothes swap. (Of course.) I picked it up because it was the perfect green for St. Patrick's Day. The shirt itself is fine but it's a little low in the arm holes and in the front. I could have altered to make it fit, but I decided to do something else.

I decided to make a skirt. I cut the shoulders off and I was half way finished already.


I added a simple elastic waistband and I had a great green skirt. This shirt made a perfect skirt.

 I also had this sweater that seemed destined to be partnered with this skirt. I wanted it to be more fitted.

 I turned it inside out and used a wide zigzag stitch and made new side seams . I cut off the extra knit material and I had a smaller sweater. That zigzag will keep it from fraying. If it is cold on St. Patrick's Day I will wear it. If it's warm I will wear the t-shirt I told you about last week.

I'm ready for all the Irish fun coming this Tuesday. My plans include Berry's Irish Breakfast Tea, Lucky Charms, scones, corn beef and cabbage, soda bread, more tea, a movie about St. Patrick, the show "Derry Girls", rainbows, leprechauns, pots of gold, the song "Danny Boy" on a loop, some U2 and so much more.

Thanks for reading along, now go make something fun for yourself. 
And Happy St. Patrick's Day too!