Wednesday, March 15, 2023

Make an Easy Peplum Top

 Hello Readers. Do you celebrate St. Patrick's Day? I do a little something every year. I love a holiday theme and I am Irish so I was in the zone.

 
Before and after.
 
This green t-shirt was not very exciting on it's own. But it was a great place to start a St. Patrick's Day project. The scarf is actually covered in green hearts, not shamrocks but It's going to be perfect for my new shirt.

This shirt was a freebie from a swap and I used green paint to cover the logo of the business. It didn't have to cover 100% it just had to tone down the white of the business name. (This isn't a business I am trying to give free advertising to. Let's just paint over the name.)

When the paint was dry, I put the shirt on my dress form to work on the fit a little. I cut the neckband off the shirt. This opens up the neck and chest a little and makes it more comfortable. 

I wanted some cute puffy sleeves so I cut the hemmed edge from the ends of the sleeves.

I cut a slit in the top of the sleeve to separate the sleeve into 2. I cut along the outside of the sleeve up to the shoulder seam.

I stretched the cut edges to make them longer. T-shirt material had a lot of give and stretch in it so this was not hard to do. 

I took the 2 ends and tied them into a knot. This made the sleeves more interesting and gave them a little more fullness. 
 
Let's talk about this scarf. It is very thin and a little sheer. That is OK for what I am going to do with it.
 
I cut out a small piece from one edge of the scarf. I wanted to make a pocket. Remember that logo I was painting earlier? This will cover the company name perfectly. 

This scarf is made of very thin lightweight material. I decided to add some fusible interfacing to strengthen the pocket and make it easier to sew. 

I ironed the bumpy side of the interfacing to the inside of my pocket fabric. The interfacing was cut smaller than the pocket so I could fold the edges in. This will give me a nice finished edge all around the pocket when I sew it to the shirt.

You can't see the logo anymore at all. I pinned the pocket in place on my green shirt.

I sewed the pocket to the shirt on the sides and bottom. I left the top of the pocket open, so I could use it like a real pocket. The top of the pocket is the finished edge of the scarf. It looks nice and neat. 
 
I cut about 6 inches from the bottom of the t-shirt. I pinned the scarf around the bottom of the shirt. Every body is different so your desired shirt length might be different from mine. Measure to see how long you want your shirt to be.
 
I put the right sides of the scarf and the shirt together and used a zigzag stitch. I gathered the scarf fabric together a little as I stitched. The scarf was just a little bigger than the shirt. The fullness of the scarf will make the big ruffle around the hips.
 
 The scarf was a long circle but I cut it to make my pocket. I connected the circle again to make the big ruffle/peplum around the bottom of my t-shirt. 
 

My St. Patrick's Day shirt is done. It is fun for the holiday and I like the white and green together. I think I have a bit of Miss Frizzle in me. Her clothes always matched the show topic. I love making clothes like this. Thanks for reading along, now go make something fun for yourself.

***Year End Update- I have been saving this for March. It is a holiday shirt and it will come back then.


Monday, March 13, 2023

Using Bins to Organize Bookshelves

 Hello Readers. I wanted to make these bookshelves easier to use for my child. I wanted to encourage reading and also encourage keeping the books neat so we could find the books we wanted. Could I make the books organized, neat and easy to grab and read? I could. Let me show you. 

Before and after bookcase 1.

Before and after bookcase 2.
 
The books always seem to end up in piles and it is hard to see what we have. These thin little paper back books are the worst. They never seem to stay stay standing up.
 

I started by removing all the books. I needed to get them all out of the way. It was a great time to sort and remove any books were had outgrown and did not want to keep.

The shelves needed to be dusted. This was the perfect time to really clean the shelves.

I found these bins at Dollar Tree. They are not fancy but this is the book library of a 7 year old so I wanted something easy to clean. I measured my shelf and made sure I bought bins that fit well. I could fit 2-3 bins on each shelf depending how I positioned them. Measuring your shelves before buying bins is the best way to get bins that work for your particular shelves.

Small books could fit in the bins like this. The bin will keep the books from falling over on each other and making a mess. Positioning the books like this lets the child see the covers of the books. They can recognize the book and pull it out.

I could also turn the bins sideways for larger and wider books. I decided to give each bin a theme and write the theme on the bin. These labels will help us stay organized. I just picked general categories and topics. If we had a lot of a certain subject, I put all those books together.

It is easy to flip through the books like files in a filing cabinet. The books do not fall down or get unmanageable. It is easy to take one out and put it back without knocking any other books down.

This bookcase looks so much neater. I didn't use the top shelf because it is so hard for the child to reach all the way up there. 

This bookcase looks a lot better too. It is less cluttered and less chaotic. I am counting that as a win for me. Thanks for reading along, now go make something fun for yourself.

***Year End Update- This was a good idea for me. It helps us keep track of all the kid books. I use the main character as the guide for where to file the book. Dogs, animals, vehicles, Star Wars, fairy tales,,, that is how we keep track of all the picture books.


Friday, March 10, 2023

Easy WIde Leg Pants

 Hello Readers. I have been in love with the kind of pants with super wide legs for a while. I have seen them at the stores too. Off the rack never fits me well so I have been on the look out for a way to make my own. I found these sage green pants at a clothes swap and thought they might work. 

Before and after.

The fit was not right but look at the length!!! I never find pants my length. I am super short so I am used to hemming everything but when I find something in my length ... it's like seeing a unicorn. I thought I could take the waist in a little and keep the loose legs as they were. 

I marked where I needed to sew the new side seam of my waistband. I tapered the new seam so it would blend in with the existing seam. 

 
This was how much fabric I needed to take away. The fit was good but I noticed that the pants had a welted seam on each side. (This kind of seam is common in denim jeans because it is so strong.) I should have paid attention. My new seams are fine but they didn't match the existing seams as well as I would like.
 
I sewed new side seams all the way down the side of each leg. I cut out enough to remove the original seam. The pants were so wide that I had enough room to do that without a size or fit issue. 
 
Here is a look at the side seam. The pants were finished and I love them. They are co comfortable and fun. And green. Thanks for reading along, now go make something fun for yourself.
 
 ***Year End Update- I still like this color and style. They just fit and feel great.


Wednesday, March 8, 2023

Long Sweater to Tie Front Sweater

 Hello Readers. I have had this long sweater on my refashion rack for a while. I think it was my daughter's sweater and she gave it to me because there is a bleach stain on the back. I decided to turn it into a cropped sweater with a tie in the front. Let me show you more.

Before and after.

You can see the bleach spot on the back of the sweater. It was very noticeable and didn't look great. It needed to be cut off. I love cutting up clothes so I was excited to start. 

I was inspired by this denim shirt. I have wanted something like this for a couple months now. I like the cropped length and the tie in front. The sweater isn't the same fabric but I could try to make something with the same shape.

 
I put the sweater on my dress form and cut around the waist. I saved the long pieces I cut off for the next step. 
 
I cut 2 long strips from the long pieces I had cut off the sweater. I wanted to use them for a waistband/waist tie. I actually cut off a 3rd piece to make the waistband long enough. I connected all 3 pieces into a long narrow strip, almost like a belt. I made sure all the finished edges were matched up.
 
I used clips to connect the waistband to my sweater. I prefer clips because I always stab myself with pins. 
 
I tried it on the dress form to see how it looked. You can see the waistband was long enough to tie in front of the sweater. It was ready for the real sewing.
 
I used my serger since this was a knit. The serger is so great with knits, I don't know how I went with out it for so many years.
 
Here is a look at the back of the sweater when it was finished. The waistband has a nicely hemmed edge that was originally at the bottom of the long sweater.
 
My new cropped sweater was sort of like the denim inspiration. The color and shape were very close to my inspiration. The stretch and comfort of the knit fabric will make this easy to wear. Thanks for reading along, now go make something fun for yourself.
 
***Year End Update- I still wear this sweater a lot. It is light and great to add on an outfit without getting to bulky.


Saturday, March 4, 2023

Using A Coffee Table For Storage

 Hello Readers. Storage is always in short supply at my house. Maybe it is at yours too? I have never heard anyone say that they had too much storage. I was having a problem with toy storage in my family room. I wasn't sure where I could put more toys/kid stuff but I found a way to "make" more space for toy storage with different furniture.

Before and after.

This is the mad chaos we were dealing with everyday. Lego blocks were everywhere! Everyday! There had to be a better way but where could I put them all so that they would be accessible to the kids but out of my walking path? We tried a big toy box but that just got dumped out all over the floor.

I was out for a walk and saw this. (It is actually my neighbors trash.) When I saw that table I had the idea to use it in my family room as a coffee table/Lego table. First I had to get it home. It weighed approximately 300lbs. At least it seemed that way to me. Seriously, it was super heavy. I took it home and gave it a good cleaning. Then I brought it inside.

We picked up all the Lego blocks and I vacuumed. 
 
I measured the shelf under the table so I knew the space I had to work with. I found some cloth bins. I thought cloth would be light weight for kids to move around. But really any bins would work, I just needed something to hold all the Lego bricks. They would hold any kind of toys so whatever you have can go in there. (Barbies, baby toys, games, puzzles, whatever you or your kids are into, just put it all in bins so you don't have to see it.)
 
Will it always be this neat and tidy? Maybe not but now we have a way to clean up and if we have company over we can make the room look more welcoming. In a small space, you have to use every inch and this table with a lower shelf gave me some extra space to use for storage. I wish I had thought of this sooner.

If we had people over for a gathering I can use this table for my guests. It can look like a family room and not a Lego toy explosion. Thanks for reading along, happy organizing to you!

***Year End Update- This was a good solution for a while but my family is a little obsessed with Lego builds and we outgrew this table storage. This would be great for other toy or game storage, we are just hoarding to many Lego blocks for this. New table set up is in the works.


Friday, March 3, 2023

Fixing a Bleach Accident

 Hello Readers. Do you ever bleach clothes that should never be bleached? That's exactly what I did. Oops!

 
Before and after.
 
I put this jacket and flannel shirt together over a year ago and I loved it. Unfortunately, it had a terrible accident. And it was all my own fault.
 
I put it in the washer with a load of towels and added bleach, not realizing until too late that the new shirt was in the wash too.
 
I was very disappointed. I loved the gray and white plaid flannel shirt/jacket. There was no way to put the gray plaid back on the shirt. The plain white looked awful and really bland.

I had an idea to make the shirt look better. My old friend Rit Dye. (Not an ad. They do not know me.)

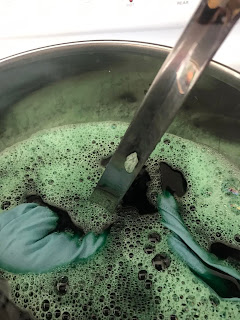
I mixed up the dye on my stove as directed. I stirred it around to get the dye evenly applied. 
 
When 30 minutes had passed it looked like this. 
 
I picked green because I like green and it's perfect for St. Patrick's Day this month. I hope your St, Patrick's Day is full of fun shenanigans.
 
 It also works with my Yoda shirt. Thanks for reading along, now go make something fun and green for yourself. 

***Year End Update- I love green so this was a winner for me. I did feel a little like a gym teacher in this outfit though.


Wednesday, March 1, 2023

Green Sweater Combo

 Hello Readers. I love the color green Is it because I am Irish? Is it because I have green eyes? I'm not really sure.

Before and after. I really like green.
 
This bright green sweater was fine. Not much to say about it it was just OK.
 
This green shirt had a lace panel in the front that was really worn out. The fabric of the shirt was OK but the lace was done. I decided to use the sleeves from this shirt.The sleeves were designed and sewn at an angle like a raglan style shirt. 

The sweater sleeves were also designed at an angle, like a raglan shirt. I decided to follow the angle on both shirts and put them together.

I put the right sides together and sewed with a zigzag stitch to keep the sweater from fraying.

That was it! I had a new green sweater. I liked the new sleeves, they add some fun to the sweater. Thanks for reading along, now go make something fun for yourself.

***Year End Update- This sweater is great because I love green and the sleeve add a little break in the color.