Tuesday, September 22, 2015

The Marriage of Two Shirts

Hello Readers. Today's project joined two shirts forever. (For better or worse.) I think it's for the better. Let's check it out.


I started with these two tops. One is a light weight, soft, silk sweater. The other is a cotton/poly blend with a nice pattern and a cute pocket that you will see later. The white sweater is not quite as roomy as I would like it to be. I am going to use the blue shirt to make the sweater a bit bigger.


First, I cut a triangle out of the back of the blue shirt. I just estimated the size and width by comparing the two shirts for length and width. My first try was too big and I had to cut it down by 5-6 inches. I also cut a slit down the back of the sweater. I started about 2 inches from the neck and cut straight down.

This triangle is too big, make yours a bit smaller.

I pinned the triangle in place and stitched them together. The sweater didn't fray but it did want to curl up. The pins helped with that. The blue shirt was very easy to work with.


Here is the back of the sweater. It fits better and I didn't lose any of the silk material. 


I decided the front needed something too. I cut the bottom front of the blue shirt off and attached it inside the bottom front of the sweater. It adds a little length to hide my muffin top. (No one needs to see that.)


I also unpicked the stitches holding the pocket on the shirt and just went over it with the needle and attached it to the front too. I used the bottom of the sweater as my guide to keep it from being crooked. I could have attached it at an angle. Maybe next time.


Thanks for reading, now go make something fabulous for yourself.

Friday, September 18, 2015

Take in the Pants


Hello Readers. Fall was just teasing us because it is really hot out there. Forget the sweaters and boots, we need light weight clothes to get through this day. That brings us to these pants that were handed down to me by a friend. (Thanks Becky!)


This is a nice pair of light weight, cropped, khaki pants. I liked the belt detail at the waist and the material is in great shape. They are perfect for a hot day. The only problem is the size. They were a little too big and one leg needs to be hemmed. 


I don't want to spend the time to actually take the seams out and then sew these pants back together. I am kind of a quick and sloppy seamstress. My plan is to sew down the outside of each leg and cut off the excess. It won't look professional on the inside but the outside will look just fine. Here is a picture of one side getting sewn. It's not that exciting but I figured a blog about sewing should have a picture of the actual sewing.

Actual Sewing!

Here is the one leg that needs to be hemmed up. It is coming undone. 


Here are the pants inside out. I cut the excess off with my trusty pinking shears AFTER I tried them on again to check my sizing. Skipping this step in the past has lead to refashion disaster.


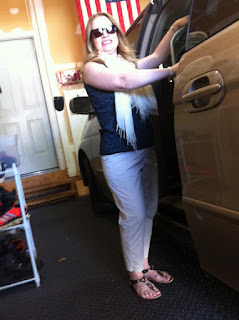
Here I am all finished and headed out to run errands with my little guy. I have seen other blogs that include picture of cool places like concerts, restaurants, festivals, art shows and other exciting outings like that. I have to be honest and the true boring story is, I ran an errand for my older son and came home to let the baby nap. That's it. Sorry folks. 


Thanks for reading, now go make something fabulous for yourself.

Tuesday, September 15, 2015

The Short Arm Solution

Hello Readers. It is a beautiful day for a project. Cool weather arrived in my neck of the woods a couple days ago. It is lovely. This project started as a very well made shirt that didn't fit. (See the closing for a note about that snotty face. Yikes!)

Snotty face!

Here we are again at the dress form. She is so helpful, I should give her a name. Rhonda? The top is a little big through the mid-section, but there is more. 


Ugh! Why?? Why are the sleeves SO long. Actually, why are my arms SO short. I guess to match the legs. Looking at the sleeves, this is too much fabric. I could roll them up but I have another idea.


This top would be much more useful sleeveless. It could be worn alone in the summer and with another shirt when it's cool out. That's right. The sleeves are getting cut off. If you look closely, the arm holes are sewn three times. I'm sure they did it for decoration, but it also makes these arm holes really strong. I cut as close and carefully as I could. It won't be able to fray much at all with that stitching to hold it together.


Here it is tied in the front. The arm holes look great and the tie cinches it in through the middle. I could take it in but this was a quick no-sew project.


I didn't think those pictures gave you a good look at the top so at the end of a long day I had the staff photographer (hubby) take some pictures in his studio (our basement). I was tired and immediately bored and this snotty face is the result. Resting Nasty Face, sorry folks.


Thanks for reading, now go make something fabulous for yourself. (Or take a nap if you need to.)

Thursday, September 10, 2015

The Blah Brown Sweater


Hello Readers. It is going to be Autumn soon. That means cool weather and sweaters. Today's project was inspired from Pinterest. It is full of great ideas. I recently saw some sweaters and even some sweatshirts with trim at the bottom and some with trim on the wrists. This sweater was depressing and blah so I decided to see what I could do. (Apologies for the cheesy smile.)


I started by taking it in because it was too big and shapeless. Can you take in a sweater? Let's try it and find out. I sewed along the arms and sides of the sweater with a zig-zag stitch, thinking it would help control fraying. I also used a straight stitch just inside the zig-zag stitches. I was hoping it would help make the new seams stronger.

Actual sewing!

It took a little while to sew it all twice but I thought it needed it. I cut off the extra and prayed it would hold. It did!


For my trim I am using this doily type thing I have had for ages. I never used it as a table cloth. I cut out the center and attached it under the bottom hem. It is large enough that I could gather it and make it loose and ruffled. It feels pretty sturdy.


Here we are finished. I didn't add any wrist trim, I have a baby, so lace dangling from the sleeve of my sweater is going to be gross in no time. This sweater is a lot more fun than it used to be. Why wear boring clothes when you can fix them up a little?


Thanks for reading, now go make yourself something fabulous.


Tuesday, September 8, 2015

The Simple Plaid Shirt


Hello Readers. This project was very easy.


 I had this plaid shirt made of linen that I liked. It is light weight and the V neck is nice. It is about 100 degrees today and I thought about making it sleeveless.


When I looked inside I found a contrasting pattern. Now, I loved this shirt even more! It even had these little buttons and straps (Technical name to be researched later.) to hold the sleeves up. I couldn't cut them off.


This shirt fit through the shoulders but the body of it was too baggy. It made me look really thick through the middle. I just had a baby and I can look thick on my own, thanks though.


I took a little off each side by sewing from the under arm seam to the hem. I used the smallest stitches I could and cut the excess off with pinking shears to help with fraying. I have never worked with linen so I'm just making it up as I go along.


Here it is finished. It fits much better now. It isn't tight, just less baggy.


Keep reading to see an example of refashioning gone wrong.

 This classic khaki skirt was in great shape and it would have matched the plaid shirt SO well. It was a little too big. I sewed down each side to take it in.


I cut off the extra fabric like I usually do. 


Here it is finished and ready to wear. The seams and hem came together so well. I was so happy until I tried to put it on.


I got careless and didn't measure correctly and this skirt is WAY TO TIGHT! I couldn't even get into it. (So, obviously, no pics.) Oh, well. Thanks for reading, now go make yourself something fabulous. (In the correct size if possible.)

Anybody want a size 1 khaki skirt?


Saturday, September 5, 2015

It's a Shirt, It's a Jacket... No, It's a Skirt!


Hello Readers. Today's project was a heavy weight shirt or it was a light weight jacket, I couldn't really tell. Either way, it became a skirt. 


 I have been wanting a denim skirt for a while. When I saw this heavy cotton material I thought it would be sturdy enough to be a skirt.  The circles are whimsical and cute too.


I began by cutting off the arms and shoulders. This gave me a basic square to work with. The bottom hem will be the bottom hem of the skirt. I narrowed the top in to make the waist of a basic A-line skirt.


I tried it on a few times to make the skirt fit well through the hips and waist. Then I folded the top edge down to make a waist band. I could have inserted elastic to tighten the waist even more, but I didn't need to.


It was easier than I thought it would be. The loose fit helps make this an easy project. The buttons were already there so I was half done when I started.


I wore it when I went out to look at Autumn plants. It's very comfortable in today's heat and I can wear it with tights and a sweater in cold weather.


Thanks for reading, now go make something fabulous for yourself.


Thursday, September 3, 2015

The Rainbow Sherbet Outfit

Hello Readers. This project came together by accident.


 It started with these shorts that were passed on to me from my lovely daughter. She is much taller than I am so these shorts were very long on me.They made my legs look even shorter than they really are. I just cut them off and plan to let them fray naturally. One of the perks of being a SAHM is the lack of dress code. They also have a nice color inside when they are rolled up.


The top was handed down to me from my mother. Bless her, she is a great source of hand-me-downs. But the sleeves on this top were very long. Perhaps my arms are shorter than the norm. Whatever.


The top fit in front but the back was a little too loose and billowy. It makes me look very full figured. This is not a problem because I can fix this yummy rainbow sherbet top in no time, just watch me.


I spread the top out so I could decide what I had to work with.
I cut the sleeves and left about an inch extra. I plan to turn the fabric under twice and sew the edges.


I also turned the top inside out and folded it in half, straight down the middle of the back.


I sewed down the back of the shirt. Taking off more at the bottom than I did at the top. I used the smallest stitches I could so it will really hold together. I cut the extra off with pinking shears to help with the fraying.


 Here is the finished outfit.The top is still loose but not quite as large. It makes me think of a big bowl of rainbow sherbet. Who doesn't love that? Thanks for reading, now go make something fabulous.