Wednesday, May 23, 2018

A No-Sew T-shirt Refashion

Hello Readers. Today we are going to a quick t-shirt project that doesn't require any sewing at all. You just need a t-shirt and some scissors.


I started with a big green t-shirt that I got for Christmas. It was too big, so I had some extra fabric to play with. I started before I even took a good picture. (Sorry!) I cut the neckband, the finished edges of the arms and the bottom off the shirt. I saved them for later.
This shirt is green like the Boston Red Sox scoreboard, the Green Monster. The triangle is part of a city landmark Citgo sign.


 I cut small slits in the shirt around the neckline and sleeves, about 1/2 inch from the edge. Now it was time for the cut off edges of the shirt. They are now long thin pieces of matching material, like string.  I laced the "string" in and out of the holes. I pulled them a little tighter to gather up and pull in the neckline a little bit.


You can see the gathered neckline below. I did the same thing on the sleeves with the edges I had cut off in the beginning. Gathering the neckline and the sleeves helped make the shirt less baggy looking but it still had a nice loose fit through the body of the shirt.


I made one in white too. I made the holes were a little closer on the white shirt just to see how it would look. (Honestly, it looks a lot like the green shirt.)


 I had a little bit of leftover cut off hem material so I used it to tie a knot at one side of the shirt.


 I am ready for the next baseball game.


I like how this shirt turned out. It is a little sporty and a little feminine, but this idea would work on any t-shirt.
 Thanks for reading, now go make something fun for yourself.

*Year end update- I am still a fan of the Red Sox and this shirt. It gets a lot of wear on warm days.

Friday, May 18, 2018

More Florals For Spring

Hello Readers. I decided to throw some more florals at you today.

This dress had such pretty material. I loved the fresh spring colors. But it was a little overwhelming because of the big bell sleeves and the huge ruffle at the collar. I thought the fabric could stand by itself. It didn't really need all the extras. (I mean calm down dress, we see you!)


I decided to remove the top of the dress. I cut the top off and left the elastic waist attached to the skirt. The material would make a nice feminine skirt. It was easy to turn under and zigzag stitch it down.


The skirt was a little big, I also took some of the excess out of the back. There was already a seam there, so I used it as a guide for my new seam.


I love how it turned out. It is simple and it lets the floral pattern stand out. I usually find simple is the best way to refashion clothes. Maybe that is just what appeals to me.


Thanks for reading this post, now go make something fun for yourself.

*Year end update- I really liked this outfit. I still have the shirt. The skirt was chewed up by my washing machine. The fabric was delicate and it couldn't be repaired. I was really disappointed. 

Wednesday, May 16, 2018

Florals For Spring?... Groundbreaking.

Hello Readers. Flowers are blooming and it is time for some spring florals. This long, long dress is a perfect project.


When I decided to work on a floral dress in spring, I couldn't help but think about the great movie The Devil Wears Prada. Meryl Streep had this great line. 

 This dress was so long on me it was almost ridiculous. I put this dress on my dress form and started pinning the sides to get a better fit. There was a zipper up the back of the dress so I could get it on and off. 

You can't see the pins, but they are in there.

I took the sides in a little and made the dress much shorter. The original floor length did not suit me at all. Floor length flowers is a lot of flowers, I think shorter will be better. I also took the sides in a little to improve the fit. This was a simple project but it made this dress a lot more wearable.


I pressed all the new seams. I tried not to burn the fabric, I can be reckless with the iron, and this was an acrylic blend. My caution paid off because the dress turned out well.


I liked the bright coral color flowers when I first saw this dress and I like them even more in a shorter dress. I also liked that I could dress it up or wear it more casual. I am a more casual person usually. 
I wore this dress on a Target run, you can't get much more casual than that.

Basic suburban mom going to Target.

Thanks for reading this post, now go make something fun for yourself.

*Year end update- This dress is perfect for anything. I still like it a lot.

Friday, May 11, 2018

A 70's Jumpsuit to Fun 50's Outfit

Hello Readers. It's time for the second part of my groovy jumpsuit refashion


 I started with this amazing homemade vintage jumpsuit. It was one of the most fabulous things I have ever found at a clothes swap. Actually there were 2 of them. The other one was lime green.
 This jumpsuit didn't suit me at all.


I made a romper last time. It was much cuter than the jumpsuit but it still didn't fit or flatter me a whole lot. I didn't alter the neckline last time at because the embroidery was so pretty. I didn't want to lose any of it. But that high neck wasn't very comfortable. 
I started round 2 of this project by cutting off the legs of the shorts I made. I hemmed the bottom edge to make a shirt and then I started on the neck.


I unzipped the front a little to make a v-neck. I pinned the sides down to make sure they matched and stayed where I wanted while I stitched them down. I did lose some of the pretty embroidery but at least it would fit more comfortably.


I wound up sewing the shirt closed all the way down the front and removing most of the zipper. It just goes on like a t-shirt I thought that the green leaves from the floral neckline matched this green skirt well. This skirt has been on my refashion rack for a long time. This is the third refashion for this green skirt. I just never found a great home for it until now. You can see where the green skirt appeared on this blog first here and then here.


I was really happy with how this outfit came together, it has a 50's vibe that I love. The top is still fitted just like it was as a jumpsuit, but it works well with the full skirt.
Thanks for reading, now go make something fun for yourself.

*Year end update- I love this outfit so much! It is heavy polyester so I never wear it on a hot day.

Wednesday, May 9, 2018

A Disco Jumpsuit to A Modern Romper

Hello Readers. I found a vintage 70's knit jumpsuit at a clothes swap. Check it out.


I can't lie, I was feeling groovy. Someone made this themselves. I could tell from the inside seams. I love finding homemade clothes. They are so special. In a world of fast throw-away fashion, someone spent a lot of time putting this together. It was so drastically out of style and unflattering on me. It had the standard zipper up the front that all jumpsuits seem to have and wide leg trousers. It was in great shape, this poly-knit material really held up well through the years.
It had a belt too, I was not able to find it until later.

 The jumpsuit is able to show every bump and roll perfectly.

I thought maybe I could make a romper out of it. I thought that would update it and make it more wearable and modern. I wasn't sure, but I thought it might work. I used a pair of shorts as a guide for how much of the pants to cut off.


I hemmed the shorts and I found the little matching belt. (It was in a pile of fabric scraps.) I decided to remove the sleeves. I thought that it would be more comfortable for warm weather if it was sleeveless. This fabric doesn't breathe very much. Why was it so popular again?


I cut off the sleeves and left 1/4 inch of the sleeve as a seam allowance. I tucked the extra sleeve fabric under and into the armhole and stitched it down.  It was very easy to manipulate and sew through this material. Is that why it was so popular?


Here is my more modern romper. This was a big improvement but I think it fit my dress form a lot better than it did me. So, while I liked the romper idea, I kept working on this. Check back next time to see what this romper turned into.


Here is a look at my sewing closet. This is a before and after cleaning. You can see why I lost the belt for a while.


Thanks for reading this post, now go make something fun for yourself.

*Year end update- I think this jumpsuit is my favorite vintage find. I altered it again in the next post.
My closet didn't stay clean for long.

Friday, May 4, 2018

Time For Exercise Clothes

Hello Readers. Do you wear exercise clothes often when you are not even thinking of exercise? 
Yeah, me too. These exercise clothes need some work before I can wear them.

The Official Uniform of Mom

I sleep, lounge, run errands, garden, and hang around the house in mine.  So, I need a lot of them. And I need some for cold weather and some for warm weather and everything in between. My daughter gave me these yoga pants. They fit but they were much too long. I decided to make them into cropped leggings. They would be good for warmer weather. I tapered the legs and hemmed them to a shorter length. This was the easy part. This stretchy material was so easy to work with.


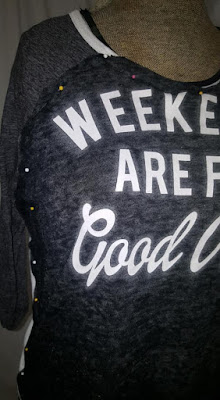
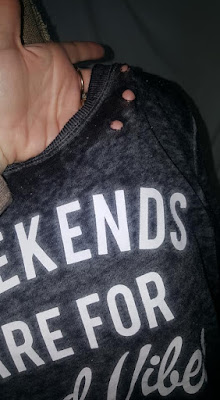
I had a couple of shirts that needed help too. The black shirt was a very lightweight sweatshirt that was really worn out. The white shirt was in great condition and fit well but it was one of those thin, sheer, tissue t-shirts. It was so sheer that I couldn't wear it. I couldn't exercise in a see through shirt! The whole point of wearing a shirt is too cover myself.


I cut the front of the black shirt off and pinned it to the front of the white shirt. I tried not to cut off any of the writing, it was close though.


I used a zigzag stitch and went over the edges of the black piece. I attached it at the seams of the white shirt. I wanted to cover the entire front panel of the shirt. It was a little short, as you can see.


I decided to use the waistband of the black shirt to finish the bottom of the shirt. I cut it off the black shirt and attached it to the bottom of the white shirt. It was big enough to go all the way all the way around the shirt.


I really liked how the black waistband made the back of the shirt coordinate with the sleeves of the shirt.


Here is my finished workout outfit. It won't win any fashion awards but it will cover me and get me through some exercise and anything else that happens. (Netflix!)


You can see how strong some new exercise clothes made me. This was the perfect outfit to plant some tomato plants I was given.


Thanks for reading, now go make something fun for yourself.

*Year end update- I love exercise clothes. These were/are great.

Wednesday, May 2, 2018

A Dress-Extender From A Pillowcase?

Hello Readers. Have you ever had a dress that was a little too short?


This light blue shirt dress was great but it was a little too short on my tall daughter. I usually need to shorten clothes because I am so short. My daughter has the opposite problem. She is tall and clothes can be too short on her. She needed a quick and easy dress extender/under skirt to wear with this blue dress.
This dress is a bit shorter on the sides, just like a typical men's shirt. That made it even shorter on my tall daughter. That's is where the dress extender comes in. It would add a little coverage for this short dress.


We were discussing the dress and I came across this pillowcase. (I was folding laundry.) It is a standard size case but it is made of knit material, like a T-shirt. The soft material got me thinking. It would make a soft skirt. Would it work under the blue shirt dress?


I cut off the closed end of the pillowcase. I was going to keep the open end of the case and use the finished edge as my hem. That would save time and effort. (I should call this blog "The Lazy Seamstress", because that's what I am.) I did some measuring so it would fit my daughter and work for the blue dress. It couldn't be too long or too short.


I folded the cut edge in and under to make a casing for an elastic waistband. It was an easy way to make a skirt and it would be comfortable to wear.  I cut a length of elastic that fit around my daughter's waist. I fit the elastic through the casing, connected the ends, and stitched the casing shut.


Here is a look at this simple white skirt. I could have added something to make the actual dress longer but decided to make this because it could be used with and under other things. 


This skirt fit well and it just peeks out from the blue dress and it adds a little coverage on the sides. That was just what my daughter wanted.  We didn't add trim or anything that would distract from the blue dress. It would be easy to add some lace or something like that to dress it up if you wanted to.


Thanks for reading this blog, I love all my readers. Now, go make something fun for yourself.

*Year end update- My daughter cleaned out her closet and gave this outfit back to me. It was nice to wear in the heat of summer.