Showing posts with label T Shirt. Show all posts

Sunday, May 4, 2025

May The Force Be With You

*Update- It's Star Wars Day or May 4th. I decided to share a flash-back to this Star Wars t-shirt my kids gave me back in 2016. I still wear it on a regular basis because one of my first memories is going to see the first Star Wars movie. I think I was 6 or 7. I have been a fan of the movies and in love with Han Solo ever since. I really liked this shirt because it looked like it was made when the first movie was made.
 
Hello Readers. I hope you are enjoying the beginning of summer. (If it is summer where you live.) I was so excited about the new Star Wars movie that my two big kids bought me this T-shirt. It was a big men's style shirt, perfect for playing around with.

I started by cutting off the neckband. It opened up the neckline and made it more comfortable.

I cut off the serged end seams from the arms. I also cut up the middle of each arms.

I pulled and tugged the cut corners to make them longer.
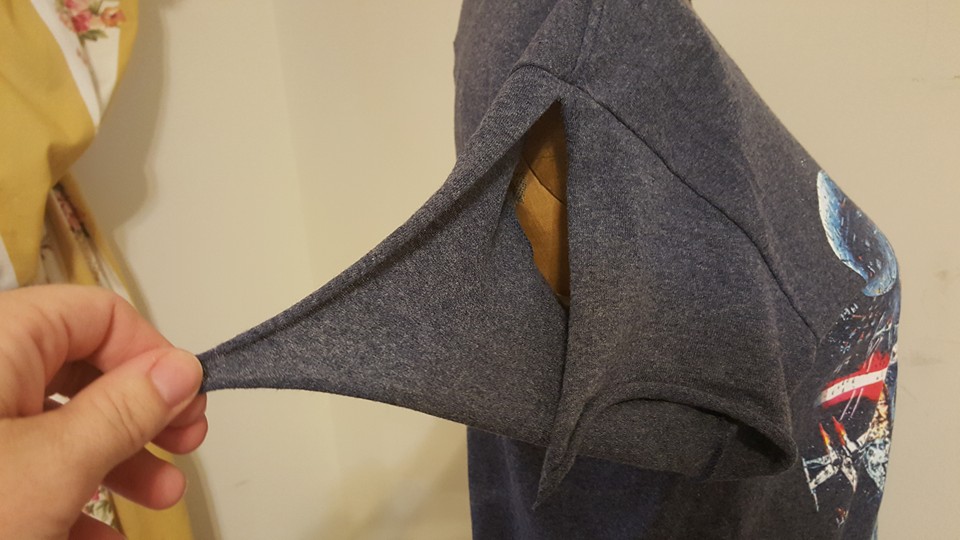
Then I tied them together in a knot. The opening added a little ventilation but left the coverage of sleeves.

I also took a little off the waist so it would be less bulky when I tucked it in. It looks funny here but it looked better when worn.

Here is my shirt. It is casual and comfortable. Perfect for...

chilling out in the backyard kiddie pool with this little guy.
*Look how little he was! Oh, my heart!

Thanks for reading along, and may the force be with you.


Wednesday, April 22, 2020

Going Sleeveless

 Hello Readers. I am writing from Corona virus isolation/quarantine. I hope you are well and safe. I'm having a sewing machine malfunction. It's more than a malfunction. My machine is done for good and when I started using my daughter's machine, it started to malfunction as well. We sent it off to get serviced. I moved on to my mom's old machine and it literally locked in place. It is still frozen in position on my sewing table. 
So, let's have a flashback to a 2016 refashion. My daughter gave these shirts to me recently. She refashioned them back in 2016. Read on to see what she did.

Hello Readers. It is the last hot, hot days of summer. I am battling a bad case of poison ivy and the heat just makes it even more itchy. I am taking lots of medications to try and get rid of it but since I am not at my sewing best, I am going to share a little of my daughters recent sewing. She has finished college and is working in an office and has been trying to add to her work wardrobe. She was working on a couple tops this week.
This first top looked so cute and fresh with this blue and white color scheme. The only problem was the pattern went from cute to overwhelming and crazy when she put the top on. Her solution was to remove the sleeves.

She simply cut the sleeves off right next to the seam and then turned the raw edge under twice and stitched it down. Below you can see actual sewing.

Here is the new seam. It is very small and narrow. It was very easy and the fabric didn't pucker or twist. She made the smallest seam she could to keep the armhole about the same size as it was originally. I think this helped the shirt keep it's shape.

The new shirt is great for summer and it seemed to calm the wild pattern down when there was less of it. Sometimes less really is more.

***UPDATE- I made this shirt a few inches shorter because it was so long on me.I used iron-on tape since I don't have a sewing machine. I will stitch it down someday so it is stronger.

She also used the same fix for this floral top. It had puffy cap sleeves that were just a little too puffy.

The new simplified arm holes were quick work.

She liked the new look much better. It was just a cleaner simpler look.

***UPDATE- My daughter made these shirts over 3 years ago and I am really happy she gave them to me. Staying home is really getting to me. Stay safe everyone. 

Thanks for reading along, now go make something fun for yourself.


Friday, May 13, 2016

Repairing a Damaged T

Hello Readers. My project today was an effort to save a shirt I was really attached to. It isn't anything special but it is one of my favorites. Why? I guess because it matched everything and it is stretchy and comfortable. Do you have a favorite T-shirt?


Here is the problem. The bottom got ripped and I had to remove the bottom 3-4 inches. Now it was a bit too short and it looks pretty rough. I needed to add some length and clean it up.


I decided to attach some wide 3 inch lace to the bottom of it. It would be longer, cover the rough edges, and it will look more finished. I chose lace in the same color family but not an exact match. I put the right side of the lace and the right side of the shirt together and stitched along the edges and  then attached the ends.


Here is the new bottom of the shirt. I had just enough to go all the way around the bottom of the shirt. It still matches everything and it's still comfortable. Now, it's a bit fancier and more unique.


Thanks for reading, now go make something fancy and unique for yourself.

Saturday, April 2, 2016

Night Shirt to High-Low Shirt (No Sewing!)

Hello Readers. My project today was a nightshirt. There is nothing wrong with it. I just don't like night shirts. They seem to get all tangled in the blankets and I don't need that kind of stress when I am sleeping. I liked the color and I had an idea. I would make a high-low shirt. I don't have one and I like how the back covers the caboose and the front elongates your legs.


I spread it out on the floor and made it very smooth. I was going to cut through both layers at the same time to make sure that each side was equal in length. I thought if i cut one side and then the other I would never get them the same. 


Here is a view of it on my dress form. I also cut a few inches off the sleeves. It is warmer out and I thought 3/4 length sleeves would be nice for spring.


Here we are finished. It is long enough that my stomach does not show AT ALL. (That is important to me. No one should see that mess.) It is also long enough to tuck into the skirt I showed you in my last post.

Sunshine and Daffodils. Spring has sprung!

Thanks for reading, now go make something fun for yourself.


Tuesday, March 29, 2016

It IS Easy Being Green; A T Shirt

Hello Readers. I hope you are well. It is warmer and warmer where I live. I am working on spring clothes. Why do I make/refashion so many clothes for myself? Well, this time last year I was about to deliver 9 lbs 11 oz of bouncing baby boy. I don't know the metric conversion for that weight. Huge is the only word that comes to mind. He was huge, I was huge. The spring before that I was much smaller than I am now so basically nothing fits as it should. That means sewing, mending and refashioning while the baby is sleeping. I like it, it keeps me busy. And I can make things fit me.
 OK, so, on to today's post. It started with this green shirt. 


It came from a clothes swap (of course). I went with a few friends and we all found some great stuff. The things we didn't like we gave to each other. This shirt was one of those items. None of us liked this top. I don't know what the designers thought was. It had this extra "strap" that goes across the chest and neck. It felt weird and it looked a bit weird too. Maybe it was to hide how extremely low cut this shirt was. Like crazy low. No one wears shirts this low.


This was a simple fix. I cut it off at the back. I was careful and cut as close to the finished edge as I could. I left it cut and it isn't visible. The entire neckline looks natural.


I couldn't just cut the front of the tie off because the knot you see in the picture was not attractive inside. It was rough edges and had threads sticking out in all directions. I tucked the end of the strap inside the shirt and put a couple stitches in by hand to keep it in place.


Here I am finished with this green shirt. I like it simple without the extra strap in the front. It is just a case of less is more.


Thanks for reading, now go make something fun for yourself.

Friday, March 11, 2016

The Ruffled Gray T

Hello Readers. I hope you are happily sewing the day away. It is hard to find the time? I hear you. I can only sew when my little guy is sleeping. Today he took a big nap in the morning and decided he didn't need his afternoon nap. So, no sewing.

My project today is a T-shirt. It is the last XL T in my stash. I am a little bummed because I had so much fun with them. They are so easy to work with.


This is what it looked like in the beginning. It is a basic men's T-shirt. It is really big and roomy on me. It was light weight and a cotton/polyester blend. It is really soft and comfortable but the light weight of the fabric was going to be a problem.


I had already cut it up for a prior project that didn't work out so I had to figure out a way to work with the pieces. I had already cut off the bottom hem and two strips that were about 1 1/2" wide.


I decided to make a ruffle along the bottom. I stitched the two strips into one long piece and pinned it along the bottom of the shirt. I gathered it together as I attached it to the bottom of the shirt. My machine didn't like the thin material so I added some hem tape to stabilize it. It worked like magic. I love this stuff. It is so old I don't even know if it is still packaged like this. 

What a nice lady.                                                         So many pins!


I liked how the ruffle looked but the shirt still seemed kind of flat. I used elastic to gather up the fabric together along each side. (It became more interesting and much more flattering.) Below, right you can see the black hem tape from the ruffle and the black elastic on the side seams.

Kind of......blah.                                                         View inside out.

In the end I cut off the arms because I cut one with the scissors by accident. (Oops!) The shirt was big enough that it still looks like little cap sleeves. I liked it better this way. The gathered sides cover up the mom tummy, that in itself is reason enough to make 5 more shirts just like it. 

I also cut away the neck binding because with a raw edge on the bottom and on the arms it seemed silly not to. This way they all match.


Thanks for reading, now go make something fun for yourself.