Tuesday, August 20, 2024

Making Shoulder Straps

 Hello Readers. The bright colors of this plaid top were so cheerful, they really caught my eye. I found them at a church sale and couldn't try them on. I thought I could figure out the fit later. I was there on the last day so everything was about 10 cents per piece. I couldn't pass up that kind of sale.

Before and after.

I loved these colors but when I wore all 3 pieces together, I felt like a magenta crayon. I decided to break up the outfit. This post will be about the plaid top and pants. I will be back tomorrow with the jacket. 

The top had very narrow spaghetti straps. They were too narrow for a regular everyday bra. That wasn't ideal for me. I thought I could make straps from the big ruffle that was around the top. I cut the ruffle about 2 inches shorter. I wanted to leave a very small ruffle on the shirt. 
 
I could use the extra fabric to make shoulder straps. 
 
The smaller ruffle looked good but I needed to finish the edge. It needed to be turned under and sewed down. 
 
Here is a look at the shirt inside out. I pinned the fabric I had from the ruffle to the shoulder straps to see how it would look. I sewed the pieces of ruffle to the shoulder straps.
 
I cut the pants into shorts. I thought the color was great for summer and I could use some easy denim shorts. I gave them a new hem and I was done.
 
It stays hot where I live until the end of September at least so this outfit is perfect for this time of year. Thanks for reading along, now go make something fun for yourself. 
***Year End Update***- I love colorful cheerful clothes. This outfit was exactly what I wanted.


Thursday, August 15, 2024

Simplify & Create

 Hello Readers. I love striped shirts. This t-shirt was a hand-me-down and it fit great but that tie in front was throwing me off. It seemed too big when I tied it and too long if I let it hang down. Something didn't seem right. The tie is so big, it really calls attention to my waist/stomach. 

Before and after.

I couldn't tuck this shirt in because of these extra large tie pieces. I like to tuck my shirts in. Sometimes you have to cut things off in sewing.(And in life.) These tie pieces were no good for me.

From the inside the shirt looked like this. There was an opening at the hem where the ties were. I could have just cut the ties off but then this opening would be like a weird window for my belly button. My belly button is not for public viewing. After 3 large babies my belly button has retired and will never be seen again. 

I decided to remove the tie pieces and sew the shirt together. I just wanted a basic t-shirt shape. 

I used my serger to connect the front opening and close it up. 

What about these 2 pieces? They can't go to waste. 

I sewed them together. It is just the right size to wrap around my head.

I had a new headband to go with my new t-shirt! Thanks or reading along now go make something fun for yourself.
***Year End Update***- These classic stripes are going to get worn to threads from me wearing it so much.


Wednesday, August 14, 2024

Crop a T-Shirt

 Hello Readers. I wanted to pair this sporty t-shirt with this ruffled skirt. I liked the contrast. The skirt was a little dressy and the shirt was more sporty. The shirt was a bit big and long though.

Before and after.

This shirt was a men's M. It wasn't doing much for me. It would be better if it was shorter so the skirt wasn't covered up. I wanted to crop it, that is cut it shorter. I don't mean a 1/2 shirt that showed my stomach and my mom tummy. I just wanted a shorter length shirt. Not all cropped shirts need to be revealing if that's not your style. It's your shirt. You pick the length.

I used a mirror to make sure I was cutting the shirt at the length I wanted. I was wearing the skirt so I could be sure how they would work together.I marked the shirt with chalk so that I could cut it the right length.

I put the shirt on my cutting table and made sure the shirt was spread out and smooth. Any wrinkles would mess up my cut.

I used my rotary cutter but scissors would work fine too. I cut straight across the shirt.

I pulled the newly cut hem to make the edge roll up a little. It looks more finished that way.  You can cut the sleeves shorter if you want and you can cut the neckband off too. It's your shirt, you can decide.

I liked my new sporty shirt. The skirt is so fun and I didn't want it hidden. Thanks for reading along, now go make something fun for yourself. 
***Year End Update***- This outfit was fun and casual. I love it.


Tuesday, August 13, 2024

Make the Clothes Fit You

 Hello Readers. I thought this skirt would be a fun comfortable match for my "Dunder-Mifflin" t-shirt. I love a soft comfortable skirt. This skirt just needed to be taken in at the waist a bit.

Before and after. 

I liked the black and white color scheme of these 2 pieces. The skirt just needed a small tweak.

I sewed along each side seam so that the angled lines would stay even.

I used my serger for the new side seams so that the seams would still stretch. 

My seam matches the original seam pretty well.

I am off to a meeting of the "Finer Things Club". Thanks for reading along, now go make something fun for yourself. 
***Year End Update***- This outfit is so comfy. I wore it so much.


Wednesday, August 7, 2024

Button Down Remake

 Hello Readers. I saw this shirt at a thrift shop and loved this floral fabric. I loved the colors and thought it would be great to refashion.

Before and after.
 
When I found this on the rack it was the middle of winter but I thought it would be perfect for summertime. I saved it until now.
 
This shirt was such a pretty and feminine floral. The shirt style seemed boxy and was not as feminine as the fabric. I got to work.
 
I cut a round neckline to remove the stiff collar.
 
I used my serger to finish the new neckline I had just cut. I didn't want it to fray. Then I turned the edge under and sewed it down. I sewed it wide enough to put elastic through and around the neck. 

I threaded elastic around the neckline to gather the shirt fabric. I stitched the neckline closed when the elastic was threaded through. This will gather the fabric around the neckline.

I made a tiny hole inside the sleeve at the hem. I used this as a casing for elastic as well. 

I tied the elastic in a knot and this made a little puffy sleeve. 

I liked the new shirt. The open neck was much more comfortable for me. Thanks for reading along, now go make something fun for yourself. 

***Year End Update***- This was such a pretty green. I gained a little weight and sadly it got a little too tight to wear.


Tuesday, August 6, 2024

The Swirl Top Table

 Hello Readers. I found this little table or plant stand, at a church sale. It was so solid and sturdy, yet the finish was completely worn away on the top. I decided to use some paint and make something fun and playful with it.

Before and after.

This little table had a nice finish on the legs but the finish on the top was all worn off. I thought it would make a nice plant stand but the top needed to be sealed or finished again to protect it from water. 

The whole table was dusty and dirty. I washed it with Dawn dish detergent and a microfiber cloth. This worked really well. I wanted to clean it all over before I started painting. I also wanted to clean the top of dust and grime so I could paint it. Paint doesn't stick well to dust or grime.

I did not want to paint the legs so I had to cover them. I put the legs into a trash bag. This would keep the legs from getting paint on them.

I tied the top of the garbage bag tight at the top so it would stay on. This looks a little weird but it worked really well. 

I wanted to swirl blue and white paint together. I didn't want to mix them into a shade of light blue. I wanted both colors to be clearly visible. So...

 
I opened the bottles of paint and poured them both out at the same time. (*Note-I should have put a drop cloth under the table. I got paint on my drive way and had to wash and scrub my driveway after this. My neighbor saw me scrubbing the driveway with soap and a scrub brush and probably think I am crazy.)
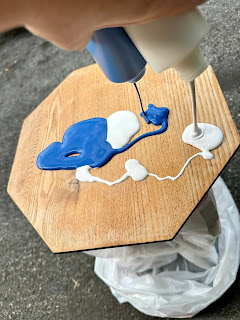
 
I kept pouring the paints out slowly and moving the bottles around over the table. This got both paint colors all over the table top. I kept moving the bottles around until the table was covered and the paint was running down the edge to cover it all with the paint. Moving the bottles is what made the swirls on the table top.
 
The paint didn't run down over this edge. I tipped the table slightly to the side to force the paint over the edge. This made the paint colors mix and swirl around on the table top even more. The more I did, the more I liked it.
 
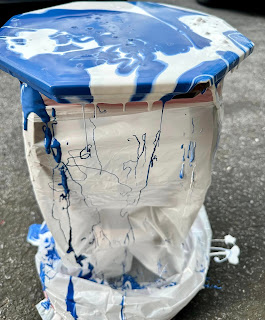
You can see the paint eventually ran down the sides of the bag like I thought it would. (You can also see the paint is getting on the ground. That was annoying to clean up. Use a drop cloth or newspapers to protect the surface you are working on.)

I let the blue and white paint dry for about a week. I wanted to make sure it was really dried and set well. I also wanted to protect the top so I added a coat of this clear spray. It just added an extra layer to guard my pretty swirls.
 
This little table is the perfect spot for this big spider plant. It needed a spot to get some sunlight and this table was a great height for this. Thanks for reading along, now go make something fun for yourself. 
 
 ***Year End Update***- There is still a big plant on this plant stand. Love the paint on this one.