Wednesday, February 19, 2020

Over Distressed

Hello Readers. I had a couple pairs of jeans that were distressed at the knees. I like that look but it is cold and the jeans were not great to wear in the cold weather. I have been wanting to try some visible patching and mending and here was my chance.

I started by cutting out all those white threads. I thought they would just get in my way, 

I decided to fill in the holes with other fabric. 

For the darker pair of jeans I chose a dark thick cotton. I cut pieces that were slightly bigger than the holes and stitched around them with my sewing machine. Was it hard to sew inside a pant leg? 
Yes. Yes, it was. It was part sewing, part wrestling.

 I wanted to keep the blue colors close in tone but also make sure the patches showed. These are my new favorite jeans.

This warm cozy sweater was a wonderful find at a clothes swap. It was brand new! I liked the length and the sleeves weren't too long on my short stubby arms! It also had beautiful silver hooks instead of regular buttons and...

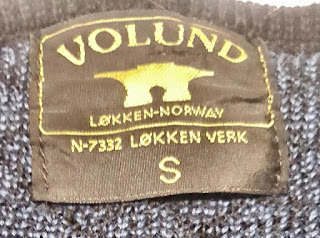
Judging from the tag, it came all the way from Norway. It was a size small but it was still a little big on me. It was thick and the extra size made it seem bulky. I thought if I could slim it down a little it wouldn't look so puffy. .
 Norway makes great sweaters!

I took a little off the sides and the sleeves. I used a tight zigzag stitch to keep it from fraying.  Usually I find sleeves can be tight, I always think I must have big arms but this sweater was the opposite. The sleeves were really too roomy.

I really liked how these 2 pieces turned out. The jeans kept my legs warm and the sweater didn't feel as over-sized. So then what did I do?
 I made my husband hold the camera down low so I looked taller in this picture. 

I decided to patch the knees on another pair of jeans. I used some scrap denim and covered the patches with visible stitches. I wasn't sure what I was doing and I didn't really have a plan. (My usual way of life!) I just got into it and thought I would figure it out as I went. (Also my usual way of life!)
The hand stitches were fun and I am not sure I am really done with these yet.

I did use my machine to attach all the patches for strength. I liked how excess sewing looked on the patches so I went a little overboard. I sewed one front pocket half closed in my excitement. Oops!

 Thanks for reading along, now go make something fun for yourself.


Friday, February 14, 2020

The Distressed Valentine T-shirt

Hello Readers. Well... Hello again. This post is originally from 2018 but I am still wearing this shirt so we are going to revisit this post for Valentine's Day 2020. Happy <3 Day!

Hello Readers. Valentine's Day is coming soon. It means love and romance, chocolates and cards. Are you doing anything special for this day? I decided to embrace the theme by making a shirt to wear for the day. I am posting it now so you have time to make one too.
 (I have 3 kids, so really elaborate celebrations will have to wait for a while. Like 15 years.)

 I am always on the hunt for refashioning clothes and supplies. It is always my goal to make fun clothes that I love, without spending any money. Free is the best. I usually have to buy thread and sewing needles of course. Where do I find freebies? I usually go to clothes swaps and take all hand-me-downs. I found some T-shirts a few months ago at my local rec center. I had taken my son to play in the kiddie gym and found this table. I took a few shirts to use later.

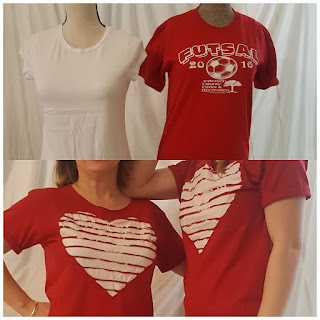
I started with this red shirt from the rec center and a this little white one. The white shirt was going to be cut up for decoration. I want to hide the writing on this red shirt.

I used paper and measured how big I wanted the heart to be. I folded the white shirt in half and cut the heart so it would be symmetrical and even on both sides. The heart needs to be big enough to cover all the writing.

I was going to pin the fabric heart on the inside of the red shirt. I turned the shirt inside out and started pinning the heart to the shirt in the same area as the writing, but on the inside. I want the white heart to be behind the writing.

I didn't want the heart to move around while I was sewing. So, I used a lot of pins. A. Lot. Of. Pins.
I stitched around the heart and I made horizontal stitches across the heart. I made about 10 seams or lines of stitching across the heart, about an inch apart.

I cut a slit in between each seam I stitched across the heart. You can see the white heart is sewn in behind the red shirt. I washed the shirt and the red shirt was supposed to curl up and cover the writing. But it didn't curl up. It didn't curl at all! I was a little disappointed, but this shirt wasn't going to beat me. I would make it work.

I cut off as much of the red shirt as possible, while leaving a little stripe of red fabric. You can still see little bits of the writing but not much. That is OK, it doesn't have to be perfect. It is going to work out great.

I cut the neckband off to open up the neck a little bit. It is more comfortable and I also rolled the sleeves and put in a couple stitches to hold them in place.

 I actually made 2 shirts. I gave my daughter a shirt to wear too. You are wondering if that is my real daughter, right? Yes, that's her. She doesn't want to be on the internet so I am concealing her identity. She is much taller than I am. I don't know how she got so tall, but it is handy when I can't reach the top shelf of the closet.
You can see how great the shirts turned out. A little bit of white print left in the stripes doesn't hurt the overall look of the shirts. And they look festive and more fun then they did when they started.
Thanks for reading, now go make something fun for yourself.

*Year end update- I still love this shirt. My 20-something daughter? Not so much.

Wednesday, February 12, 2020

A Valentine's Day Shirt for My Little Guy

Hello Readers. Valentine's Day is coming soon. Are you ready? Do you have a sweet card and chocolates for the special someone on your life? Are you even into this holiday? I decided to make my youngest a shirt for Valentine's Day. He can wear it to school for the party they are going to have. 
I started with a plain white shirt.

I wanted him to look like a little gentleman so I made suspenders. I just used red grosgrain ribbon I had in my sewing stash. I used my machine and stitched them on the front of the shirt. I didn't have enough ribbon to put them on the back of the shirt too. They are obviously fake so I just focused on the front of the shirt.

I added white hearts on the ribbons. I used a rubber stamp and some white acrylic craft paint. They didn't come out perfect but I never aim for perfect. My goal here is fun and cute.
I also drew the outline of a little bow tie in pencil.

 When the white paint was dry I painted the red bow tie. I just used cheap acrylic art paint. It never washes out when I get it on my clothes by accident so it will last a good long time on this shirt.

I wasn't sure if he would like it. He is very picky about his clothes, where they came from (He only wants hand-me-downs from the boys next-door.) and how they feel when he wears them. He agreed to try this on and when he did he said, "I think I love it." I was one happy mom!
He insisted that I take pictures with his latest creation. I decided not to argue.

He also insisted on taking a picture himself.

He did pretty good.

Thanks for reading along, now go make something fun for yourself.

Friday, February 7, 2020

Boring Bat-Wings

Hello Readers. It is cloudy and dreary here in my part of the world. It is gray and blah and it makes me want to go to sleep. Just like this gray top. Zzzz.....

I started with this casual gray shirt. It was plain but in great shape. It also had these big bat-wing style sleeves. They just don't look good on me. I am built like an ice cream cone and this top just magnifies that shape.

I also had these shorts. I found them at a recent clothes swap. I didn't like them as shorts because they were too short on me. I liked the material and the trim. I am going to cut them up and use them for parts. (Like a stolen car but this is all legit.)

These shorts had a wide elastic waistband that I thought I could use as a waistband for my shirt. That would draw the waist in and add a little shape and color. And that trim on the legs of the shorts would be pretty somewhere too. 

I cut the wings out from under the sleeves. I made the new sleeves a standard shape. It made a very plain and simple shirt. I wanted to add some trim to make it more interesting. I added the waistband to the bottom of the shirt.  I left a little bit of the short's fabric on the waistband to make a little ruffle. 

I decided to take a little excess out of the shoulders too. The wide neck just seemed too wide on me. I added the trim from the leg of the shorts to the neck.

Here is a closer look the the neckline. The trim and a bit of the burgundy fabric make it more fun. It adds a little color too. This gray could use a little brightening up.

I wore this shirt to work. It was perfect because the higher neckline didn't reveal anything when I was working. I hurry and move around a lot and I don't like to worry about my clothes. 
Yes, those are the corduroy pants from the last post. I love them. 
Thanks for reading along, now go make something fun for yourself.

Wednesday, February 5, 2020

The Red Ribbon Sweater

Hello Readers. It is finally February! Did January seem 17 week long or is it just me? February always makes me think of Valentine's Day so I decided to make a date night outfit in case I get taken out to dinner or something. (If my husband needs a hint, I like Chinese food and dark chocolate.)

I started with this pink sweater. I used the lace from the back in a refashion last November and the sweater was just sitting waiting for some love and attention. The sweater was pretty simple in front and had a deep open V in the back.

I wanted to find a way to make this sweater wear-able and I surfed all over Pinterest to find an idea. I saw some sweaters with ribbon accents and I decided to try that. I had this dark red ribbon in a stash of sewing notions and trim that my sweet mother-in-law gave me. I only had a little so that determined what I did with the ribbon.

I used some pins and then stitched the ribbon in place on the inside of the sweater.

What would I wear with the sweater? I found these wonderful dark red corduroy pants at a clothes swap and fell in love with the color and the sheen the fabric had. I have short scrawny chicken legs and these long pants looked horrendous on me. But they matched that ribbon perfectly. 

I did my basic resizing technique of taking fabric off the sides of the pants. It worked pretty well. I made them into skinny jeans. The fabric had a lot of stretch to it and it was easy to make them fit.

Sometimes when I remove fabric from the out side of a pair of jeans or pants the back pockets can get shifted into a weird placement on my backside. I took the pockets off the back with my seam ripper and re-positioned them into a more central location.

I reattached the pockets and I was ready to go. 

I am ready for a casual dinner date with my Valentine. He is coughing and feverish at the moment so I am hoping he is better by the 14th. I am also really hoping he doesn't spread his germs to me and our kids. I will keep hoping for the best.

Thanks for reading along, now go make something fun for yourself.