Showing posts with label Kids Craft. Show all posts

Thursday, August 29, 2024

The Back to School Shirt

Hello Readers. It is "Back-to-School" time in most of the U.S. Do other countries start the school year in late August or early September? I'm not sure.....but I have a fun project for you! This is a great shirt with a school theme. It's perfect for teachers, school kids, homeschoolers, parents really excited about school... and no sewing is required.
 
You need any white cotton t-shirt. The thicker the fabric, the easier this project will be. 
(I learned this the hard way.) You also need a blue and pink fabric markers. Regular markers will not work well for this project.
 
 I put something inside of the shirt in case the marker went through to the back of the shirt. I tried to draw straight horizontal blue lines across the front of the shirt. My shirt was very thin and stretchy. The shirt stretched when I wrote on it. It would have been better if the shirt was not stretchy, it would have been easier to draw my lines. It's OK, it doesn't need to be perfect. This project is supposed to be fun. Don't stress about it. The mistakes are all part of the fun.
 
I drew one pink vertical line on the left. I let the lines dry over night. The next day I searched around for something round and found this bottle. I wanted to make the 3 holes on the left that notebook paper has. I painted the top of the bottle and used it as a giant stamp. 
 
I made 3 big gray dots and let that dry over night too. I kept something inside the shirt so the paint wouldn't go through to the back. Newspaper or cardboard will work for this. 
 
You can wear this shirt to school. Or to shop for school supplies. Or to meet the teacher. Or at home while you homeschool your kids. Or anywhere! 
 
Thanks for reading along, now go make something fun for yourself.
***Year End update-  This shirt was so useful. It was part of a "Rock, Paper, Scissors" costume at Halloween. I wore white jeans with it and my costume was ready.

Tuesday, August 27, 2024

Frame a Puzzle

 Hello Readers. If you have kids then you probably have some Lego blocks somewhere at your house. My youngest is obsessed with anything Lego has ever made. He got a new bedroom recently and you can probably guess the decorating theme. That's right. It's going to be a Lego room. As a bargain loving mom, I want to decorate on a budget. I had an idea. Puzzles! Specifically, puzzles we already owned.

 This was an easy project using very simple supplies I had at home. 

My youngest loves all things Lego. I thought he would love this puzzle in his room.We could put it together and hang it on the wall. I knew there was special glue I could buy and use but did I need special supplies? (Spoiler- No. I didn't.)
 
This puzzle was not easy. Getting all the Lego heads together was a lot harder than gluing, framing, and hanging it was. 
 
I spread a couple sheets of newspaper on the table and put the puzzle together on top of it. This is very important.
 
Once the puzzle was together I needed simple basic white glue. I grabbed a bottle of kids school glue and some kind of paint brush. Any brush will do.

I squirted the glue on one part of the puzzle to start with and ...

I spread the glue all over the puzzle, one section at a time. I tried to make sure I didn't miss any pieces of the puzzle. 

I tried to make sure that some glue got in every crack. This wasn't difficult because the glue looks white at first but it will become totally clear when it dries. 
 
Here is my puzzle all dried. The glue adds a bit of shine but it is clear and doesn't change the look of the picture. 
 
The puzzle was connected by the glue and all one piece now. I was able to lift the puzzle and move it around easily. I flipped it over so I could see it back.  
 
I peeled the newspaper off the back of the puzzle. Some pieces of paper stayed stuck to the back of the puzzle. The small bits of paper won't matter when I put the puzzle in a frame. I just want to remove any excess paper from showing around the edges.
 
I didn't have a frame that was the exact size so I added a small piece of tape at the top corners of the puzzle to keep the puzzle from shifting around in the frame when it was hung on the wall. 
 
I put a nail in the wall above the dresser. I just used my eyes to judge the placement. 
 
I hung the frame with the puzzle on the wall and my kiddo loved it. 
 
We also used this puzzle. We put it together and glued it the same way. You can't have too much Lego art on the walls, right? Thanks for reading along, now go make something fun for yourself.

***Year End Update***- My youngest still loves Legos and this puzzle on the wall.


Saturday, May 13, 2023

Protecting Your Table Decor With Plastic

 Hello Readers. I wanted to use my table for more than just eating. I wanted to decorate it and use it to display 2 dimensional items like photos, pictures or maps. This was really easy to do and adds a bit of fun to a table. Using plastic protects whatever you decide to display or decorate your table with.

Whatever you are displaying on your table can be protected with plastic sheeting. That opens up so many table display options. Precious family photos, priceless children's artwork and even educational or instructional items can all be safely displayed.

I bought this plastic material a Walmart because it was the heaviest plastic I could find. It came with a sheet of white paper layered between it that had all kids of suggestions about what you could make with it. It was thick plastic and had a nice amount of weight to it. That would help it stay in place on the table. This isn't thin plastic, it is strong and sturdy. You could also use a clear table cloth or even a clear shower curtain but check the thickness and strength of the plastic you use. Thin plastic won't last as long and could be so light weight that it shifts around on your table.

This is my kitchen table. It is fine but I wanted to display some maps so my child will learn some geography. I don't want the maps to get ruined with spilled food or drinks so I needed to cover them with something. 

Here is a look at the maps I wanted to use. I spread them out on the table and arranged them the way I wanted. This step would be the same for displaying photos for the family reunion, pictures that your child drew or even company policies on the break room table. Whatever it is you want to display needs to be spread out and arranged on the table. Just lay them out the way you want. The plastic is going to hold them in place.

I took the white paper off my piece of plastic. It is not stuck or glued on in anyway. It separates from the clear plastic easily.
 
I spread my sheet of plastic over the table and smoothed out any wrinkles. The piece was a little bigger than my table.
 
 I didn't want the plastic to hang down over the sides of the table. I wanted to cut the excess off the edges of my piece of plastic. I wanted it to be exactly the same size as the top of my table. It will stay in place better this way.
 
The plastic is easy to cut. I went around the table and made sure the plastic was the right size for my table by cutting all around the edge. I used basic craft scissors.
 
 My youngest immediately sat down with cocoa, crayons and books. He liked having something to look at on the table. I liked that the plastic would protect everything.
 
I liked this idea for displaying photos at the family reunion or get together. What a fun table that would be! Everyone could see the pictures and reminisce while they sat around the table. Even the old irreplaceable photos would be safe to show off.

It would also be a really fun way to display your child's art work. They make so many wonderful creations and the front of the refrigerator is only so big, you can only hang up so much on the refrigerator door. Cover your table with their works of art.

I hope this idea is as useful for you as it was for me. The best part is that none of this is permanent. You can remove or change your display anytime. There is no commitment. Thanks for reading along, now go make something fun for yourself.

***Year End Update- I hope we have learned a lot of geography from this because the maps are still on my table.


Wednesday, February 12, 2020

A Valentine's Day Shirt for My Little Guy

Hello Readers. Valentine's Day is coming soon. Are you ready? Do you have a sweet card and chocolates for the special someone on your life? Are you even into this holiday? I decided to make my youngest a shirt for Valentine's Day. He can wear it to school for the party they are going to have. 
I started with a plain white shirt.

I wanted him to look like a little gentleman so I made suspenders. I just used red grosgrain ribbon I had in my sewing stash. I used my machine and stitched them on the front of the shirt. I didn't have enough ribbon to put them on the back of the shirt too. They are obviously fake so I just focused on the front of the shirt.

I added white hearts on the ribbons. I used a rubber stamp and some white acrylic craft paint. They didn't come out perfect but I never aim for perfect. My goal here is fun and cute.
I also drew the outline of a little bow tie in pencil.

 When the white paint was dry I painted the red bow tie. I just used cheap acrylic art paint. It never washes out when I get it on my clothes by accident so it will last a good long time on this shirt.

I wasn't sure if he would like it. He is very picky about his clothes, where they came from (He only wants hand-me-downs from the boys next-door.) and how they feel when he wears them. He agreed to try this on and when he did he said, "I think I love it." I was one happy mom!
He insisted that I take pictures with his latest creation. I decided not to argue.

He also insisted on taking a picture himself.

He did pretty good.

Thanks for reading along, now go make something fun for yourself.

Tuesday, September 27, 2016

Happy Fall Y'All

Hello Readers. That title reveals my slight southern accent (Is y'all a southern term?) but it is officially Fall now. It is still hot here but I decided to embrace the season by redecorating the front porch. Without spending any money!


I had this orange jacket/shirt thing from a clothes swap. They color is great for fall. It was too big for me to wear as it was and there was one thing I didn't really like about it. Can you guess what it is? The GIGANTIC knot buttons were just not my style I guess. I am pretty short so maybe they look big on me. They just felt so huge.


If I ignored the front, the back was nice and plain. I could use it to make anything to create something for my front porch. KC the Wonder Dog was there to help me.


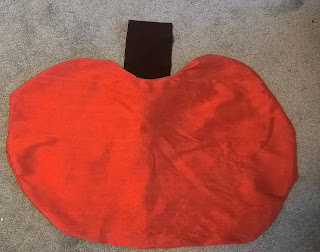
I cut out a vaguely pumpkin-ish shape. It isn't perfect, that is OK. I am going to make a pillow and when it is stuffed I think it will look even and balanced. And are pumpkins perfectly even and balanced? 


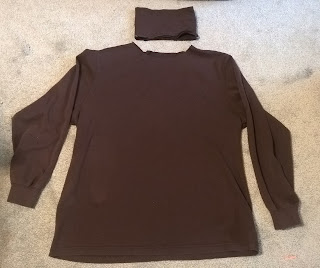
I also had this brown turtleneck shirt from the same clothes swap. It is a great shirt but I don't like the tight band around my neck. I feel like I am being strangled by them.


I cut the neckband off. I will save the shirt for another refashion another day.


Here is the back of my pillow. I sewed the center seam shut but left a small opening and left the knot button as a closure so I can stuff it. 


This is the front of the pillow. It is nice and plain. Maybe a little too plain. I will work on that too. And the stem needs to be more stem shaped.


I stuffed some plastic bags into the pillow. They are good for outdoor use and free! This pillow won't really be used like on a sofa or bed. So the crinkle of the plastic bags is OK.


I used a brown Sharpee marker to make curved brown lines down the pumpkin. It is subtle but it gave it more of a pumpkin look. You can see here I shaped the brown fabric stem as well.


There was a lot of fabric left from the arms. It's too much fabric to go to waste.


I put the arms together and made a long sash. I wasn't sure what to do with it yet. 


I used the sash on my door with a sign my daughter made for me when the little guy was born. I love it. The sash coordinates with the pumpkin pillow. My summer flowers are still in good shape so I tied some fall ribbon around the pots and left them on the porch.


*** KIDS CRAFT IDEA ***

This little pumpkin is a nice simple craft for kids. It is just a toilet paper roll wrapped in fabric. You stuff the fabric into the center of the roll. Thin fabric is best and orange is nice but not the only color you can use. 


Then you can twist a paper stem and stuff it in the center too. No messy glue needed!


Thanks for reading, now go make something fun for yourself.
Happy Fall Y'all!