Hello Readers. I repainted/redecorated a bathroom at home and I wanted a shelf. This bathroom had absolutely no storage. A shelf would give us more space. I looked a shelves online and realized I could make a fun shelf from a wooden box I already had.
You would not believe how long it took to repaint this bathroom. All in all, about 3 years. I am serious, we started repainting and redecorating this small bathroom about 3 years ago. Life got in the way and we just recently, finally got it done.
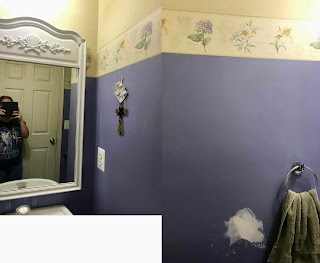
This is what we had in our bathroom. We were tired of the 2 paint colors and the wallpaper border. It seemed like an easy redecorating job. It was a small room. We could do this in a weekend right? We started patching dings and nail holes in the walls. And then it was Covid times and it sat like that for another 2 1/2 years.
My husband started painting it for me this past Mother's Day. (Thanks Honey!) I thought he was priming the wall here. There was some miscommunication.
He thought I wanted it white. Like a stark glaring bright white. I did not actually want this color. We have kids and a dog, white would be hard to maintain. I actually wanted the tan paint we had on hand.
A couple weeks later he painted it tan. (Thanks Honey!) This is a great color when you have kids and dogs and real messy life going on in your house. It is Brown Teepee by Behr. You can get it at Home Depot. It is the color of a brown paper bag. I love it.
OK! We were finished painting and was ready to hang a shelf.
Here is the wooden box I used. I have had this for ages and it has never matched any bathroom in my house. I liked the cream color but not the writing on the front. I decided to paint over it because the box will be hung on the wall and the writing will look odd at that angle.
I used some acrylic craft paint in the shade "Antique White". It matched the color of the box and would cover the writing.
This is what it looked like after 1 coat of paint. I let it dry over night and painted a second coat the next day. When second coat of paint was dry it was ready to hang on the wall.
I wanted the box hung in the center of the wall like this. We used the level to get the box balanced and drew a line on the wall along the top of the box. That line would be our guide for the next steps.
We measured to find the center of the wall. The box should be right in the middle.
We put 2 holes in the wall. These holes are slightly closer together than the corners of the box.
Here is a look at the anchors and screws we used to hang the box. The screws are about 1 1/2 inch long. The anchors help the screws stay in the drywall.
We put a plastic anchor in each hole.
We put screws into the anchors but did not screw them in all way. The screws stick out about 1/4 inch out. The box will rest on the screw heads. You can see the line we drew, it helped us know where to put the screws and make sure we kept the new shelf level.
We used a Dremel to make a couple grooves in the back of the box. The grooves would keep the box from sliding off the screws.
We made the 2 grooves on the back of the box. The grooves are in the frame of the box along the top edge.
The box is hanging or resting on the screws and the screws fit in the grooves. That will keep the box from shifting around.
The handle of the box naturally hangs below the box and it is perfect for holding a towel.
The shelf is high enough that little kids can't reach the items easily but adults can.
This is the end of our bathroom saga, thanks for reading along. I hope if you repaint your bathroom it doesn't take you as long as it took us.
***Year End Update***- This shelf is still on the wall and it still looks great.


No comments:
Post a Comment