Friday, May 27, 2022

Denim Days-Add Some Adidas

 Hello Readers. This is my last denim post of May. (I have another fun theme planned for June. Animal Prints!) For now let's focus on the denim. This whole project was inspired by @blueprintdiy who has done some amazing refashions with some Adidas clothing and much more. Go check her out, she is super stylish.

Before and after. 

These jeans fit when I bought them and they were the right length so that is why wanted to refashion them. Jeans that are the right length for me is a special thing. But they are too tight now. That's OK. I can fix this. A lot of refashions are making something big into something smaller but today we are doing the opposite. Let's make these jeans bigger, more fun and more comfortable.

I started by cutting the side seams open on the sides of the jeans. I cut from waist to hem. 

I could have unpicked the seams but it was a lot faster to just cut it all off. 

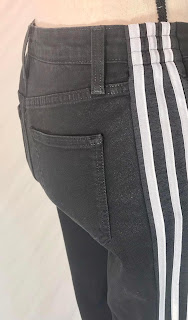
My friend Deb gave me some Adidas sweatpants. I liked them but I couldn't quite fit into them. I decided to use them for parts and cut the stripe detail out of the sweatpants. I cut the striped part out and left 1/2 inch seam allowance. 

I put the right sides facing each other and stitched the stripes into my jeans. The stripe pieces added about 2 inches to each side.

Here is a look at the right sides that are now sewn together. 

I used a straight stitch to connect the striped pieces to the jeans and I added a zigzag stitch on the edge to control fraying inside my jeans. The zigzag stitch will keep it all nice and neat. 

The striped pieces went into the jeans easily. The waistband of the sweatpants is still there and I hemmed the bottom of the sweat pant pieces to match the length of the jeans. 

Here is a close look at the waist. 

I can't tell you how comfortable these jeans are now. I love them. And the stripes are so much fun! Thanks for reading along, now go make something fun for yourself. 
*Year End Note From Chickie- These jeans got so comfortable with the striped fabric added. They got more fun too. I still wear these a lot.


Wednesday, May 25, 2022

Denim Days-A Shirt Refashion

 Hello Readers. We are getting to the end of May but I have a couple denim refashions before the month of denim is over. Sometimes I sew with a real purpose in mind... sometimes I am just playing around. I wanted to combine these 2 shirts for fun. I thought they could be more interesting. 

2 shirts combined. 

 
There wasn't really anything wrong with these shirts. I just wanted to make them more fun. 
 
I cut the shirts in 2 pieces. I cut under the pockets so I did not damage them and I tried to avoid cutting through any buttons. I also cut the sleeves so I could combine them too. 
 
When I put the shirts together I sewed the denim layer on top. I am really into frayed denim and I wanted that denim layer on the outside so it would show as it frayed over time. 
 
I used this faded denim colored thread. It blended in really well. 
 
Here is a look at the denim edge. It will fray over time and give the shirt a fun casual look. 
 
This was the first shirt I made. This was the originally planned project and I love how it turned out. I wore it on vacation. There was a pool table at the pool! I played against my 7 year old and he said I lost. Oh well. 

I realized that all these scraps could actually make a second shirt and thought I should put them all together. (Bonus shirt!) This shirt turned out shorter in length but I thought that was cool too. I liked them both open as a jacket combined with white. Do you have a favorite? Let me know below in the comments. 
Thanks for reading along, now go make something fun for yourself. 
*Year End Note From Chickie- I liked both of these shirts, I gave one to my daughter and kept one for myself.


Friday, May 20, 2022

Denim Days-Capris

 Hello Readers. It is getting hot and sunny and cropped jeans are perfect, a really high waist would be even better. I didn't have any jeans like that. I did have these tan Capri style denim jeans. Let's refashion!

Before and after. 

I wanted to change the look of these tan Capri's and I had a fun idea for the sweater too. Let's start with the jeans first. 

I have been wanting some more brown in my wardrobe so I got a bottle of brown Rit dye. (Not an ad. They do not know me.) I put the denim jeans and the dye in my washing machine. There are very detailed drections on the bottle. I always follow them.

The color came out great. I took a little out of the waist to make them fit a little better. I also took the stitches out at the cuffs. The jeans were rolled up and stitched down. I wanted them a little longer so unrolling the cuffs gave me more length. Instead of Capri length I had more of a cropped pants length.

This was a very simple refashion. The tan jeans were now changed into cropped brown jeans. But what about the sweater?

 
The sweater was such a loose knit that it was a little see-through. I had an idea to fix that though. 
 
Here is a view of the inside of the sweater. Adding this ribbon filled in the holes and it was a fun way to add some color to the sweater. 
 
I used a zigzag stitch to secure the ends of the ribbon to the side seams of the sweater.
 
I liked how the ribbon looked. It was easy to weave in and out of the sweater. It only took about 10 minutes. I used ribbon that I had on hand. This turned out to be a one of a kind piece. You could use ribbon in your favorite colors and customize it for yourself.
 
This outfit was a great spring/summer combo for me. Thanks for reading along, now go make something fun for yourself. 
*Year End Note From Chickie- These brown pants are cropped and I liked them in summer and into fall. I wore them a lot. I wear the sweater a lot too. The added ribbons made the sweater fun and it seemed to match so much with the extra colors in it.


Wednesday, May 18, 2022

Denim Days-Dying Dots

 Hello Readers. I have been refashioning denim this month because I love denim and I love a theme to get me thinking. Today's post is about a lightweight denim jacket. I found this jacket at a clothes swap . The purple polka dots caught my eye. 

Before and after.

This jacket was boxy and shapeless and just did not fit well. The sleeves were not long enough to be full length and not short enough to be 3/4 length. I knew I could fix those things but I wasn't crazy about the lavender purple color either. Did the purple look to juvenile? I couldn't quite figure it out but something didn't work for me.

Here is a picture of my actual washing machine and the Rit dye I used to change this jacket into something I would love. (Not an ad. Rit dye doesn't know me. I am just a fan.) I chose this color because I liked it and it was darker than the lavender and I knew it would cover it well.

I was very happy with the color. I pushed up the sleeves and played with the length a little. I thought a shorter cropped length jacket would be better. I decided on a good length for me and just cut the bottom of the jacket off.

I cut the jacket and the sleeves so they would fray and I would have a distressed look. 

This new shorter length was just what I was looking for. 

I really like the look of frayed denim. You can faintly see the polka dots which is OK with me. I didn't mind the dots, I just didn't like the original lavender shade of purple that much. 

This jacket was a great layer for a windy day. And the red wine color really popped!

I like this color a lot so when I dyed the jacket, I also dyed a pair of cotton khakis. Both of these pieces took the dye really well. They were both made of 100% cotton and I used the dye for cotton fabric. 
Thanks for reading along, now go make something fun for yourself. 
*Year End Note From Chickie- I loved the color of this dye. The jacket is wearable all year round.


Friday, May 13, 2022

Denim Days-Vest to Jacket

 Hello Readers. This little white vest has been in my closet for quite a while. I wanted to add some excitement and add some more room. It was a little too tight.

 
Before and after. 
 
 I liked the white denim vest a lot. But what if it was a little bigger? I liked this lace shirt a lot too. What if I put them together? They would make a great combination. The denim is classic and the lace would add a little something extra.
 
This lace button-down style shirt is the perfect source of the extra fabric I needed to make the vest a little bigger. It is really pretty white eyelet lace fabric. The lace shirt was too big and I could cut some of it off and use it for my vest. 
 
My first step was to cut open the sides of the vest. 

The next step was to cut the sleeves off this lace shirt. I cut around the arm holes and then I cut about 3 inches from each side of the shirt.

These small side pieces are what I needed to make the whole vest bigger around.
 
The pieces went together sort of like a little puzzle.  

The lace sleeves were a pretty way to turn the vest into a jacket. 

I love the eyelet lace with the denim. And I love that is is looser and fits better too. 
 
I didn't stop there, I added some eyelet lace to the collar too. I didn't have to, but why not?
 
Thanks for reading along, now go make something fun for yourself. 

And if you are wondering about the leftovers from the lace shirt, I sewed it back together. It is still a great summer shirt.
*Year End Note From Chickie- These were fun summer pieces. White eyelet lace in the summer is always a favorite.


Wednesday, May 11, 2022

Denim Days-Shorts

 Hello Reader. Some times clothing just needs some simple resizing or restyling to be great and fit well. 

 
Before and after. 
 
There just isn't anything good happening here. I mean, yes, i am wearing clothes. That is important. But these clothes are not great on me. They are shapeless and adding about 20 lbs. (I am American an I do not know how many kilos that is, sorry if you are anywhere else in the world.) The point is, this could be better.

These denim shorts were nice and classic but they just needed the sides moved in a little. I turned them inside out and stitched along the sides inside the side seam. Then I cut off the excess fabric. I didn't want the shorts tight just better in fit. Now they fit great. But what about that top?

I wanted to refit this shirt but I also wanted to save that little tassel detail on the side. I cut the bottom 2-3 inches off. That was going to be a new waistband.

I cut some of the shirt off at the sides. I knew it all needed to be more fitted so I cut the new shirt I wanted. I used the side seams as a guide and cut an inch inside of that seam. (3cm?) I also cut some of that new waistband off, about 4 inches. The waistband needed to be smaller around than the shirt to pull in at the waist.

You can see here where I did my sewing. I used my serger and some rainbow thread so it would be easy to see. This shirt was stretchy so it was easy to put the fabric together for sewing. Making a waistband let me save that little tassel and it gave the shirt a different shape. My new casual summer outfit was ready to go. Go where?

To the beach! This was my last day of a weekend at the beach with my family.
 We stayed at a house with a hammock chair in the living room. It was fabulous. Thanks for reading along, now go make something fun for yourself. 
*Year End Note From Chickie- I still love the shirt so much. It is SO soft. The shorts were great all summer.