Thursday, December 31, 2015

The Loose Gold Shoes

Hello Readers. I know what you are thinking. More shoes? Yes, that's right. And I saved the best for last. Or, I saved the most flashy for last. You can decide.


I have had these shoes for a long time. When I got them I thought they had so much going on between the floral design and the gold trim everywhere. I love them but they don't fit. I must have gotten them at the end of the day and my feet were a bit swollen. Now when I put them on in the morning they slide off in the back. I never wear them because of this.


I had an idea for a fix. I was going to attach a strap across the top. With all the gold on these shoes, I choose this gold elastic. A little more shine and sparkle couldn't hurt these shoes.


I gently pulled the sides apart a little and used my hot glue gun to glue one end of the elastic down in the side, as far under the sole as I could get it. I glued it well to keep it from coming off when I am wearing it.


I glued heavily under the sole where I wouldn't feel it. I glued lighter up the sides. 


Here is the finished look. The elastic is soft and comfortable. You can't see it with pants at all. I wore them at home to see if it would hold. If you try this, do a test run before you go out in public. 


Thanks for reading. Now go make something fabulous for yourself.

Wednesday, December 30, 2015

The Vest Jacket

Hello Readers. My project today is a casual jacket. It started as a vest that didn't get much use. To be honest, if my body is cold enough for a jacket, than my arms are cold too. I needed sleeves. I found this sweatshirt at a clothes swap. I didn't like the big logo on the chest. So, you can probably guess what I did next.


The vest has an interior draw string. It gives it a nice shape, it's not too heavy or bulky. I just needed to wear it more.


I attached the hood to the collar and made my stitches on top of the seam that was already there. The edges of the hood are raw, I just cut them off the sweatshirt and attached them to the vest. They won't fray.


I attached the arms, and again sewed along the seams on the armholes.


It was finished just in time for a cold, damp day. But what did I do with the body of the sweatshirt?


I refashioned it for K.C the Wonder Dog. I just sewed down the middle of the chest. I cut the pocket down and used it to cover what was left of the logo. I also cut out the belly.


He doesn't like to be cold and appreciated the sweatshirt but he wouldn't pose nice for the camera at all.


Thanks for reading this, now go make yourself something fabulous.

Tuesday, December 29, 2015

Blue Suede For Days

Hello Readers. Today's project came from this blue suede outfit. Well, it wants to be suede, but it's not. It's just pretending. My before picture is not good at all. I apologize for that. I found this two piece outfit at a clothes swap. I love the rich blue. Between the skirt and top, there is A LOT of blue suede here. Today I am just going to break up this outfit and fix up the skirt.


Here is a better picture of the skirt. It had an elastic waist and about 6 inches of satin trim at the bottom. There was a slit on the side. I cut the waistband off.


I flipped the skirt upside down. attached a zipper in the slit. The bottom hem will now be the waistband.


It took some re-sizing to get the satin band to fit my waist and hips. This skirt has no stretch so I had to measure and re-check.


I gave it a new hem. It was very easy to work with this fabric.


And here we are. I like the skirt by itself. I don't plan to wear it with the matching shirt.


As always, I appreciate you taking the time to read this. And I enjoy your comments too.
Now, go make something fabulous for yourself.


*Note- Some changes were made in this post for clarification after publishing.

Wednesday, December 23, 2015

Does This Skirt Make Me Look Like Mrs. Claus?

Hello Readers. No offense to Mrs. Claus, (I don't want to be on the naughty list!) but I don't want to dress like her. This skirt was passed on to me from my dear mother. All I could think of was Mrs. Claus and Christmas. I have been waiting to fix it up and wear it to church on Christmas Eve.


It has an elastic waist that was too wide and loose. It was a little too big all over too. I thought about shortening it and leaving it as full as possible. I decided not too because I didn't want it to look like a school uniform. That's not a look I want either.


I kept it long and straight. I didn't want it too tight or I wouldn't be able to walk. I took in a little from both sides and left the length as it was.


It is unseasonably warm where I live. And it will be warm all week.  It doesn't feel much like Christmastime as usual. It's like we traveled to the south for the holidays.


Thank you for reading. Now go make something fabulous for yourself.

Tuesday, December 22, 2015

The Cameo T-Shirt

Hello Readers. Today's project is a shirt I made specifically  so I could wear this cameo pin I got in the mail. Let me tell you how it started.


I checked the prices on Amazon for thread and such in comparison to the store. The prices on Amazon were better for some things. I made an order and when I got my items from The Jay Company, they also sent this elaborate cameo pin. I loved the basic cameo. (Thanks Jay Company!) The white cording around it is nice. There is a bow and a couple hanging pearls. I wanted to put the focus on the cameo.


I started with this plain men's T shirt. I cut off the neckband and I cut it up the front. I didn't cut the middle like a cardigan, I cut a little off center, on the right side.


I used the pin to hold the front together. I also rolled the sleeves up twice and sewed a button on each sleeve.


It was too long so I cut off about 6 inches and rounded the front corners. The white of the pin really stands out against the black fabric.


Thanks for reading, now go make something fabulous for yourself.

Monday, December 21, 2015

The Big Black and Silver Shirt

Hello Readers. This is a post about the dress that wasn't. I wanted this long shirt to be a dress but it just wasn't meant to be.


It is a nice classic button down shirt. It has silver stripes and it is a comfortable cotton blend. It has a cinched waist that I thought would be very flattering. I thought that when I took it in, I could use the excess from the sides to make it longer somehow. That didn't work.


It was hard to capture how big the bottom half made my hips look. When I tied the belt, it cinched it all in and the bottom puffed out in an alarming way. I narrowed it down to correct this. It was too short on the sides for a dress and too long in front for a shirt.


I decided to cut off the bottom and make it even all around.


I like it as a top. This is me almost falling off the chair. (So NOT graceful.)


Thanks for reading, now go make something fabulous for yourself. (And be careful sitting on chairs.)

Thursday, December 17, 2015

The Painted Shoes

Hello Readers. Today's project is another pair of shoes. What?!? Another pair? That's right baby! And they aren't even my shoes. So let's get started and I will explain what is going on..


I have a daughter and she really liked these shoes. They were off white, lacy and went with everything. Walking around campus has taken a toll on them. They are just dirty. We were not sure if they were washable. So, they just sat in the closet for a while.


It occurred to me that I could probably just paint them. They were heavy cotton and I know I can paint clothing. Why not cotton shoes?


I found some matching acrylic craft paint at the store for 50 cents. I applied it with a sponge, two coats on the really bad spots. They looked better right away. I let them dry overnight.


They came out great. They were a little rigid when they dried but my daughter wore them for a few minutes and said they softened up after walking around the house. She was very happy with them.


Thanks for reading, now go make something fabulous for yourself.


Wednesday, December 16, 2015

The Messy Neckline

Hello Readers. I hope this is a happy sewing day for you. My project today is a fix for the neckline of this shirt. I found it at a clothes swap and it seemed brand new or close to it. After I washed it the neckline was loose and coming out from the inside. I could have just ironed it, but I hate to iron and I would need to iron it every time I wore it. You know what that means? I would never wear it. 


Here you can see the whole shirt. It isn't awful, but it doesn't look sharp either. 


I stitched around the neckline once. I was careful of the pleats. This made that inner lining lay flat for good.


I wore it to a Christmas party recently with this sweet guy.


The big plate is mine. This could be a factor in the baby weight I am still carrying. Oops!


Thanks for reading, now go make something fabulous for yourself.

Tuesday, December 15, 2015

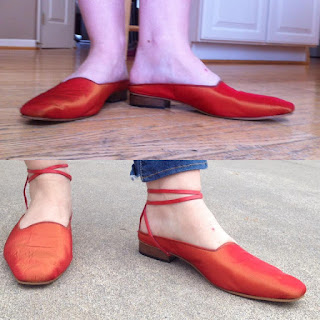
The Red Shoes

Hello Readers. I hope you are having a good day. I haven't done any shoe makeovers on this blog, so it's time for me to pretend to be a cobbler. I say pretend because I don't know much about putting shoes together. I am going to adjust these shoes a little. Let's get started.


 I was given these beautiful red shoes for my last birthday. (Thanks J.U.) The color and fabric are wonderful. They are comfortable, but they slide off a little too easily. 


They are hand made. There isn't enough "hand made" in this world if you ask me.


I found this soft deerskin cord at the fabric/craft store. It didn't cost much and it matched the shoes.


I started with my trusty hot glue gun. You can see from the picture it is well loved and well used. I glued the cord up against the heel. I glued on the bottom and up along the sides of the shoe. I tied the cord around my ankle first to see what the position would be when I wore them.


The cord comes up and back around the back of my ankle, I wrapped it around and tied it in a knot. This cord is so soft. The shoes are more comfortable and easier to wear.  I love how the cord looks as well. I have worn them a couple time already and the hot glue is holding well.


Thanks for reading, now go make something fabulous for yourself.