Thursday, September 29, 2016

The Baggy Skirt

Hello Readers. I hope you are doing well. I did a thrift store run recently because a friend posted that there was a 10 for $10 sale. (Thanks Toni!) I couldn't ignore a sale like that. I found this top and skirt. The top fit so my project today is the great skirt that was too big. You can see from the before pictures that is was baggy and unflattering. The drawstring held it up but it needed some help on the fit. 
Usually I just take in the side seams when I want to make a garment smaller. But this skirt had some cute stitching details on both sides as you can see below. I didn't want to lose those cute extras. 


I decided to remove the excess from the back. I tried it on inside out and marked where I needed to make my new seam. I stitched straight down the middle of the back of the skirt. Lots of skirts have a seam down the back, it won't stand out or look strange if this skirt has one too. I pressed the new seam to make it nice and smooth.


I liked this skirt mainly for the color. It is perfect for Autumn. Where I live it is cool in the morning but still hot in the afternoon. This is a great outfit for that kind of weather. You can see the new seam in the photo below on the right. 


I already owned the sweater, so it was $2.00 total for the whole outfit. I think that is pretty great.

That's all for now. Thanks for reading, now go make something fun for yourself.


Tuesday, September 27, 2016

Happy Fall Y'All

Hello Readers. That title reveals my slight southern accent (Is y'all a southern term?) but it is officially Fall now. It is still hot here but I decided to embrace the season by redecorating the front porch. Without spending any money!


I had this orange jacket/shirt thing from a clothes swap. They color is great for fall. It was too big for me to wear as it was and there was one thing I didn't really like about it. Can you guess what it is? The GIGANTIC knot buttons were just not my style I guess. I am pretty short so maybe they look big on me. They just felt so huge.


If I ignored the front, the back was nice and plain. I could use it to make anything to create something for my front porch. KC the Wonder Dog was there to help me.


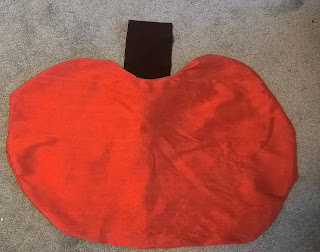
I cut out a vaguely pumpkin-ish shape. It isn't perfect, that is OK. I am going to make a pillow and when it is stuffed I think it will look even and balanced. And are pumpkins perfectly even and balanced? 


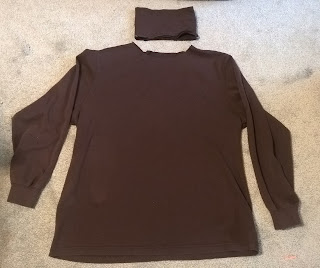
I also had this brown turtleneck shirt from the same clothes swap. It is a great shirt but I don't like the tight band around my neck. I feel like I am being strangled by them.


I cut the neckband off. I will save the shirt for another refashion another day.


Here is the back of my pillow. I sewed the center seam shut but left a small opening and left the knot button as a closure so I can stuff it. 


This is the front of the pillow. It is nice and plain. Maybe a little too plain. I will work on that too. And the stem needs to be more stem shaped.


I stuffed some plastic bags into the pillow. They are good for outdoor use and free! This pillow won't really be used like on a sofa or bed. So the crinkle of the plastic bags is OK.


I used a brown Sharpee marker to make curved brown lines down the pumpkin. It is subtle but it gave it more of a pumpkin look. You can see here I shaped the brown fabric stem as well.


There was a lot of fabric left from the arms. It's too much fabric to go to waste.


I put the arms together and made a long sash. I wasn't sure what to do with it yet. 


I used the sash on my door with a sign my daughter made for me when the little guy was born. I love it. The sash coordinates with the pumpkin pillow. My summer flowers are still in good shape so I tied some fall ribbon around the pots and left them on the porch.


*** KIDS CRAFT IDEA ***

This little pumpkin is a nice simple craft for kids. It is just a toilet paper roll wrapped in fabric. You stuff the fabric into the center of the roll. Thin fabric is best and orange is nice but not the only color you can use. 


Then you can twist a paper stem and stuff it in the center too. No messy glue needed!


Thanks for reading, now go make something fun for yourself.
Happy Fall Y'all!


Thursday, September 22, 2016

The Painted Jeans

Hello Readers. I did a really fun project recently. I saw some painted jeans on Pinterest that I couldn't resist copying. They were distressed and had cherry blossoms painted on the legs. Here is a link if you want to see my inspiration. These are a cheaper version of a designer pair the cost $500, according to what I read. I don't have $500 to spend on jeans so I made my own.

 I grew up near Washington DC and every spring the cherry tree blossoms would come out in the all trees along the tidal basin. The nation capital loses it's mind over this every year because it is so pretty. The trees are watched to predict when the blossoms will be at their fullest, it is part of our daily news and there is a huge National Cherry Blossom Festival.


I started with a pair of jeans that fit but were not my favorite pair. I didn't want to risk my favorite pair if it didn't turn out well. You never know.


I thought that I would like the jeans to be faded. So I soaked them in diluted bleach. It didn't turn out well. I have tried this before, I guess I am a slow learner. They did not fade evenly as I thought they would. I decided to go with it and see how it looked after painting them.


I got some paint from the craft section at Walmart. It was only 50 cents a bottle. It is basic acrylic paint that dries fast and doesn't wash out in the washer. (Wear old clothes or an apron if you try this idea.) The sponge brush came in handy as did a regular narrow child's paint brush. (Not shown.)


I smeared some white paint on the jeans randomly. It seemed to dry instantly. Then I painted black branches on the jeans too. I did it with no plan and no sketching first. I let the black paint dry for a few minutes.


I used the paint brush to add bright pink dabs of paint around the branches. It looked very bright but that's OK. I wasn't done. I didn't let it dry I went right into the next step.


I mixed some white and pink together for a lighter shade of pink and did a bunch of small dabs on the dark pink spots. Some dark pink showed through and some didn't. I had some nice variation in the colors. I didn't wait after this step either, I went right into the next step.


I added a little plain white paint on top of the light pink. Some of the paint started mixing together as I painted and that made it look even better. I was just doing tiny little dabs of paint with a small brush. Cherry blossoms are small and clustered together. I also thought I had covered the branches too much so I added a little bit more black on top of the black branches to make them show more.


I let it all dry over night and the next day I repeated these steps on the back of the jeans. I didn't do as much, just enough to coordinate with the front.

Here is the finished project, it was one of the most fun to do. I love painting and this was easy because it isn't meant to be perfect. They were really stiff at first but they got softer after one wash. It is a bit hard to see (Look closely.) the distressed knees that I added in the picture on the right because I was trying to show the cherry blossoms. 


Thanks for reading, now go make something fun for yourself.

Tuesday, September 20, 2016

The Blue Plaid Skirt

Hello Readers. How are you? Are you finding time to do some sewing? It can be difficult to fit it in. I have to leave my sewing machine out on a table and all my sewing supplies right next to it. If I had to get everything out each time I sewed, I would never get to it.
My project today is a skirt made from my husband's old button down shirt.


This was a great no-wrinkle shirt that he wore and wore until it was just too worn under the arms to keep wearing. He put it in the give away pile and I put it away until I came up with an idea to use it.


I cut it off right under the arms. The got rid of the worn spots. The placket down the front was a little worn too. I stitched the two front pieces together and now I had a tube shape. It's almost a skirt already. I will turn the shirt around and that new seam will be in the back. 


I also had these exercise pants. They were too small for me in the hips and legs. (Baby #3 has left his mark, if you know what I mean.) The waistband still fit so I had been saving them for a project just like this. I cut the waistband off and threw away the legs. 


I used pins to get the waistband centered on the top of the shirt. I put the right sides together and pinned it at the center of the front and back. I also pinned the sides. I did this so I knew how much space the fabric out as I sewed to distribute the blue fabric evenly along the black waistband.


I stretched the waistband as hard as I could and that made them the same size. I stitched them together and when I let the waistband go, it gathered the blue fabric evenly. Things don't always work that easily and you have to gather the fabric yourself as you sew. I used a zigzag stitch so it would have some give for putting on and off. I used white thread so you can see it in the picture. It is inside and no one will see it anyway.


Here is the skirt  as it came from the shirt. The hemline is a bit shorter on the sides because that is how the shirt was made. The front of the skirt is actually the back of the shirt so it is smooth and the seams are on the sides and in the back. 


I wore it on a short road trip. It was very comfortable and it never wrinkles. I think that's awesome because I hate to iron. 


Thanks for reading my blog post, now go make something fun for yourself.

Thursday, September 15, 2016

The White Lace Skirt

Hello Readers. I hope you are doing well. I am slowly getting over a nasty case of poison ivy. There are downsides to rural living. This is definitely one of them. I love not having traffic jams but the poison ivy is enough to make me move back to the big city.
 I was given this skirt. My daughter passed it on to me and I think she got it from a friend. Where ever it came from I thought it was really pretty. And it would cover the ugly poison ivy on my legs. The only problem was it was a bit big. It said size XS but it was really loose and shapeless on me. It is meant to be long and full but this was a little too full. The waist hung very low and that made the whole skirt almost drag on the ground.


It just needs to be taken in a little but it is such an open lace that I wasn't sure I could take it in. Some of the lace is so open it's not even there. How could I sew through that? I would need to use something to stabilize it. It had a lining built in, so really it is two skirts. And that got me thinking, could I use the under skirt to stabilize the lace skirt? Well, I could try.


I turned it inside out and made sure both skirts were smooth and flat. I moved the side seam in about an inch and sewed right through both skirts. This means they will be connected on the sides. What would that look like? I was going to find out very soon.


Here is the skirt inside out after sewing. The extra fabric got cut off. This is all acrylic knit so there will be no fraying to worry about.


You can see the side view here. It came out great. The outer skirt is still nice and full. The side seam didn't disturb the graduated sizes of the tiers. The waist fits now and the whole skirt fits much better. It is still nice and long but isn't dragging along the ground or tripping me up as I walk. I am quite clumsy, I need safe clothes that won't trip me up.


I wore it with long sleeves to cover up all the poison ivy, even though it was super hot that day. It would look great with a tank or a T shirt.
Thanks for reading, now go make something fun for yourself.