Wednesday, November 14, 2018

The Pajama Skirt

Hello Readers. I refashioned this fabulous set of pajamas recently. Check them out. They are so colorful and pretty. I was sure I could turn them into something wonderful to wear during the day.


These pajamas were a silky polyester. They looked a lot like silk but they weren't the real thing. They didn't breath like silk so I didn't want to keep them as sleepwear. Polyester pajamas didn't sound very comfortable to me.


These pants were very baggy. I thought I could make them into a skirt.


I cut the inseams open and spread the fabric out. I was going to keep the waistband, I just needed to remove the fabric that made up the crotch. I wanted to keep the loose fit because there was no stretch to this fabric.


I made a basic skirt shape. I couldn't make it too fitted but I could make it shorter.


I gave the skirt a big cut and made a new hem. It would be easier to wear at this length. Floor length skirts tend to trip me. (#clumsy)


I made the shirt a bit smaller. I didn't want to alter the shirt at all. I really liked it the way it was. I kept the shirt and skirt as 2 separate pieces so I could wear them by themselves or together.


I like the shirt tucked in the skirt but I think I like it untucked and loose even more. The drawstring waistband worked well in the skirt too. With a loose fit and an adjustable waist, I think I just found a great outfit for Thanksgiving!


I wore it to a charity dinner that my mom took me too. There was a trivia contest. My table didn't win y'all, not even close. But we had a lot of fun. Money was raised for Young Lives, a mentor and support group for teen moms.


Thanks for reading along, now go make something fun for yourself.

*Year end update- I still think this outfit is fabulous. It isn't very warm so it is put away until spring.

Friday, November 9, 2018

New Blue Shoes

Hello Readers. Have you ever wanted to change the color of your shoes? Maybe this issue hasn't come up in your life. This was an issue for me recently.


I know what you are thinking. Those shoes are really light blue. They are a unique shade of light blue for shoes. They are really comfortable and they have great arch support.
 But they are a weird shade of light blue. They are seriously the color of a 1992 suburban bathroom.


There is a solution. It is cheap, available on Amazon, and easy to use. It is called Angelus Leather paint. (They do not know me and did not pay me to say anything about them.) There are so many colors too. I had navy paint, so I used it.


There was a little brush that came in the bottle but I didn't like it. I used a larger brush. The paint was easy to apply to the shoes but it dries very fast. I worked in little sections and tried to spread the paint evenly. I jabbed the brush in and around little nooks and crannies to cover everything. I needed to add a second coat of paint to some spots.


The finished look of the shoes was nice and still looked like leather. I was afraid the paint would look too thick or look plastic-ish, but it looked great. It added a little shine, like I had polished my shoes with shoe polish.


I didn't paint the inside of the shoe. I didn't know if the paint would come off on my feet over time so I just painted the outside. The inside doesn't show anyway. I like the navy color much better than the original light blue color. It went with my jeans better anyway.


Thanks for reading along, now go make something fun for yourself.

*Year end update- It has been 2 months since I painted these and they still look great.

Wednesday, November 7, 2018

Cheap Porch Decor

Hello Readers. How is your Autumn going? It is cooler and finally feels like "sweater-weather" where I live. I like to decorate my front porch to reflect whatever the current season is. I was excited to get ready for Fall. I did something different this time, I used a pallet and a cable spool on the porch this year. They were free. You can't get cheaper than that.


I also use some really old paint that has been sitting in my basement for who knows how long. But that made it free. (Does everyone else have a lot of old stuff down in the basement?) I choose white because I like it and it will go with anything. Yes, I spilled some in the garage.


I remember dragging this pallet home from my neighbors driveway. It was heavy and I had to carry it uphill. They put it out for trash and you know what that means. It is up for grabs, so I took it.
 I painted the pallet white all over with my old white paint. It was going to be on the porch, so I didn't worry about being too perfect. I just tried to cover all the surface.


Here is my cable spool. I dragged this home from a different neighbors driveway. They were moving and were giving a lot of stuff away.


The spool also got a couple of coats of that old white paint.


Here is my porch. The horizontal slats made the pallet a great plant stand and the spool is a great little table. I am planning a white winter/snow/snowman porch coming in Winter and these will look good then too.
 All of these white flowers came from a third neighbor who had too many and gave some away. Yep, that's right. For free.

*****     BONUS TRACK     *****

One more idea for cheap outdoor/porch decor. Cinder blocks are great for outdoor projects. Cheap and durable. This plant stand was made by my friend Patti. I love how she painted the blocks and the wooden shelves different colors. It is so fun and eye-catching.


Thanks for reading along, now go make something fun for yourself.

*Year end update- The pallet and the spool are still on my porch. White was a great choice.

Friday, November 2, 2018

Making Tight Clothes Bigger and Bigger

Hello Readers. Do you have any clothes that have grown too tight? Is it just me? Life happens, aging happens, clothes get too tight. Read on to see how I made clothes "grow" to fit me.


This dress was soft and stretchy so I could technically get it on my body. You can see how tight the dress is on my dress form, and this dress form is a little smaller than I am.
 I couldn't wear it this tight.


 I decided to cut the bottom of this dress off and make a shirt. I cut along the seam and saved the lower part of the dress for later.


 I cut along the side seams to open the shirt. I cut the seams from the bottom, all the way up to the ends of the arms. I wanted the shirt completely open on the sides to insert extra fabric and make it bigger.


I also cut this black shirt up for material. I cut strips of the black fabric to put into the sides of my striped shirt and make the shirt wider. I thought 2 of these black strips, 1 on each side, would make the shirt big enough.
 (I was wrong. I underestimated, but that's OK. Read on.)


 The side pieces looked great but the shirt was still a little tighter than I wanted. I should have made the black pieces bigger.


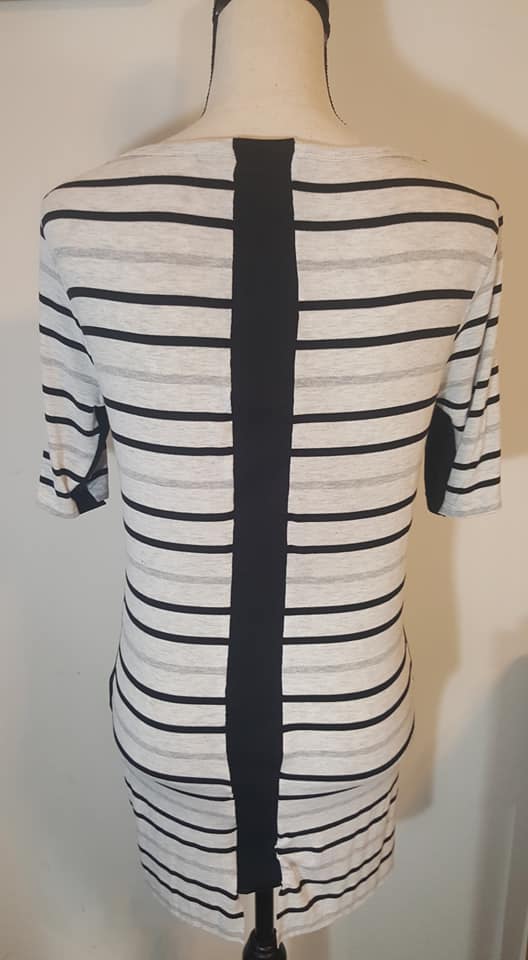
I could have taken the side pieces out and put in larger pieces. That would have been a lot more work. I decided to add a strip of black fabric down the middle of the back of this shirt. It added about 2 inches. That was just right.


Remember that piece of dress I cut off? I added some of it to the bottom as a waistband. I used the part with the hem already on it. It made the new shirt look more finished. And I really liked the contrast of horizontal and vertical stripes.


I kept the shirt long enough to tuck in but I also like it out so all the stripes show. I wore this to a kids birthday party last weekend. It was perfect. (Until I dropped red sauce on myself when I was pigging out on home-made spring rolls. Oops!)


Thanks for reading along, now go make something fun for yourself.

*Year end update- This shirt became an instant favorite. I am still loving it.

Friday, October 26, 2018

Denim Days; Jean Jackets

Hello Readers. I found a couple jean jackets a clothes swap recently and they will be the last post in this denim series. I gave this first jacket a glitzy upgrade with bits of trim to dress it up.
 

The jacket fit well but I decided to shorten the sleeves to a 3/4 length just for fun. I started adding trim and ribbon to the jacket. I didn't have a real plan. I put the trim where it seemed to fit best. I put some at the waist, collar, front panels, and in the back. I also tapered the sleeves a bit too.


I kept adding trim until I was afraid I would start to look like a Las Vegas show girl if I didn't stop. This was a fun sewing project because it cleared out some trim from the scrap collection and there was no wrong way to do it. Anything was OK. I just kept stitching until I felt done.


*****     JACKET TWO     *****

This second jacket was basic and simple in a good way. It would go with anything and everything. It was almost perfect. I just wanted to shorten those really long sleeves. Why were the sleeves so long? (Why are my arms so short?) If I rolled up the sleeves they will be very bulky. I really need to shorten them so I can wear this jacket.


I wanted to keep that original cuff but I also needed to remove some of that fabric. I unpicked the stitches and took the cuff off. I removed about 3 inches of fabric from the sleeve and then I reattached the cuff.


I used heavy gold thread made for jeans so the stitching would match the rest of the jacket. This thread made the jacket look like it had always been the way I fixed it. It isn't expensive but it it so thick, you get less of it on the spool. I think it's worth it though.


I can now wear this jacket and use my hands too. It sounds like a small issue but it is annoying when your arms are never long enough.


Thanks for reading along, now go make something fun for yourself.

*Year end update- I had so much fun with these jackets. The ribbon jacket can dress up anything and the plain one goes with anything.


Wednesday, October 24, 2018

Denim Days; Much Too Distressed

Hello Readers. I was overly distressed. Well, my jeans were overly distressed. It was my own fault. I am the one who distressed them.


I loved these pink jeans and those rips and holes were great in hot summer weather. They were like built in air conditioning. It is getting colder and colder so the holes were not nice to have anymore. Maybe I got a little over-enthusiastic with my distressing, I am paying forr it now.  I could stop wearing them until spring comes... but I don't want to.


I decided to line the inside of the jeans behind all the holes and stitch them closed. At least I wanted to try and close the holes the best I could. I chose this brown fabric because it had some pink in it and it was already in my sewing stash. (Using scraps is free!)


 I put the brown fabric into the leg of the jeans and stitched the holes with a zigzag stitch. Some of the holes closed and some of the holes are a little open to let the brown floral fabric show a little. I didn't try to make it perfect, distressed jeans have a messy lived-in look. I didn't want to lose that.


 This is the view from the inside of the jeans after I was done with my sewing. It looks pretty crazy.


I cut off the excess material. It is still a little crazy looking but no one will see that when I am wearing the jeans. 

  The view  from the outside is distressed but the holes are closed. (Is it just me or does the leg on the right look like a face. A sleeping face. Weird.)

I like the closed up holes. The jeans still look distressed. I like that look. I was warmer too, that was my main goal.


*****     BONUS TRACK     *****

Do you have any boot cut jeans in your closet that you haven't worn in a while because they seem too wide at the bottom of the legs? Mine felt like bell-bottoms compared to my skinny jeans.


I wanted to taper the jeans just a little so they were more of a straight leg fit. 


I made them a pinch smaller from the knees down. It was simple but made a big difference.

 Thanks for reading along, now go make something fun for yourself.

*Year end update- These jeans are both worn often, but the pink jeans are 100% my favorites.