Showing posts with label Alterations. Show all posts

Tuesday, April 28, 2026

Make a Cropped Shirt Longer

 Hello Readers. I love a matching set. Give me a two-piece outfit. I loved this blue set but the top was a little more cropped than I wanted. Let's make it a bit longer. 

 Before and after.

This top was cute but I am 53 and I have had 3 kids. My stomach does not need or want to see the light of day. I prefer to keep it hidden away. If this shirt was a bit longer it would cover my mommy tummy when I wore it with the matching high-waited pants from the set.  

 I decided to open the seam at the hem of the shirt and add this trim. That would add about 2 1/2 inches of length to the top. 

 I used my seam ripper removed the stitches all around the hem of the shirt. 

When the hem was opened, I could iron the hem flat. This was precious length that I wanted to have on my shirt. 

Next, I sewed the trim to the hemline of the shirt. I sewed around the hem of the shirt and made the shirt look nicely finished, and it made the shirt longer. 

 I loved the outfit. It was light weight cotton and would be great for summer. I made a matching bracelet too. You can read about it in the previous post. Thanks for reading along, now go make something fun for yourself.  

Tuesday, March 10, 2026

More Tiny Alterations

 Hello Readers. I love to sew but I don't always make large or elaborate projects. Sometimes I just need to make a small or tiny change to improve how things fit. 

 Before and after.

 This shirt was so pretty, I liked the embroidery and the full sleeves. I thought it was too long to leave out and too bulky to tuck in. Let's give it a cut in length. 

 I cut the shirt tails to make a shorter shirt. This fabric will fray for sure so I needed to give it a new hem. 

 I sewed a new hem along the bottom of the shirt.   

 These velvet jeans were so cozy but too long.

 
  I just cut the bottom of each leg and then gave the jeans a new hem too.  

 I liked the new fitting outfit better. This was quick sewing but the clothes feel better when they fit better.  Thanks for reading along, now go make something fun for yourself.  

Wednesday, March 4, 2026

Tiny Alterations

 Hello Readers. I always seem to be altering my clothes. (That is how this sewing blog started back in 2015.) Clothes just don't seem to fit and I feel the need to "fix" them. This skirt and shirt are like that. 

 Before and after. 

 This shirt was a mini dress that my daughter made into a tunic. She did not really like how it fit so she gave it to me. The brown in the plaid matched this skirt so let's make them work for me. 

 I decided to make it into a very simple top. I cut the sides straight and the length a bit shorter. 
 
I sewed the new sides and hem back together.
 
  I wanted a basic t-shirt fit instead of the tunic style. 

The skirt was really nice but just a bit loose and saggy, it needed to be just a little more fitted. 

I sewed along the side seams to make new side seams. I only took about 1/4 inch off each side. I didn't want it too tight I just wanted it to fit me a little better.  
 
I cut off the excess and used a zigzag stitch along the edge to prevent fraying. 

 These two piece fit much better now and I liked them together. Thanks for reading long, now go make something fun for yourself.  


Wednesday, June 19, 2024

Pencil Skirt Adjustments

 Hello Readers. I started sewing about 25 years ago because everything always seemed too long on me. I am short y'all. Like real short. I am 5 feet tall. Not 5 and some inches, Just 5 feet. They don't usually make clothes for my height. Not off-the-rack, and not in my budget anyway. So, I started sewing to hem my own clothes. I sewed more and more over the years because it was so worth it. Alterations are expensive but they can make a huge difference in how clothes look.

What are we hemming today? Skirts.

This skirt was a fun summer print that I loved but was a bit big at the waist and of course, too long.

I made new side seams and took about an inch from each side. I shortened it and I was done. 
 
My new shorter skirt fits so much better. But wait there is more. 
 
I had a second skirt that needed the same treatment. It was too big around the waist and just a little too long.
 
 This skirt had Dachshunds all over it. I really can't resist wild, unique or colorful fabrics and I loved this skirt because of these little guys. 
 
It reminded me of my most loyal staff member, Assistant Creative Director Gordon. He can't sew but he's cute.
 
I cut it shorter and hemmed it and I took the waist in just a bit. 
 
I was so much happier with the fit of this skirt now. Thanks for reading along, now go make something fun for yourself.


Tuesday, February 14, 2023

Simple Resizing Ideas

 Hello Readers. Sometimes our clothes get too small. And maybe sometimes too big? Life happens. Stress, cookies, illness, age, it can all change our weight and shape. Today's post is about some simple resizing techniques that I have used and that always work for me.

Before and after.

This outfit needed some help. I was loving the neutrals but the fit of the clothes was all wrong. The sweater was mine and got too small like 5 years ago. Pandemic snacking changed everything. The corduroys were such a nice warm camel color. I got them from a clothes swap and was determined to make them work.

I got to work on the pants first. The easiest way to make them smaller was to turn them inside out, try them on, and mark where I wanted them to fit. I sewed along the side seam and made a new seam. I only needed an inch or so off each side to make them fit better. I also had to hem them because I am short.

The sweater was going to take a little more work. But it wouldn't be hard to make the sweater a little bigger so I can wear it again. I am going to cut it open on the sides and fill in the gap with a ribbon.

I used my scissors and cut the seam open. 

I used a zigzag stitch to sew over the lace and I made sure I was stitching along the edge of the sweater where I had cut it open. I left some extra ribbon at the end so I could fold it under for a nicely finished edge at the wrist.

Here is the finished sweater. The sweater is bigger because the ribbon added 2 inches to each sleeve and 4 inches to the body of the sweater. You could use wider ribbon to add more space to it. The length of the sweater is unchanged.

My whole outfit fits so much better This picture turned out a little weird but it showed the lace added to the sweater so well, I decided to use it.
 The best thing about these methods to change the size is that you could use the same idea for making the sweater smaller and making the pants larger. Using the side seam as the guide for sewing new seams or adding something into the seam is an easy way to go. Thanks for reading along, now go make something fun for yourself.
 
***Year End Update- I love anything cashmere so I am still wearing this sweater all the time. It matches a lot and beige corduroy pants in winter are a go to item.


Wednesday, October 5, 2022

Altering Clothes while Wearing Them

 Hello Readers. Have you seen the videos of people cutting and altering their clothes while they are wearing them? I always thought it was a crazy idea so I decided to try it. I love crazy ideas. I wanted to see if it would work for me. 

Is this a good idea?

 
I was able to cut it and I tied it in the front. It doesn't look terrible at first glance but is this a good idea?
 
I really tried to cut it straight but you can see how ragged and uneven it is. 
 
I used my serger to make this more even and smooth. 
 
I ironed the edge and tuned it under twice. The stitching gave me something to hold onto but I really didn't want the stitching to show.
 
I stitched the edge with a straight stitch to make it nice and neat.
 
It is done! The edges are actually sewn and even. It looks nice. Can you alter clothes while wearing them? I would say, not well. 
Thanks for reading along, now go make something fun for yourself.
 *Year End Note From Chickie- I love this blush pink shirt. I won't try to cut clothes while I am wearing them ever again.


Friday, November 2, 2018

Making Tight Clothes Bigger and Bigger

Hello Readers. Do you have any clothes that have grown too tight? Is it just me? Life happens, aging happens, clothes get too tight. Read on to see how I made clothes "grow" to fit me.


This dress was soft and stretchy so I could technically get it on my body. You can see how tight the dress is on my dress form, and this dress form is a little smaller than I am.
 I couldn't wear it this tight.


 I decided to cut the bottom of this dress off and make a shirt. I cut along the seam and saved the lower part of the dress for later.


 I cut along the side seams to open the shirt. I cut the seams from the bottom, all the way up to the ends of the arms. I wanted the shirt completely open on the sides to insert extra fabric and make it bigger.


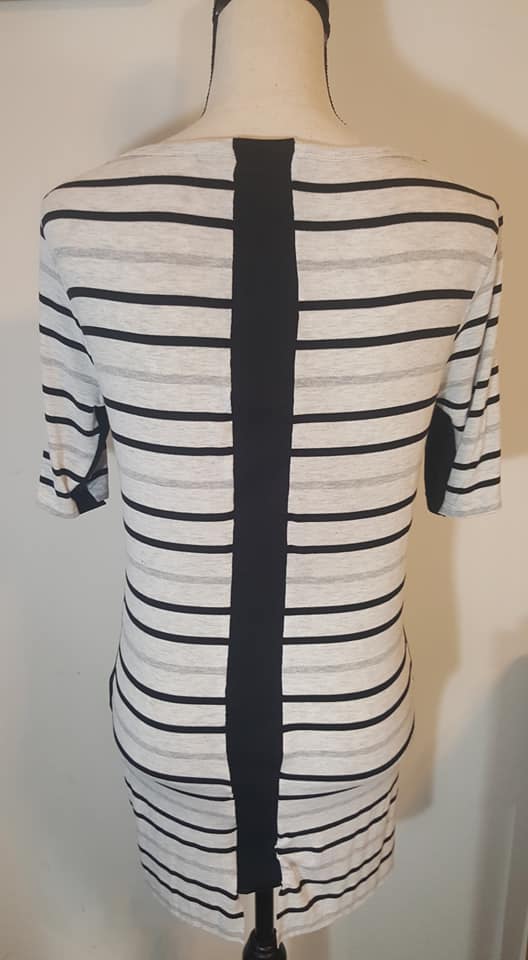
I also cut this black shirt up for material. I cut strips of the black fabric to put into the sides of my striped shirt and make the shirt wider. I thought 2 of these black strips, 1 on each side, would make the shirt big enough.
 (I was wrong. I underestimated, but that's OK. Read on.)


 The side pieces looked great but the shirt was still a little tighter than I wanted. I should have made the black pieces bigger.


I could have taken the side pieces out and put in larger pieces. That would have been a lot more work. I decided to add a strip of black fabric down the middle of the back of this shirt. It added about 2 inches. That was just right.


Remember that piece of dress I cut off? I added some of it to the bottom as a waistband. I used the part with the hem already on it. It made the new shirt look more finished. And I really liked the contrast of horizontal and vertical stripes.


I kept the shirt long enough to tuck in but I also like it out so all the stripes show. I wore this to a kids birthday party last weekend. It was perfect. (Until I dropped red sauce on myself when I was pigging out on home-made spring rolls. Oops!)


Thanks for reading along, now go make something fun for yourself.

*Year end update- This shirt became an instant favorite. I am still loving it.