Friday, September 24, 2021

Resizing Jeans

 Hello Readers. The only reason I started sewing was to make my clothes fit my body. That's it. I am short and I needed to alter clothes. I had kids and I also needed to dress them and myself on a budget. A very small budget. There are a lot of social and environmental reasons to thrift and buy second hand but my main motivation in the beginning was money. I was a thrift store shopper and I found out about clothes swaps. The beauty of clothes swaps is that they are totally free. The down-side is the size options are limited. You have to get lucky and find your size or make what you find into your size. 

Today"s post is about 2 pairs of jeans. One pair was too baggy and one pair was too tight. Let's start with the loose pair. These jeans were a hand-me-down and they were a little baggy. That is great because I can size them down and make them perfect for me. 


It is not hard to alter jeans. The first step is to try them on inside out and mark where the new side seams should be. Don't make them too tight. Make sure you leave room for the new seam and for you to move comfortably. I like to use a pencil and mark the waist, hips, thighs... all the way down the leg. Don't worry about length just yet.

It is possible that your new side seams will need to be right where the belt loop is. If that happens, just remove the belt loop with a seam ripper and then stitch it back on when you are done with the jeans. 

You can see the new side seams I made in this picture. I did not need to remove that much to change the fit. I made the jeans smaller and then tried them on. I was able to see where the jeans fit well and where I needed to make the jeans smaller. You can see I went back a few times on each side to make the jeans fit really well.

When the jeans fit like you want, it is time to make them shorter if you need to. Always hem them last because you won't get the right length until the fit is correct.

I like to use matching gold thread in the hem. I barely had enough to finish these jeans. I did not use the thick gold thread on my bobbin (It's too thick.), I used this denim blue thread in my bobbin. 


 My new jeans are ready to go. What about the tight pair?

These jeans were so tight, they hurt me to put on. I think if something is hurting you, you should avoid that thing. (*Life Tip-This applies to people too.)


I knew an easy way to make these jeans bigger. I was going to add something to the jeans. That something was this wide grosgrain ribbon. 

The first step was cutting the side seams open on the sides of these jeans. I cut the jeans open from the waistband to the hem. 


Here is a look at the new side seams. I used my sewing machine to connect the ribbon to the denim. It added 3 inches on each leg and 6 inches to the waist and hips. Your measurements will be different from mine so choose ribbon that works for you. 

These jeans fit so well now, I can move, breath, eat... That is all I wanted. 


I hope these ideas help you as much as they helped me. Thanks for reading along, now go make something fun for yourself. 

***Chickie's Year End Review-I am still wearing and liking these a lot. The gold stripes are a favorite.


Wednesday, September 22, 2021

Dress to Sweatshirt

 Hello Readers. Sometimes when I am at clothes swaps or getting hand-me-downs I find something that I really like but it does not really like me. Like this purple dress. 


This dress was by a sports brand and was supposed to be moisture wicking and it was super soft. I just did not think it was flattering on me. It was fitted around the hips and stomach. It really clung my mommy tummy and it was loose on top. And these sleeves are super long on me. It made me feel out of proportion. Why would I want to wear a dress that did that? The fabric was so great though, I knew  I could do something with this.

 I decided to cut the skirt off...but not all of it. I left a few inches as a waistband. 

The skirt was actually 2 layers of material. You can see I cut the inner layer of the waistband shorter than the outer layer. 

I connected the 2 layers together along the cut edges. 

Here is a view from the inside of the waistband. The connected layers won't ever show from the outside. By cutting the inner layer shorter it made the outer layer turn under and into the shirt.

From the outside the sweatshirt looks like that waistband was always there and not something I just came up with one day in my sewing room. 

I had to shorten those sleeves. My arms are really short. I made these sleeves a 3/4 length. You might not need to shorten the sleeves. You probably have normal adult length arms, you can skip this step. My arms are really short, sleeves are always too long on me.

What about that skirt piece that I cut off? I stitched those cut edges together and I had an tube.

It was a perfect infinity scarf. Winter is coming, I will want a scarf on cold days.

What will I wear with it? How about this casual denim skirt?

This skirt just needed a little reshaping. The length was decided for me based on that cargo pocket. I did not want to lose or bother to move the pocket. #lazysewing I just cut and hemmed the skirt on the bottom after making the waist a bit smaller.

I was happy with my casual outfit. Is anyone getting dressed up anymore? Formal wear in 2021? No way!


Thank for reading along, now go make something fun for yourself. 

***Chickie's Year End Review-A casual top and a denim skirt are 2 of my favorite things.


Friday, September 17, 2021

Bold Patterns

 Hello Readers. Do you love patterns? Do you love color? Do you love stripes? Do you like them all at the same time? Have I got the dress for you!

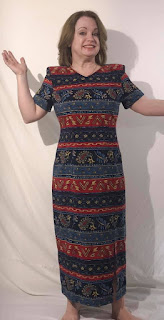
This dress fit really well but there was a problem with the length. It was very long on me. I loved the fabric of this dress. It is like a whole party in a dress! How could anyone not like it?

I needed to make this dress work on a very short woman. (Me!) I started by cutting the top off the dress. I made my cut under the zipper in the back. I am glad I did because it made a subtle peplum shape. I thought it was great.

I definitely took these out. 

The shirt was cute by itself.

What about that skirt piece? It could have been a matching scarf. But I didn't really want a scarf.

  The skirt had a big slit in the front. 


I sewed the slit closed and cut some fabric from the top. I wanted to keep the hem in the skirt to save time. I added an elastic waistband. I know the elastic doesn't look that pretty but you wont see it so its OK.

Here is my shorter skirt. The pattern and stripes made the slit blend in well.

My new 2 piece dress was complete. It was really fun and colorful and fit so much better now that it was shorter. I think the 2 pieces will be more versatile than a 1 piece dress. 

Thanks for reading along, now go make something fun for yourself.

***Chickie's Year End Review-I haven't worn this again. I haven't gotten dressed up as much as I usually do. Maybe next year.

Wednesday, September 15, 2021

Wide Shoulders

 Hello Readers. Sometimes things are not what you think they are. This shirt for example. I thought it was a dress until I put it on. It was a weird length.I am SUPER short and this was really short on me.


 It was too long for a shirt and too short for a dress. I wasn't sure what was going on here. Was it made to wear with leggings? I still do not know the answer. The fabric was amazing. It was soft and thick. This shirt was heavier than your average t-shirt but not as heavy as a sweatshirt. I knew it could be fabulous as soon as my daughter gave it to me.
 

I knew I wanted to make this shirt shorter. I started cutting the bottom of the shirt. My first step was to cut the bottom into a point.
 

The next thing I did was to cut the back of the shirt straight across. I only wanted that point in front. Then I cut that front point in 2. It seems like a lot of cutting but the fabric is knit and will not fray. 


The next step was to tie those 2 pieces in front into a knot. It makes a nice shape and adds a lot of interest to the shirt. 
 

We could stop there but I have been wanting to try an idea that was shared online from @blueprintdiy on Instagram. She refashioned a white t-shirt with wide shoulders but did not use any shoulder pads. It looked really cool. I cut the bottom of the sleeves off at an angle. It looks a little messy but its going to be OK.


 The next thing I did was tuck the whole sleeve into the shirt. This made the shoulder 2 layers thick. The 2 layers make the shoulder a little stiffer and it stands out a little. 


This was the shape I got. It was a fun shoulder detail but it wasn't a huge padded shoulder from the 1980's. It was more of a hybrid cap-sleeve.


I wanted the sleeve to stay inside the shirt while I was wearing it so I stitched the sleeve to the shoulder. I did this by stitching along the seam that was on the shoulder. Sewing in the seam means you couldn't see my stitches. 
 

 I just followed the seam at the top of the shoulder.
 

I also stitched around the new opening of the armhole. I thought it would look nicely finished. When I was done, I cut away the excess fabric inside the sleeve.


I was done sewing and it was time to go to work. I like to tuck-in the knot on the front of the t-shirt. It is an easy way to get that half tuck to stay in place.
 

Thanks for reading along, now go make something fun for yourself. 

***Chickie's Year End Review-I love this color and this shirt was a fun project. It was great for work too.