Hello Readers. One thing I learned from Covid was that my life and my body are always changing. I wanted to make a top that would always fit me. A top that would adjust to my changing size and shape.
I am a short, thrifty, creative upcycler refashioning clothes & more. On the cheap!
Thursday, May 8, 2025
Making a Wrap Shirt
A wrap top would be the best.
A while back I recovered this stool cushion with this fabric. I had some left over. It was a weird L shape and there wasn't much of it. Could I make something to wear? I always try to use my scraps so I don't waste fabric.
Here is a close up. It's such a great design. The wild print is going to help me.
I made the L shape into more of a square. You can see the new seams here. I didn't try to match the pattern to hide the seam, the wild print will hide the new seams well enough. I wanted a wrap shirt so I needed a front and back that were the same size and shape.
I made 2 equal pieces with 1/2 of an oval in each for the head hole. I used a sewing machine to connect the shoulder seams. If I had more fabric I would have made the top longer but as long as the 2 pieces are equal the shirt will fit well. (At this point I noticed that there was a JoAnn Fabric's logo on the edge of the fabric that I had to cut off.) I made sure my design was right side up on both pieces
I made sure my design was right side up on both pieces before I sewed the shoulders together. I didn't want a bunch of upside-down faces on one side of my shirt. If I had used a solid/stripes/polka dots, this wouldn't be something to consider. When I put it on the dress form I thought it looked really short.
I was right, it was really short. This is all the fabric I had so I was going to have to keep going with it. My shirt will be a cropped length but you can make any length you want.
I didn't want to lose a millimeter by turning the edges under and I needed ties at the waist so I used bias tape to finish the edges.
The bias tape wraps around the edges to cover them. I sewed the bias tape around all the edges and the neck hole. I used extra long pieces at the waist that would be used to tie the shirt around my body. That might sound confusing...
Bias tape close up! The bias tape is like a... taco and the fabric is the filling. (And now I want tacos.)
Here is a better look at the whole shirt. The blue bias tape is a great finish for the sides and neck. I used the bias tape along the waist also. I made the bias tape at the waist so long that it hangs off the edges and it can tie around my waist.
The shirt doesn't have closed sides. I create sides when I tie the shirt on myself. The ties from the front piece are tied in the back. The ties from the back piece are tied in the front as you can see above. The ties are adjustable so this shirt will always fit comfortably.
I wore the shirt over a simple straight skirt with a very high waist, that way the shirt is the star of the show. Thanks for reading along, now go make something fun for yourself.
***Year End Update- This top is so sweet. It's the best. I could never find it at the store. That is the beauty of sewing. It is fun and I love it.
Wednesday, May 7, 2025
Container Gardening Without Containers
Hello Readers. I am not a master gardener but I do like to have a little veggie garden every year. I only grow things that are easy to grow like tomatoes, beans, and this year, lettuce. I am trying a new method for the lettuce. This idea won't require me to buy containers, because containers can be expensive. I want the fresh veggies not big expenses. I only had to buy the bags of garden soil. And the seeds of course.
Sometimes we need easy inexpensive ideas.
This plan started to form in my head when I saw these shelves that my neighbor was getting rid of. (Yes, I am the neighbor looking over the trash before the trash truck comes down the street.)
These shelves were similar to this set of shelves. The parts all pop together to build it. My neighbor was getting rid of 2 shelves and that was what I wanted for this project.
Before I could really set it all up the way I wanted, I had to do some prep work. You can see what happened when I got some rain. The water is just sitting. I needed some drainage holes.
To make holes I got the power drill. I drilled small holes in the low areas of my shelf. The size of the holes isn't that important, but having some drainage is necessary.
I spread the table cloth over my 2 shelves. I am sort of pretending the shelves are some kind of side table. This plastic tablecloth will make the whole thing look a little better. It is also safe to leave in the weather on my deck all summer.
I used rubber bands to secure the tablecloth to the legs. The bags of soil will hold the tablecloth down, it won't blow away. I just don't want it blowing around and flapping in the wind.
I also poked a few holes in the plastic tablecloth so water won't collect in it. I felt around for the low areas and poked holes where I had drilled holes in the plastic shelves. This will allow excess water to escape.
Now it is time for the bags of soil. These are really the most important part of this project. I can't plant seeds at all without this.
I set the bags in place on my little garden table and poked a couple holes in the bags themselves. Then I flipped the bags over so those drainage holes would be on the underside. Water can run out of the bottom of the bags, and through the tablecloth and shelf.
After I made sure the holes were on the underside of the bags I carefully cut the top sides of the bags open.
I wanted to used the bags as containers. I cut them open but made sure the sides were intact and tall enough to hold the soil in. I added water to moisten.
I got my lettuce seeds. I wanted lettuce because I like salad. These seeds do not need to be planted very deep. These bags are 4-5 inches deep so they won't be big enough for larger/deeper plants. I think for my lettuce or maybe small herb plants this is going to work fine.
I planted my seeds as the packet directed. And kept the soil moist.
Look at this! They sprouted! I can't eat them yet but I wanted to show you my bargain garden idea. Thanks for reading along, I hope it inspires you to try and find a garden spot where ever you are.
Tuesday, May 6, 2025
The Darth Vader Sweatshirt
Hello Readers. I am reposting this sweatshirt from 2017 in honor of Star Wars Day/May the Fourth Be With You/Revenge of the Sith/May 6th. If none of this is familiar to you it's all part of being a kid from the 80's who really loved Han Solo.
I loved this Darth Vader shirt. He is supposed to be so evil but really he just wants to share freshly baked cookies with everyone. How bad could he be if he has cookies for everyone? I am going to have to rethink my opinion of him.
Before and after.
This shirt got hit with some bleach and it is looking a little worse for wear. Darth Vader is fine but he needs a new home.
I had this nice gray sweatshirt with black trim just hanging on my
refashion rack. I could put these two shirts together couldn't I?
I cut the cute picture off the bleach stained T-shirt. After looking at
it I decided to round the corners of the picture and make it smaller.
I wanted to stitch the picture onto the sweatshirt. I didn't want the
fabric to move or pucker. To prevent that I pinned the picture onto the
sweatshirt and then I basted the picture with a needle and thread to
keep it even more secure.
I used my machine to attach the picture to the sweatshirt and tried to
sew slowly so I didn't mess the whole project up. (Darth is counting on
me.)
The cashier liked this kinder gentler version of Darth Vader too.
I am happy to say that the fabric and my sewing machine got along well
and it turned out well. It isn't dressy or super sophisticated but
sometimes a mom needs a sweatshirt. I even
stopped at Starbucks for a latte. (Stereotypical suburban mom.)
Sunday, May 4, 2025
May The Force Be With You
*Update- It's Star Wars Day or May 4th. I decided to share a flash-back to this Star Wars t-shirt my kids gave me back in 2016. I still wear it on a regular basis because one of my first memories is going to see the first Star Wars movie. I think I was 6 or 7. I have been a fan of the movies and in love with Han Solo ever since. I really liked this shirt because it looked like it was made when the first movie was made.
Hello Readers. I hope you are enjoying the beginning of summer. (If it is summer where you live.) I was so excited about the new Star Wars movie that my two big kids bought me this T-shirt. It was a big men's style shirt, perfect for playing around with.
I started by cutting off the neckband. It opened up the neckline and made it more comfortable.
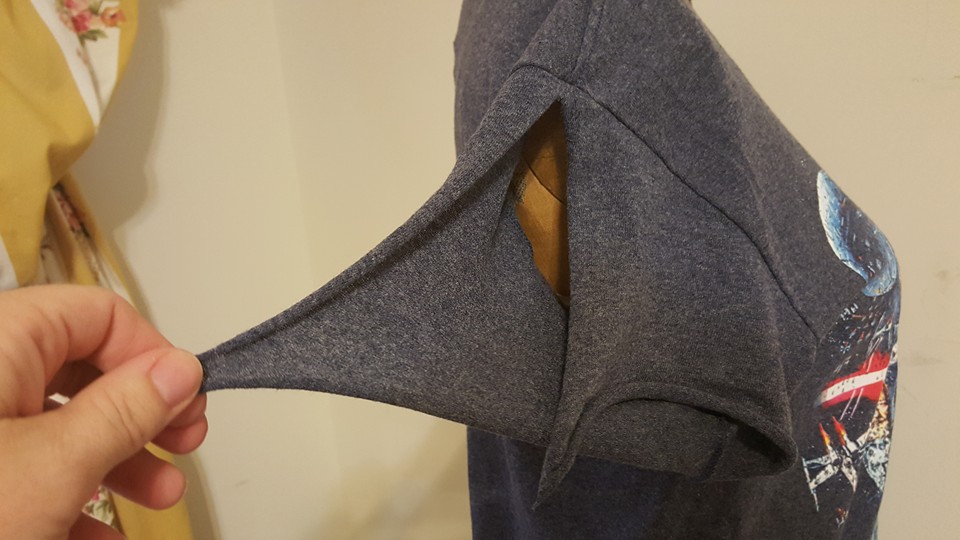
I cut off the serged end seams from the arms. I also cut up the middle of each arms.
I pulled and tugged the cut corners to make them longer.
Then I tied them together in a knot. The opening added a little ventilation but left the coverage of sleeves.
I also took a little off the waist so it would be less bulky when I tucked it in. It looks funny here but it looked better when worn.
Here is my shirt. It is casual and comfortable. Perfect for...
chilling out in the backyard kiddie pool with this little guy.
*Look how little he was! Oh, my heart!
Thanks for reading along, and may the force be with you.
Thursday, May 1, 2025
Tablecloth to Top 2
Hello Readers. Yesterday I posted about a shirt I made from a tablecloth. I liked it and I was super happy with it but what about the scraps? Let's talk about them. They were almost a shirt already. So... I made a second shirt.
My second shirt from this tablecloth.
I made this shirt first.
The table cloth pattern looked great on the back of the shirt.
This piece is what was left from the tablecloth when I was finished with the first shirt. When I looked at it I thought it looked like a halter style top.
I cut the top bits off so I could get to the sewing machine.
I turned all the cut edges under and stitched them down.
I needed a string of some kind to tie around my neck. I sewed some bias tape closed and used that.
I made a narrow casing across the top of the front of the shirt. I put the string through and tied it around my dress form's neck. This was coming together pretty well.
I needed to close the back somehow.
I used elastic to gather the top edge and sewed the 2 sides together.
Thanks for reading along with this accidental adventure. Now, go make something fun for yourself.
Subscribe to:
Posts (Atom)


.jpg)
.jpg)