Showing posts with label Dress to Skirt Refashion. Show all posts

Tuesday, October 1, 2024

Use Shirring as a Waistband

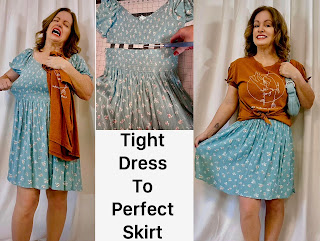
Hello Readers. This dress was such a nice Robin's Egg blue. It had pretty shirring through the body. I like the shirring but it did not like me. Or more accurately, it didn't fit me. I could still do something with it and keep that wonderful Robin's egg color. I could make a skirt. It would be so easy because the shirring would make an almost instant waistband.

Before and after. 

The shirring was a little tight. It was not comfortable around my chest and I didn't like how tight it was at all.
 
I cut the top of the dress off. That was the the part that was so uncomfortable. I measured 4 inches and used the lines of elastic as a guide to make a straight cut. 
 
I used my serger to finish and close up the cut edge so it would not fray. I "serged" all the way around the skirt. (Here is a inexpensive beginner serger. If you are considering adding one to your sewing room.) The serger makes a strong edge so you could leave it like this. But we can make it prettier. 
(*You can use a sewing machine and a zigzag stitch on this cut edge. It will work well but it might not be as neat. We are going to hide it so it won't matter in the end.)

I used my sewing machine to stitch down the waistband with a zigzag stitch. (Here is a good beginner sewing machine to start some basic sewing projects.) I wanted it to be able to stretch and give with it's elastic. I folded it in and under and stitched all the way around the waistband. Folding the waistband in half so the new waistband is 2 inches wide. 

The shirring made a great elastic waistband. It would be comfortable and stretchy and easy to wear. The shirring made it so pretty too. 

It was a fun match for this t-shirt. Thanks for reading along, now go make something fun for yourself. 

***Year End Update***- This was comfortable and cute. I love this skirt.


Thursday, December 28, 2023

Ruffles for Dressember

 Hello Readers. I hope you are having a happy holiday season. I have been talking about the Dressember fundraiser all month. I have been wearing (And refashioning!) dresses all month to participate. I am on a team with my daughter. You can learn about our team here. It isn't difficult to participate, consider joining us next year. All you have to do is sign up and wear a dress. (Approx 75% of the victims of human trafficking are women. The dress is a symbol of those women.) 

This is my last refashion of 2023. It is a fun project to end the year on a cheerful note. I do not remember where I found this dress, it was from a thrift store or a clothes swap, I know that much. (Scavenging, that's how I roll.) 

Before and after.

This dress was too tight in the bodice but the ruffles! I had to save the ruffles! The only way to do that was to make this into a skirt. 

I cut the dress to remove the top. I left enough fabric to make a casing for some elastic. These ruffles are made of chiffon. I hate working with this fabric. It frays like crazy and slips around a lot. All I had to do was make the waistband so I tried to just get it done quickly. 
 
I put the edge of the chiffon through my serger to keep it from fraying. 
 
I put the elastic through the casing. I connected the ends of the elastic and then stitched the casing closed. You can see the lining of my new skirt here. It is a nice cotton knit material, like a t-shirt. Whoever made this didn't choose the cheapest nylon/polyester lining material they could find. They actually chose something comfortable! 
 
My new skirt is so fun! And it matched this flower pin that I have had for years and years and never wore. What a way to end the year. Thanks for reading along, now go make something fun for yourself.
 
***Year End Update- I caught a cold for Christmas so going out was not going to happen. I love these ruffles and they will be worn soon. 


Friday, December 9, 2022

Dressember #3- The Vest Dress

Hello Readers. I am trying to wear dresses (Or ties.) all month to raise money for Dressember and awareness about their work to fight human trafficking and forced labor. Fashion in general has serious problems with it's labor practices. The Dressember organization has taught me more about the problem. Go to Dressember.org to learn more about this global issue.

This black dress was simple and classic and the vest really appealed to me. I really wanted the vest by itself. I wasn't sure what the skirt would look like by itself, but I was curious.

Before and after and after.

I thought I could remove the vest easily and it would be really a great men's wear style layering piece.

I found the connection between the skirt and the vest and knew I could unpick those stitches and pull them apart. 

This is what the vest looked like inside when the skirt was taken out  I needed to put the vest back together. 

The vest had an inner layer/lining. I tucked that layer into what I am going to call the waistband. I just had to figure out how to make it look nice and neat. 

Here is a look at what I came up with. It seemed like the easiest way was using iron-on tape and ironing the vest lining into place.

I liked the vest by itself so much. The pink tie was perfect for Dressember.

The skirt was so well put together that it came out of the vest in great shape. It just needed a little finishing up at the waist.

I turned the edge under and stitched it down with my sewing machine and I did a little hand sewing and made sure the clasp was secure. 

This skirt was a fabulous classic midi length and I was so happy I was able to save it. I liked it just as much as the vest. I think these 2 separate pieces will be more useful and wearable on their own. Thanks for reading along, now go make something fun for yourself. 
*Year End Note From Chickie- I like both of these pieces. If I grow the vest won't fit anymore. The skirt has plenty of room though. Clothes are weird.


Friday, June 3, 2022

Tight Tiger Transformation

 Hello Readers. I am really getting into animal prints this month. Today's post is about a dress. I think it is a tiger stripe print with some leopard spots mixed in? I am not sure but I did like the pattern and colors.
 
 Before and after.

This dress was a little too tight in the chest but the pattern was so wild, it is hard to tell. I didn't like the buckle right under my chest either. I needed to keep what I liked about this dress and fix what I didn't like.

I started by cutting off the part that didn't work for me. I cut the whole top section off. When the parts of a garment that I don't like are out of the way it is easier to see what I have left to work with.

I used my serger to sew the cut edge together and make a waistband. This dress was going to be a midi length skirt now.

I liked this new length skirt better. I could move the gathers and that big buckle down so the whole thing looked more like a belt. It was more comfortable with the buckle lower. (It wasn't poking me in the rib cage anymore.)

My new skirt was easy to wear and I liked it so much better. Thanks for reading along, now go make something fun for yourself. 
*Year End Note From Chickie- I still like the colors of this skirt and I think I put it away for warmer weather. I think I should get it out and try to winterize it. I still like it so much.