Friday, April 27, 2018

A Too Bright Dress; Part 2

Hello Readers. Today is the second part of my BRIGHT red dress.

 
You might need sunglasses for this dress. 

My last post was about a top I made from this red dress. I also had a purple shirt with bright red stripes in the same shade on my refashion rack. The purple shirt was a little tight in the shoulders so I never wore it. It's been hanging on my refashion rack for over a year. Recently I saw that the colors matched and decided to use the shirt with...


Remember the bottom of the dress from last time. I had the skirt leftovers, so I wanted to find a way to use them. I don't like to waste large pieces like this skirt. I was happy to put them together somehow. That skirt piece is almost a complete skirt already. It just needs to be finished.


I cut the arms and shoulders off the shirt. I now had a sort of tube top. I flipped it upside-down and attached it to the red skirt. The finished hem of the shirt became finished edge at the top of my dress. Flipping it upside-down like this saves me time sewing and finishing what I am sewing.


I don't really trust strapless dresses.They always let you down. Literally. Gravity always wins, and the dress starts to fall down. I used the sleeves of the shirt to make wide straps for my dress. I could relax and be sure my dress would stay up.

I liked how comfortable it was and it's super bright colors brighten up my day. It was very warm the day I made this, I was thinking of warm summer days. It got very cold the next day, so I will have to wait to wear this dress again. That's OK, warmer weather is coming, I'm sure of it.


Thanks for reading this post, now go make something fun for yourself.

*Year end update- I like this dress and it was great in the summer when it got warm.

Wednesday, April 25, 2018

The Too Bright Dress

Hello Readers. This bright red dress caught my eye. It was hard to miss.


I mean this is B-R-I-G-H-T! These photos don't really do it justice. I think the red was too much for me because it didn't have anything else going on. It is just red, red, red. It was also really low cut. It was too low for me to show you how low. But trust me, it's crazy low.


I wasn't kidding. Why is this dress so low? Who could wear this? The neck line is lower than my chest. It's not really wearable. Even a shirt under it looks a little off.


I thought there was a simple solution. I started by cutting out the tags as close to the seam as I could..


I cut off the bottom of the dress. Now I had a fun top. I also made it a little more narrow in the arms and body. I liked the elastic waist and left about 5 inches as a peplum.

I have a plan for that leftover skirt piece too.

I turned it around and wore it backwards. I liked the bright red as a top. It is bright and fun but there is less of it and it isn't overwhelming like it was as a dress. I left the lower edge unhemmed because the sleeves had a raw cut edge. If the sleeves could have raw edges, so could the hem. 
I also didn't want to make the shirt any shorter by turning it under and making a real hem. This knit material wouldn't fray, so I wasn't worried.
 

Thanks for reading, now go make something fun for yourself.
 I will show you what I did with the skirt part of this dress next time.

*This was such a great top in such a great color. It was tragic when I got ink on it and could never get it out.

Friday, April 20, 2018

The School Marm Dress


 Hello Readers. I found a dress that is too juvenile and yet makes me look really old at the same time.

Here is a look at the front and back of this amazing dress. It looks like what I would call a jumper, a shapeless dress for a little girl. The straps make me think of a school uniform. But it also looks like an old granny dress. I felt old just trying it on. 
So, why did I even bother with this dress? The fabric was some of the nicest I have ever worked with. It was a super soft warm wool blend. That would be nice because we are not having Spring where I live. We are just continuing with winter until the end of time apparently.


This dress had a side zipper and I didn't want to take it out and/or put it back in. That meant I couldn't take the sides in on this dress, so how would I alter it? I decided to take it in in the back, right down the center. Lots of dresses have a seam down the back, it would work for this dress too.


My finished dress is on the left. The piece of fabric on the right is what I took out of the back of this dress to make it more fitted. I also made it shorter at the bottom. I thought shorter would be more flattering and less school marm.


I needed a white shirt to wear under it. I don't own a white T-shirt. I should, but I don't. I had this cropped shirt in my refashion stash. The chances of me wearing a cropped shirt and letting the world see my mommy tummy are less than 0%. I was just saving this shirt to use for spare parts. It would be great to wear under this dress if it was less baggy.  


The sleeves of this white top fit well, so I just made the body more narrow. I wanted it to be fitted under the dress.


I think this shorter more fitted dress is a lot nicer than the original. It is still a jumper style dress but I like it so much better.

Just a side note: I found out that my phone has a feature to lengthen legs in photos. From now on you can assume all my photos are altered to make me look taller.

Thanks for reading this post, now go make something fun for yourself. 

*Year end update- I still wear this dress with the white shirt. I wore it last week.

Wednesday, April 18, 2018

Fixing Up the Front Porch

 Hello Readers. My sewing machine was in the shop for a few days last week so I had to find something to do that didn't involve sewing.


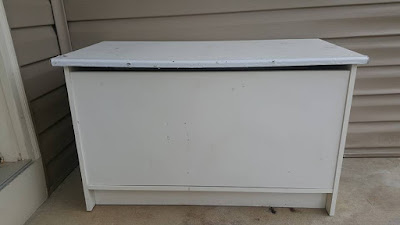
 It all started with this white trunk. It was given to me (Thanks Carmen!) and I used it for a toy box but it was too tall for the little guy to reach the toys. I thought it would be good for outdoor storage and seating. It just needs a little dressing up for spring.


 I started with some fabric samples I had in my closet. My mother-in-law used to work at a fabric store and I have lots of old fabric samples waiting to be used. They are nice because the edges are all finished. They are small but they worked to cover the top and a little of the front and sides.


 I also had these 2 seat cushions. They seemed to fit the trunk well so I tried to make it look like a bench, with cushions on top.


 The seat cushions had ties in the back and I tied them to the hinges inside. I didn't want them to fly away in a storm. This was really helpful because we have had a couple windy days. If I have to go outside and bring e-v-e-r-y-t-h-I-n-g inside every time it starts to rain,,, no thanks.


 I added some other pieces and I was done for now. I haven't done any other gardening or flower planting because it is hot one day and freezing cold the next. Mother Nature seems a little confused this year, I am hoping for warmer weather soon.


That is all for now. I hope you are having a nice Spring. Thanks for being a reader!

*Year end update- These colors transitioned into the fall very well. I later killed the flowers accidentally.

Friday, April 13, 2018

Return of the Free T-shirts

Hello Readers. Free t-shirts are everywhere. You can't escape them.


  At least I can't escape them. I think they multiply at night. I had an idea I wanted to try. I wasn't sure how it would turn out.When I was at the local rec center a few months ago, I found this table. It's free t-shirts! I hate to turn down free anything, so I took a few. I used some back at Valentine's Day.


The thing about free t-shirts is that they are always advertising or promoting something. I didn't want the writing on my shirt. I decided to cut the front of the shirts off and use the backsides of the shirts. I wanted to make something simple and classic, with no writing. Can you make a shirt out of 2 backs? Is that possible? We would find out.


I used my machine to attach the two back pieces together to make one complete shirt. There was one little problem. The white shirt had writing on the sleeve. I didn't like that so I decided to cover it.


I cut a small pocket shape from the front of the red shirt and sewed it onto the sleeve to cover the writing. It was easy and worked like a charm.


Here's the thing? Even I, the maker of this shirt am not sure what side is the front now. Should the red be in front or the white? 
Either way is fine really. It's like 2 shirts in 1. What a deal!


Thanks for reading, now go make something fun for yourself.

*Year end update- This shirt was great for layering. It was eaten by my terrible washing machine. I replaced it as soon as I could.

Wednesday, April 11, 2018

A Fun T-shirt Update With No Sewing

Hello Readers. Sometimes I get ideas from my daughter for projects. She is very helpful. She came home with this shirt and asked me to fix it up for her. She even had an idea of what she wanted. I love T-shirt refashions, so I got to work.


The shirt was pretty inspirational all on its own. The only problem was that it was kind of shapeless and big. It was the only size available but my daughter didn't like the fit nearly as much as the positive message it had on it..


I started by cutting off the lower hem. I wanted a raw cut edge for my next step.


I folded the shirt in half so I could find the center of the front of the shirt. I cut a little piece of fabric from the front and a big piece from the back. It looks a little weird here doesn't it?


This is what I ended up with. I wanted the two hanging tabs in the front. The shirt is shorter now but I didn't change the size of the shirt anywhere else.
If you look closely you can see the logo on the right sleeve. My daughter had a plan to hide that.


I rolled up the sleeves twice and I put in a few stitches to hold the rolled cuffs in place. Rolling the cuffs hid the logo on the sleeve. The red shirt looks great without the logo.


The two tabs in the front get tied in the center and it draws the whole shirt in at the waist. I didn't want to make the shirt too short. You can make your shirt whatever length you want to fit you best. The shirt still has a nice loose fit but is not as long and shapeless anymore.


My daughter was happy with how this shirt turned out. I kept the basic shape and size but it is a little more fun and cute. It is perfect with high-waisted pants.
Thanks for reading, now go make something fun for yourself.

*Year end update- My daughter still likes this shirt and wears it often.

Thursday, April 5, 2018

Making Tight Shorts Fit

Hello Readers. I have been using up fabric scraps lately and today's post is no exception. I used some tiny pieces from my last refashion to expand the waistband on a pair of denim shorts.
 Do you ever have trouble finding pants that fit in the waist and the hips? It seems like they never work together to fit all of me. The hips might fit but the waist doesn't, and vice versa. This post is about making pants work for you.


I started a simple pair of denim shorts from the thrift store. This idea would work on a pair of jeans too. The waistband was too tight for my friend Abigail. She asked me to  fix them for her and she had an idea planned out.

The waist is so small, who can fit in here?

She wanted me to insert some extra fabric into the waist to make these shorts more comfortable. I agreed, it was a great idea and I wanted to see how it would work.
I cut the sides right at the existing seams. I am going to add fabric to both sides of the shorts right inside these cuts. 


I cut 2 triangular shapes from the leftover scraps from the denim dress I was working on recently.  I made them a bit larger than I needed so there was extra for a 1/4" seam allowance.


 I used my sewing machine to stitch these little denim triangles into the shorts. It was easy-peasy until.......


 My machine jammed up and it wouldn't budge. I was stuck and in need of a sewing machine doctor. 


 It's OK. I know a guy. If you need sewing machine repair, he can help. His website is on the bottom of the card. He had my machine back in shape in no time.


 I liked the dark denim with the lighter colored denim. I finished the shorts and got them to my friend Abigail.


She tried them on and they fit so well. They look really cool too. 


I hope this idea works for you. Let me know if you try it. Thanks for reading, now go make something fun for yourself.

*Year end update- These shorts were for someone else, but she really liked them when she got them.