Showing posts with label Curtains. Show all posts

Saturday, December 7, 2024

Fixing a Curtain With Big Holes

 Dear Readers. Hello from my house. I found these holes in my curtain and it seemed like the identity of the vandal was obvious. It had to be Gordon. No one else in the house is that height and no one else took the blame. Who did this doesn't really matter, I really wanted to repair the curtains. 

He is really sorry. Let's fix this. 

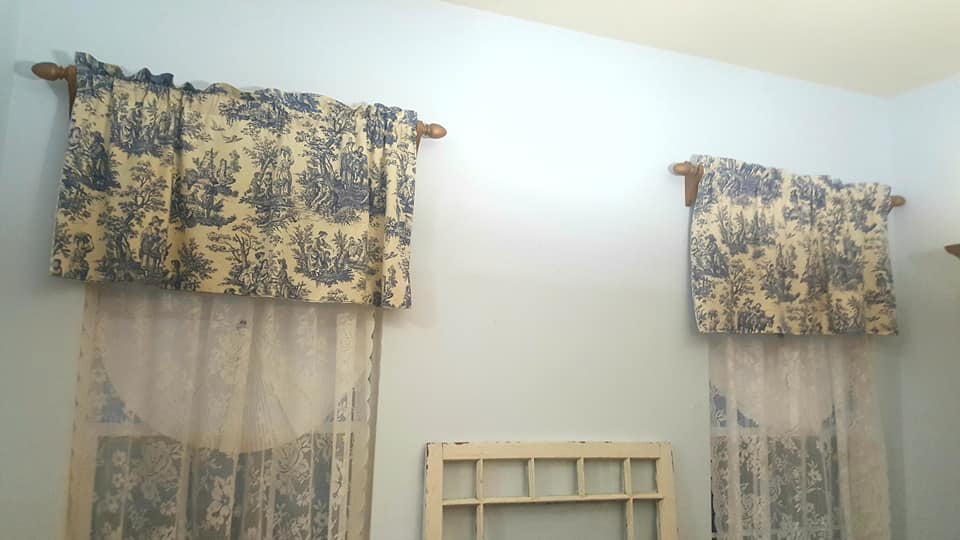
The curtains are actually one large panel. They were custom made and then returned to the decorating shop my mother-in-law worked at. She bought them with her employee discount and gave them to me. I can't afford to replace them so I wanted to try and fix this in some way. All the damage was on the left. The holes were too big to just sew the holes together. What else could I do?

Could I remove the section of curtain that had holes? That would mean removing the the 2-3 feet of fabric on the left. I decided to take the curtains down and take a better look. 

I got up on a step ladder and took the curtains down. 
 
 My curtain hung on little hooks but the way it is hung won't really matter for this fix-it job. 

I stopped for a quick wash. Since I had the curtains down, I might as well wash them. 

I used sharp sewing scissors to cut off about 2 feet from the width of the curtains. My curtain had stripes woven in it. That helped me cut straight up the curtain. I wanted to have an even straight cut to make a new side of these curtains. This was a lot to cut off one side but I wanted to try it and see if it would look OK when I hung it back up.
 
I folded the newly cut edge under twice. I needed to make a new seam to finish this side of the curtain. I made this new seam as small/narrow as possible. This curtain is going to be more narrow now but making the smallest seam might help a little. 
 
I hung the curtain up the way it was before and kept hoping it would cover the whole window. It did, but not quite as full and fluffy as before.
 
The curtain is more narrow now. But it looks so much better with out the big holes in it. If you try this fix your curtain will be a little more narrow too. That isn't necessarily a terrible thing. As long as the curtain covers the window, or most of it, I was happy.
 
Gordon has been spending time thinking about what he did and he promises not to eat curtains again. Thanks for reading along, now go fix your curtains too. 
***Year End Update***- Gordon has not eaten any other home decor items. What a good boy.


Friday, August 2, 2019

A Curtain Refresher

Hello Readers. Today's post is not about clothes. It's about curtains. I decided to dress my curtains up with some trim that I was given.

Before                             After

My sweet mother-in-law cleaned out her sewing room and passed along some great stuff. My house has a lot of blue and white so that is what I gathered together. I found enough pom-pom trim to dress up all of my curtains downstairs.

I added the blue pom-poms because they were so fun. And because there was enough of it to do the whole job. The blue really adds a pop of color to the valances. The curtain on the left is finished. The curtain on the right is waiting for trim.

I added the blue and yellow fringe trim to the fabric blinds on the windows. These are heavy enough to block the hot summer sun from coming in and making my house too warm. The fringe adds a fun touch.

This is my dining room. These valances were straight along the bottom edge. I wanted them to match the other valances. My house is really open and you can see every room at once. I like the curtains to match each other room. Different colors and fabrics can look like a crazy mess when the rooms all join each other.
(There are toys and kid stuff everywhere so it's still a crazy mess. The curtains won't change that, but the the windows will look nice and neat. Notice that none of these pictures show  any of the floor, that's where the kid mess is.)

I used a curved valance as a guide and cut the straight curtains to match.

I added the blue pom-pom trim and hung them back up.

This is the front room, now every room is matching a little better.

Thanks for reading along, next time we will be back to the clothing.
***Year End update-  I'm not sure if this is a true refashion. I still like the blue toile curtains. I am glad I added the trim. I am still very happy my mother-in-law gave me all the trim.

Friday, August 3, 2018

Bedding Fit For a King (Sized Bed)

Hello Readers. My mother in law recently gave me a pile of sheets she didn't want anymore. They were pretty and matched my bedroom.It was great!

The only problem was the size. There were twin and queen size sheets. I wanted to make them fit my bed somehow. I decided to combine them all and make a duvet cover for a comforter.


I saw first that the queen size sheet was big enough to cover the top of the bed. One side of the duvet would be made of this red queen size sheet.


For the other side of the duvet I used the twin sheets. The red center is a fitted twin sheet. I cut off the elastic and cut it into a rectangular shape. The yellow sheet I cut in half and attached to the sides of the red sheet. It hangs over the side of the bed so lots of the pretty yellow fabric shows. I was liking how it looked so far.


The only problem was that the red fitted sheet ended up a bit shorter than the other sheets. I needed to add something to the top to make it longer.


I decided to add this tiny piece of curtain to the top of the red sheet. It is actually a very small valance. It came from my mother in law too. (She is very nice.)


You can see where I fit it in to the sheets at the top. The straight lines made it easy to stitch together.


I can use either side of the duvet cover and the sheets are machine washable. I can throw it in the wash all the time as needed. It is open at the top so I can put a quilt inside for winter.


I need to wash this all the time because of these 2 troublemakers. They are always spreading dirt around the house.


Thanks for reading this post, now go make something fun for yourself.

*Year end update- This is on my bed right now as I type this update months later.

Friday, May 25, 2018

Making Pillows

Hello Readers. Today's project started as a spectacular shirt covered with dogs.


***   PILLOW 1   ***
Seriously, check out this material. I assume the dog is out enjoying the great outdoors and hunting the ducks? This just isn't my style. What should I do with this shirt? I have been thinking about this for quite a while. Even if this shirt fit well, I wouldn't really want to wear it.


I realized there was someone that would like this shirt a lot. I needed to alter it for them. I started by removing the collar. I had come up with an idea for that collar. I also removed one cuff. I was going to need that too.


I made the cuff a little more narrow and used it as a connector to connect the collar together in the front. I needed the collar to fit a really big neck.


 Here is the guy who is going to wear his collar. I turned the shirt inside out and sewed it into a square shape. The buttons let me open it and stuff a pillow inside. Every dog needs a pillow right? He has never caught a duck but he would if he could. He can't, he's slow and lazy.


 Here you can see how much he loves his new dress-up collar and his new pillow. He always looks a little depressed but he really liked it when I put the pillow down and let him rest his big head on it.
 I like how the pillow stays on but can be removed and washed.


You can see the collar here. He looks like a sharp dressed dog. The cuff had a button and button hole already sp it is a perfect way to make the collar big enough for K.C. the Wonder Dog.


***   PILLOW 2   ***

This second pillow started as a small curtain. I hung it up so you could see it. I liked this fabric a lot but I didn't need a curtain. I thought I could turn this into a pillow instead.


I folded the curtain over and onto itself so that I was making a tube. I then closed up one open end.


Here is my pillow form. It will go inside of the curtain pillow.


Here is my pillow after I stitched the final edge closed. I stitched around the edge twice to make it strong and to make it look nicely finished.


The blue, white and yellow fabric matched my family room. This new pillow fit right in. It is comfortable for lounging, and we all need to lounge right?


Now my dog and I both have a pillow. Thanks for reading, now go make something fun for yourself. Or your dog.

*Year end update- These pillows are still being used. My dog loves his pillow. Actually he loves any pillow. 

Thursday, May 11, 2017

The Tablecloth Curtains

Hello Readers. Sometimes you find a fabric that you just love. That is what happened to my friend K.F. She had curtains from a fabric that was no longer being made. But she really wanted to use them.  


After looking and looking she found a tablecloth on EBay. She asked me to rework the curtains and tablecloth to fit her windows. I did some measuring to be sure of my plan. And then, I measured again.


I took 2 valance curtains like the one below and cut them into 4 pieces. I was so careful about my measuring to make sure the 4 pieces would be equally distributed when they were hung on the windows. That required some division and even some algebra. My high school math teacher was right! I did use it again! 


When I cut the curtains I opened the seams and then made new side hems. I kept the rod pockets in the same place.


Here are the "new" curtains on the windows. The curtains block the morning sun from hitting them in the eyes while they eat their breakfast. 

Check out that gorgeous teapot collection!

For the second window I used the tablecloth. It was a basic rectangular tablecloth. It had a nice scalloped lace edge all around it. I decided to use and show that trim as much as possible.


I folded the curtain in half so it would be 2 layers thick. The first set of curtains were 2 layers thick and it gave them a nice weight. It also keeps the front from fading in the sunlight coming through the windows. I made them the 20" length K.F. requested and that left just enough for a top edge piece to show off a little more of that trim. 


Here is the curtain over the sink. There was a serious problem neither of us had thought of. The fabric hung right against the light. The light is actually resting on the fabric. Can you say fire hazard?!?

I made a house call to fix it. I don't often sew for other people, but when I do I try not to start a fire. 


A little pinning and tucking pulled the fabric up in the middle just enough to prevent any fire danger but block as much of the bright morning sun as possible. 


*****     BONUS TRACK     *****

My vintage dress form was getting a little beat up from all my sewing. I had put a tank top on it for some protection but it didn't cover the lower half. Some of the form was getting damaged. I found this stretchy nylon dress at a clothes swap. It was exactly the thing I needed. It was way to tight for me to wear but it was perfectly tight on my dress form. The tight fit doesn't add any bulk under clothes and the nylon dress lets clothes slide on and off easily. 


That's all for today. Thanks for reading, now go make something fun for yourself.