Thursday, January 30, 2025

Purple Palooza

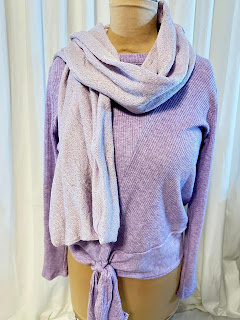
 Hello Readers. I like to sew and that means there are a lot of fabric scraps. My daughter and my Mother-in-law also like to sew. That means there are even more fabric scraps at my disposal. I always want to try and use them. I don't like to be wasteful and fabric is expensive. Let's make a scarf from some pretty  purple scraps. 

I went on a purple binge. 

These were the scraps I had to work with. This was a very soft knit material. I really liked it but it was small and oddly shaped. 

This soft purple fabric was a bit gauzy and my serger had a bit of trouble with it. My sewing machine would have torn it up completely. As it was I broke 2 needles working with this fabric. I connected the pieces of fabric with the right sides facing each other. 
  
It kind of looked like this, 2 long narrow pieces. I wanted to connect them into one long narrow piece because scarfs are usually long and narrow. I sewed 2 short ends together but left an opening to flip it all right side out.

I wiggled the right sides out of the scarf. 

I sewed the opening closed by hand with a needle and matching thread. 

The material has a nice drape so it makes a great scarf. 
 
 I thought this shirt matched the scarf. The shirt had a tie at the waist that would be in the way if I tried to tuck the shirt in. I always tuck in my shirts so I needed to change this. 

I could cut off both pieces of this tie and I could sew this opening closed.

I clipped the sides together. 

This was easy to sew closed. 

I could wear the finished shirt untucked but I can tuck it in if I want. 

I loved the color of this belt with this shirt and scarf but the length of the belt was way too long on me. That's OK, I had a plan to fix it. 

So I cut it. That's right. I just cut it with a pair of sharp craft scissors and left the cut edge. It was leather so it wont fray or fall apart. The belt buckle will hide this cut end anyway so it won't really matter how it looks.

I used sharp scissors with a tip and made a hole at the right spot for me. It doesn't look as nice as the original but this buckle will hide the hole I made too. I kind of stabbed the belt and turned the tip of the scissors in a circle until I had punctured the belt. It was not difficult. I just had to apply a little pressure. I had the cutting mat under the belt so I did not damage the table. 

The design of this buckle hides all my cutting a hole making. The buckle fits in the hole I made and the belt looks just like it should when it's worn. No one knows I cut it and made holes in it. well, no one but you. (Shhh, don't tell.)

I was really feeling all this purple. The belt was great with this shirt and vest. (Yes, I have purple sneakers. Don't judge.) Thanks for reading along, now go make something fun for yourself.


Wednesday, January 29, 2025

Alter a Houndstooth Skirt

 Hello Readers. I loved this skirt. It seemed so classic. I loved the hounds tooth pattern. It was a soft corduroy fabric. I decided to take it in a little to make it fit.

 Before and after.

This seemed like the kind of skirt that would go with anything and everything. I am trying to remember that I need neutrals in my closet too. I am always attracted to colors and patterns but they don"t always go together. 

I tried the skirt on and marked where the new side seams should be. The length was perfect the way it was.

I cut off the excess fabric so I could make the new side seams.

I liked the skirt a lot. It was so quiet and neutral but still had some fun and some pattern. Thanks for reading along, now go make something fun for yourself.


Tuesday, January 28, 2025

The Changeable Sweater

 Hello Readers. I love green but this sweater has been sitting on a hanger waiting for me to fix it. It was just confusing because I wasn't sure how to wear it.

  Before and after.

This sweater was a bit weird. It had the biggest turtleneck in the world but no sleeves. That seemed strange to me.Was it even a Turtleneck? Was It supposed to be off-the-shoulder? I really did not know. I liked the color though. It was a bit large too. The armholes came down too low. They would show bits and pieces they shouldn't.

I decided to resize the sweater by taking in the sides. That would keep the armholes from showing stuff they shouldn't.
 
When I took the sides in, it made little cap sleeves at the armholes. The turtleneck was still very large.
 
The armholes were so much better. I could wear it as a big loose cowl neck or...

I could wear it around my arms. Maybe this is what it was supposed to look like? I'm still not positive either way.

I liked it under a sweater too. Thanks for reading along, now go make something fun for yourself.


Thursday, January 23, 2025

Velvet T-shirt

 Hello Readers. This loose velvet jacket was a little to loose and flowy for me. I thought the fabric was nice, what could I make from it? I wanted a simple black top so that is what I made. (I forgot how difficult it is to photograph velvet. I seems to completely absorb all the light.)

 
Before and after. 
 
When jackets are cut like this is makes loose flowing front panels. It looked nice enough but I didn't really want a jacket. I could really use a long sleeve shirt.
 
Because of the shape of the jacket there was a lot of fabric in front.  
 
I wanted to close the front of the jacket like this. I could sew it up and it would be a mock turtle neck shirt. 
 
I sewed the front of the shirt where the pins were. 
 
I also took in the sides and sleeves a little. That would improve the fit of my new shirt.  
 
I turned the top around so the front was in the back. That new seam I made could be in the back. 
 
The back of the shirt could be the front. It was a loose mock turtle neck. That is just what I wanted.
 

Thanks for reading along, now go make something fun for yourself. 


Wednesday, January 22, 2025

Resizing Bat Wings

 Hello Readers. I am trying to replenish my supply of long sleeve shirts. It is SUPER cold right now and I am cold. I liked the softness of this shirt but that was about it. Let's change it up so I do like it.

Before and after. 

This shirt was nice and soft. I really liked how it felt. The sleeves were wide bat wing style sleeves. They also had brown buttons along the sleeves.Why brown? I did not love that. The over all length was a bit too long for me too. I decided to make the sleeves more narrow first. 

You can see the buttons on the sleeves here. These sleeves were so wide I decided to remove this entire row of buttons and the fabric they were on. 

This is the inside of the sleeve. I could remove this band of fabric that the buttons were on and it would make the sleeves more narrow at the same time. 

I used my serger so that it would sew and cut off the extra at the same time. I could have cut off the extra and used a zigzag stitch too. 

I cut off some of the extra length. The shirt was just a little too long on me. I reattached the hem at the bottom of the shirt so it would look nicely finished. 

I wanted to be able to wear this shirt tucked in or out and now I can do that. This will be a nice layer under other clothes to stay warm. Thanks for reading along, now go make something fun for yourself. 


Tuesday, January 21, 2025

Dress to Shirt

 Hello Readers. I liked this dress but I didn't need it. I really needed some long sleeve tops to layer under sweaters. My part of the world has become arctic and I need more long sleeves. Could this dress be a shirt? Sure it could.

Before and after.

This knit dress was like a long T-shirt. I needed some long sleeve shirts so I decided to make this dress into a shirt I could wear more often. Especially in the cold weather we have been having. 

This dress had a waist seam and I decided to cut the skirt off about 3 inches below that seam.
 
I removed the zipper from the back of the dress. I had to cut it in the middle when I shortened the dress anyway. I unpicked all the stitches and took out the zipper completely.
 
The back of the new shirt was open like this. That's OK. I can now sew the 2 sides back together. It went over my head fine without the zipper. 
 
I sewed up the back seam and it only took a minute. 
 
This is the inside of the new shirt. I wanted to sew the bottom of the shirt to the waist seam. That would create a waistband of sorts at the bottom of the shirt. 
 
Here is a look at the shirt from the outside. You can see how the bottom looks like a waistband. It's an easy way to finish the shirt without buying anymore sewing supplies. 

I liked to little floral pattern with this cream colored outfit. Thanks for reading along, now go make something fun for yourself.