Showing posts with label Waistband. Show all posts

Friday, November 26, 2021

It's a Funny Story

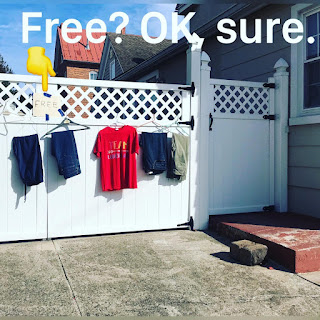
 Hello Readers. In the beginning of the year I decided to try and refashion for free all year. I wasn't going to buy anything, even from thrift stores. All the clothes and trims, zippers and hardware had to be from my stash or free somehow. I was only going to buy needles and thread. It is amazing but so far I have done it. I have gotten hand-me-downs. I have worked through my stash. And, strangely enough, I actually found some clothes hanging on a fence when I took my youngest to the dentist. 

Before and after.
 
 Does this happen to other people? Is it just me? There were various clothes hanging nicely on hangers and of course I saw the sign that said "FREE". I took the jeans you see hanging second from the left. 
 
I also got 3 pairs of Banana Republic dress pants. New.With.Tags! I forgot to remove the tags before putting the pants in the washer. Oops!
 
I took my son to his dental appointment and then I took these pants down from the fence, went home and put them in the washer. I am all about the "free" life style but I wash everything right away! Like immediately. Warm water, soap, extra rinse. Every time. 
 
Well, let's talk about today's project. It was quick because I am a crazy busy woman lately. (I had to make pumpkin pies!) I liked these straight leg jeans because they fit pretty well in the hips but they were too long. I did some cutting and hemming. 
 
 
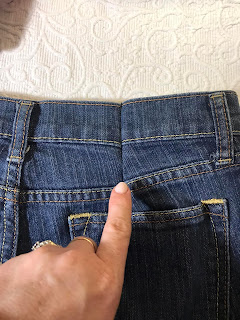
I also made 2 tucks in the back of the waistband to get rid of the gaping waistband in the back that some times happens with jeans. It wasn't a huge change but it is the small things that make you feel good in your clothes.

 Here is the outside view of one of the the tucks I made. .

 
This fabric sample was from my mother-in-law's stash. I wanted to make another scarf. I wanted to use the fabric and it was a small piece. A scarf is all I could think of.

I cut the edging off the fabric. It was nylon thread to keep the edges from fraying. I wanted to make fringe so, it was in my way.  

I pulled the treads off the edges a few at a time until I had fringe all the way around. 
 
 
The threads piled up quickly. It took quite a while.
 

That is it for today. Go make something fun for yourself. 
 
***Chickie's Year End Review- The jeans and scarf were fine basics but didn't change my life.


Friday, July 16, 2021

Replacing a Waistband

 Hello Readers. Summer means hot weather and shorts. I had an idea to fix the tight waistband of these shorts so I could wear them comfortably. 

These shorts were roomy enough in the hips and the rear but the waistband was really tight. Like painfully tight! I needed to do something because I don't wear clothes that hurt me. This t-shirt was cute but baggy. I could fix that too.

My first step was to find a new waistband. I decided to cut the waistband off these dark gray sweats that my mom gave me. (Thanks Mom!) I cut the elastic band off and made sure to leave about 1/2 an inch extra for the seam. I wanted to have enough extra fabric to attach it to the shorts.

Then I cut the waistband off the shorts. I just cut all the way around also removing the belt loops.  I won't need a belt with these shorts so I won't need belt loops either. *Notice the zipper is down. You can't cut through the zipper pull. Don't try it. You will ruin your scissors. This zipper is plastic so it was easy to cut through. If the zipper is metal, you need to cut between the zipper teeth.


 The next thing I did was attach the new waistband. It was easy to attach. I put the right sides together.  A zigzag stitch or a serger will keep the cut fabric of the shorts from fraying. I do not recommend trying to sew over the zipper. Skip that part and do it by hand so you do not break your sewing machine/serger needles. 

You can see here that the new waistband here. It is enough stretch to get the shorts on and off. And it does not dig in to my mom-belly. (I have 3 kids, and I like snacks, the tummy is what it is.)

I made new side seams on both sides of this shirt to make the body of it a little more fitted. Sometimes baggy t-shirts can look a little sloppy and bulky. I want to avoid that if I can. 

I also took in the side seams of these shorts. They were just a little too roomy in the legs. I only needed to remove about an inch from each side. You can see the original side seam I removed. It has a lot of strong stitching. When you make new side seams remember how strong they were originally. You need to try and match that strength. Sew over the new seam more than once if you need too. That will make clothes that can last a long time.

My "new clothes' fit so much better now. I found this shirt at a swap and I loved the graphic. Sewing always feels a little like magic to me.


Thanks for reading along, now go make something fun for yourself.

*If you are following along with my plan to refashion for free in 2021, I am on track. I made it to one out-door swap and I was given enough hand-me-downs to keep going. I am already planning fall and winter. It did occur to me that buying a serger might have been a cheat. I did spend money but not on the clothes. If it was cheating, I apologize. But I love the serger, and I am going to keep it. 

***Chickie's Year End Review-Neither of these pieces was going to win a design award but I still have them and wore them to play outside with my youngest.

Friday, November 6, 2020

Taking in the Waist

 Hello Readers. Sometimes when clothing fits in the hips, it gapes in the waist. If it fits in the waist, it is too tight in the hips. It happens a lot with jeans and it was happening with this red denim skirt that I got recently at an outdoor clothes swap.

I hate a gaping waistband. The only way I have been able to get a comfortable fit is to get clothes that fit in the hips and then make the waist smaller. It is easy to fix.

  I decided to make new side seams at the waist of this red skirt. I took off an inch from each side. That 2 inches made a huge difference in the fit. I tapered the new seams out so that the skirt had more of an A-line shape. I just like that style and it flatters all body types. The A-line shape also leaves plenty of room for hips and backsides to be comfortable.

 I found this fun t-shirt at the outdoor clothes swap too. I liked the comic book vibe and it went together perfectly with the skirt.

 I didn't plan to post this right at the election. It just happened that way. It is not an encouragement for anyone to go out and physically fight.


 I was happy because it was warm enough to wear this outfit and I spilled tea on myself while I was setting up my camera to take these pictures. 
I had to go change. 


 Thanks for reading along, now go make something fun for yourself.

Wednesday, August 19, 2020

Lots Of Florals

 Hello Readers. How are things in your neck of the woods? Is there any good news to report? If so let me know in the comments. Today's post is about a lot of florals. At least it felt like a lot of florals to me. They were all over.


 This dress was great I love a good floral design but I felt a little over-whelmed by all these flowers. I thought about making it short sleeved. I did that and than I thought, "Do I even need a dress?" I kept going. I couldn't stop!


 I decided to make a top. It was less over-whelming as a top. The flowers were so pretty. It made a pretty shirt. I liked the pattern a lot more when there was less of it.


 I also thought the top would go with these shorts that were passed on to me recently. These shorts were a great shade of dusty purple.


 These shorts fit everywhere except the waist. The waistband gaped open in the back. I hate that. It happens with jeans a lot too. I usually make tucks in the back of the pants but I decided to try a different method to make the waist smaller. I didn't want to loose any room in the backside. 


 I made an opening in the waistband. I inserted 1 inch elastic into the waistband. I wanted to make an elastic waistband but only along the back of the shorts. 

 
  I used a zigzag stitch to close the openings and hold the elastic in place. This elastic will improve the fit and be very comfortable. You can see how the elastic pulled the waistband in a little. It still has lot of stretch.  I need room in the waistband for my Corona snacks. (Am I the only one who needs to stop all the extra snacking?)

 My outfit was done and I went for a walk. It is not very exciting but my dog and my youngest child needed to burn some energy off.


 Thanks for reading along, now go make something fun for yourself.

Wednesday, January 30, 2019

The Gaping Waistband

Hello Readers. Do you ever find a great pair of jeans that seem to fit except the waistband? That waist hanging open in the back is not going to work.


I really wanted these black jeans because they were very dark. My current black jeans are old and very faded. I could dye them...or I could make these jeans fit a little better.
(They are a little long too. #shortgirlproblems)


I started by making new side seams to take the hips in a little. This won't fix the fit problem entirely. It is just a start.
The right leg looks much shorter. I swear my legs and the legs of these jeans are the same length in real life.


The way I like to fix this kind of fit issue is with tucks in the back. I fold the jeans and stitch narrow triangles that start at the waistband and taper off down into the pockets. Sometimes I cut off the excess fabric inside and sometimes I leave it there. I just want to be comfortable. If it feels bulky, I remove it. If it doesn't bother me, I leave it there.


 Having the tuck end under the pockets helps hide them. I want my jeans to look normal and plain in the back.


I was pleased with the new fit at the waist. I don't like to wear belts very much so these needed to fit well around the waist.


Thanks for reading along, now go make something fun for yourself.
 *Year end update-I still use this method to make the waist smaller on pants. It always works well for me.