Wednesday, March 29, 2023

Crochet Top

 Hello Readers. I had one more crochet blanket that I wanted to use to make something to wear. Could I make a simple sweater? I thought I could so I gave it a go. 

I did it. Before and after.

This blanket was in good shape and I loved the 70's colors. It had a lot of openness in the design. That made me a little concerned that it would be hard to sew together. Would it fray like crazy?

I used a sweater that I already had to get an idea of the shape I wanted to cut out. I thought it would fray and I was right. I cut out this shape and quickly got it to the sewing machine.

I couldn't just sew the side seams together because there were to many open spaces in the weave. I used bias tape to "wrap" the edges of cut yarn. I put the cut edges in between the 2 layers of the bias tape. I used a wide zigzag stitch to hold all these layers together. When the side seams were done I cut out a head hole and finished it with bias tape as well. 

Full disclosure- This was such a difficult project. The sewing machine did not like sewing this at all. It was so uneven that my sewing machine could handle it. The thread broke over and over and the needle broke several times too. I love the colors so much though I am glad I did it but I am glad it's over. And I don't think I will do a project like this again. Thanks for reading along, now go make something fun for yourself.

***Year End Update- This blanket to sweater was so fun and I love the warm fall colors.


Friday, March 24, 2023

Making a Bag from Scraps

 Hello Readers. I refashioned a quilted skirt in my last post and I had some of the fabric left over. I wanted to make a matching bag from the scrap pieces. 

Before and after.

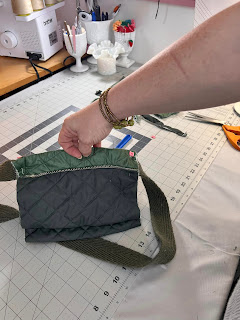
I had these 2 scraps from the bottom of my skirt to make my bag. I don't like to waste scraps of fabric and I thought a matching bag would be fun.

 
I didn't have a pattern and I just tried to piece together 2 rectangles with sides and a bottom and I thought it was going well. (Spoiler-It was not going well.)
 
I had this olive green belt and I was going to use it as my strap. 
 
I put the bag together and.... you guys it was a lopsided mess.
 
If at first you don't succeed, try, try again. 

I made a new shape with the scraps of the first bag. It was getting smaller each time so I had to get this right.

I liked the new little bag.

I liked the bag on it's own but it will be great with the skirt too.


Wednesday, March 22, 2023

Quilted skirt

 Hello Readers. I found this amazing quilted skirt at a clothes swap and I was really drawn to it. I took it home without trying it on. (Obviously I don't strip down at a clothes swap.) I really liked it as it was but it didn't really fit well. 

Before and after.

The skirt had zippers on each side. I thought they looked really cool. I didn't really want to remove them.

I cut off as much of the length as I could without cutting the zippers. I shortened it as much as I could. 

I made it shorter and tried it on inside out so I could mark it if I wanted to alter it anywhere else. 

I had to alter the waist a little to make it fit well. They only place I could make a change was down the back seam. I took in a few inches at the waist and sewed the new seam all the way don the back of the skirt so the seam would be smooth and look like it was always there.

I removed the belt loop and then sewed it back on, right on top of the new seam.

I liked the skirt in a casual outfit too. I will tell you more about the matching bag next time. (Spoiler- It was a hot mess.) Thanks for reading along, now go make something fun for yourself. 

***Year End Update- This skirt is really warm and comfortable and warm. And I do love green.


Saturday, March 18, 2023

Refresh Kitchen Cabinets With New Knobs

 Hello Readers. I have lived in the same house for 20 years. Some things are getting a little worn out, of course. All those years, the kids, the dogs and everyday life can wear things out. One of the places I can see the wear is the kitchen, specifically the cabinets. I wanted to do something bold and different to brighten it up and I decided to replace the cabinet knobs. 

These gold knobs were what the builder decided we were getting when the house was built. We lived with them for all this time and they were ... fine, for a while anyway.
 
This poor sad knob had been to war and back. I replaced it with a new bright fresh knob and gave the kitchen a fresh new look.
 
This little rack was my inspiration. These blue and white ceramic knobs were so fun. This was hanging in my daughter's apartment. It occurred to me that I could buy some knobs like this and I could replace my beat up old gold knobs with new bright knobs. It would really freshen up my kitchen cabinets.

I needed more knobs so I started shopping around. Look at all the different shades of blue in these knobs. If I wanted new knobs to have a visual impact then bright colors and various patterns would be best. These are the knobs I chose.

This is a look at my kitchen before replacing any knobs. The cabinets are all white and the counter is blue. If you think there is a blue and white theme to my choice of new knobs, you are right. Those blue knobs will really work well here and give the kitchen  more custom look.

 The first step was removing the gold knobs. I used a screwdriver to help loosen the screw from the inside of the cabinet and the knobs came right off. 
 
There was 20 years of crud under those old knobs. YUCK!!  I scrubbed all the dirt away on each cabinet.
 
The new knobs I chose came fully assembled on a long screw. I pushed the screw through the hole in the cabinet. There were already knobs on these cabinets so I did not need to drill holes. 
 
 Once the knob was in the hole I put the washer (Metal O) on the screw. The 6 sided nut went on last. I tightened them up by hand. You can use a wrench to tighten the whole assembly if needed.

Here is a video reenactment of the whole process.
 
 I love the little pops of blue and the variety of the shades of blue.
 
Here is a little side by side comparison of the old and new knobs. The blues really pop. The blue knobs look great against the white cabinets.
 
And one more before and after picture. 
 
I love the effect of the new brightly colored knobs. Will it always stay this neat and orderly? No, but the new fun knobs definitely add a new fresh look to the overall decor. Thanks for reading along, now go make something fun for yourself.
 
 ***Year End Update- These knobs are fun a colorful. They really made my cabinets look more custom. They seem to catch to the eye.


Friday, March 17, 2023

Using a Scarf to Make a Sweater Larger

 Hello Readers. Today's post is about a beautiful green sweater. I liked it so much and it was so soft but it was also a little tight. It had a matching scarf with it so I thought it would look great if I used it to make the sweater larger. it would match perfectly. Let's do it!

Before and after. 

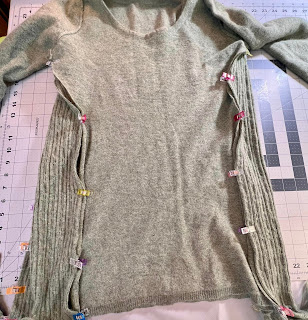
I found the side seams of the sweater. I needed to cut along those seams to open up my sweater. 
 
I cut the sweater in 2 pieces. I needed one for each side of the sweater.
 
I made a pointed end on the scarf piece so it would fit into the underarm area of the sweater easily.
 
I clipped it all in place so it wouldn't get out of hand while I was sewing. 
 
This is a look at the new piece sewn in. You can see the stitches from my serger.
 
Here is a look at whole the sweater from the outside.
 
A close up!
 
And tucked in. Wearing it this way hides the tassels from the scarf but it's good to have options. Thanks for reading along, now go make something fun for yourself. 
 
***Year End Update- This sweater is still a winner for me. I love the color and the style is versatile. 


Wednesday, March 15, 2023

Make an Easy Peplum Top

 Hello Readers. Do you celebrate St. Patrick's Day? I do a little something every year. I love a holiday theme and I am Irish so I was in the zone.

 
Before and after.
 
This green t-shirt was not very exciting on it's own. But it was a great place to start a St. Patrick's Day project. The scarf is actually covered in green hearts, not shamrocks but It's going to be perfect for my new shirt.

This shirt was a freebie from a swap and I used green paint to cover the logo of the business. It didn't have to cover 100% it just had to tone down the white of the business name. (This isn't a business I am trying to give free advertising to. Let's just paint over the name.)

When the paint was dry, I put the shirt on my dress form to work on the fit a little. I cut the neckband off the shirt. This opens up the neck and chest a little and makes it more comfortable. 

I wanted some cute puffy sleeves so I cut the hemmed edge from the ends of the sleeves.

I cut a slit in the top of the sleeve to separate the sleeve into 2. I cut along the outside of the sleeve up to the shoulder seam.

I stretched the cut edges to make them longer. T-shirt material had a lot of give and stretch in it so this was not hard to do. 

I took the 2 ends and tied them into a knot. This made the sleeves more interesting and gave them a little more fullness. 
 
Let's talk about this scarf. It is very thin and a little sheer. That is OK for what I am going to do with it.
 
I cut out a small piece from one edge of the scarf. I wanted to make a pocket. Remember that logo I was painting earlier? This will cover the company name perfectly. 

This scarf is made of very thin lightweight material. I decided to add some fusible interfacing to strengthen the pocket and make it easier to sew. 

I ironed the bumpy side of the interfacing to the inside of my pocket fabric. The interfacing was cut smaller than the pocket so I could fold the edges in. This will give me a nice finished edge all around the pocket when I sew it to the shirt.

You can't see the logo anymore at all. I pinned the pocket in place on my green shirt.

I sewed the pocket to the shirt on the sides and bottom. I left the top of the pocket open, so I could use it like a real pocket. The top of the pocket is the finished edge of the scarf. It looks nice and neat. 
 
I cut about 6 inches from the bottom of the t-shirt. I pinned the scarf around the bottom of the shirt. Every body is different so your desired shirt length might be different from mine. Measure to see how long you want your shirt to be.
 
I put the right sides of the scarf and the shirt together and used a zigzag stitch. I gathered the scarf fabric together a little as I stitched. The scarf was just a little bigger than the shirt. The fullness of the scarf will make the big ruffle around the hips.
 
 The scarf was a long circle but I cut it to make my pocket. I connected the circle again to make the big ruffle/peplum around the bottom of my t-shirt. 
 

My St. Patrick's Day shirt is done. It is fun for the holiday and I like the white and green together. I think I have a bit of Miss Frizzle in me. Her clothes always matched the show topic. I love making clothes like this. Thanks for reading along, now go make something fun for yourself.

***Year End Update- I have been saving this for March. It is a holiday shirt and it will come back then.