Friday, February 25, 2022

Pink T-shirt as Lining

 Hello Readers. I am refashioning all red and pink items this month because Valentine's Day was this month and it inspired my color theme for February. I like red and pink so it seemed like a great idea to me. This long pink shirt was perfect material for refashioning.
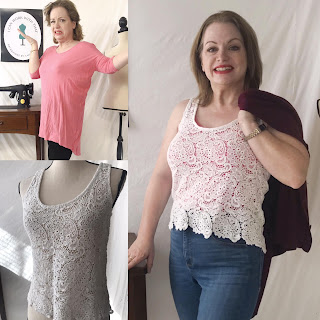
 
Before and after.
 
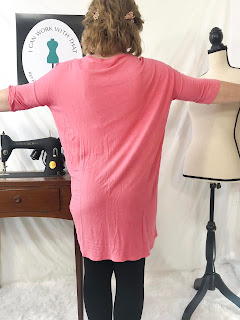
This pink shirt has some problems. It was thin and clingy. It was very big but it had tiny tight arm sleeves. (It made me think of this scene from "Meet the Robinsons".) The fit of it didn't make a lot of sense to me but the color was fabulous. Let's give it a new life. 

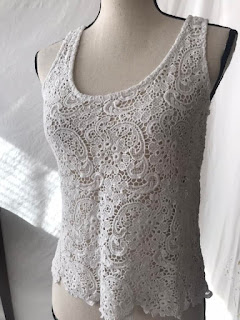
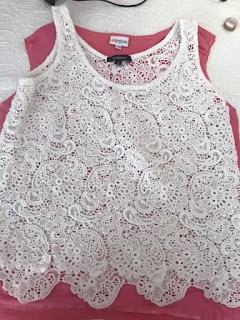
This tank top was made of such pretty lace. It is too sheer to wear alone but I had an idea. What if I gave it a lining? Like a pink lining? You see what I was thinking right?

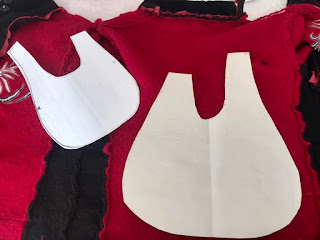
I used the lace tank as a pattern and cut the pink shirt into a tank top shape. It did not need to be perfect because it would be inside the lace tank but I had to cut the big pink shirt down into a tank top shape.

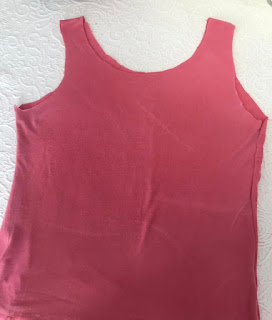
My new tank was easy to cut out. I made new side seams so my pink tank was pretty close in size and shape to the lace tank top. 

I love how the lace looks over the pink. It looks like an old-fashioned lacey Valentine. 

I was able to connect the edges of the 2 tank tops together using a zigzag stitch. I simply stitched along edge of the neckline and the edge of the arm holes. It was easy and fast work. The lace tank hides any imperfections in the pink tank top I made. 
 
I could wear this tank alone or ... 
 
 I could wear it with a sweater. It will be great in spring and summer by itself, for now I need to stay warm with a sweater. Thanks for reading along, now go make something fun for yourself. 
*Year End Note From Chickie- This tank is so simple but I love it. The color is a great pink but it's not too much pink. It's one of my favorite refashions of the year.


Wednesday, February 23, 2022

Dress to 2 Piece Set

 Hello Readers. This red and black patterned dress seemed great for my red and pink theme in honor of Valentine's Day. It was a little long and frumpy on me but it was really nice fabric.

Before and after.

This dress was nice but not very flattering. We can do something more fun with this great dress.

I started cutting. I cut the top of the dress off. There was a built in waistband and I left that attached to the skirt.

I pinned the sides to get a better fit. I also made made 2 tucks in the front just under the bust. The tucks are just narrow triangles. Taking some of the excess from the sides and front of this little shirt will improve the fit.

This is what the tucks look like from the outside. The fit was better but I needed to finish the cut edges.

I used my serger on the edges to finish the edges and the light colored thread was perfect to break up the red patterned fabric a little. 

I added an elastic waistband to the inside of the waistband of the skirt. The elastic will keep the skirt up high on my waist. The skirt already had a waistband so I stitched the elastic to that waistband on the inside of the skirt.

You can see here how I cut the dress shorter and took the sides in to change the shape and style.

I didn't hem the skirt, I used the serger there too. 

I cut the edge of the neckline off the top so I could use the serger to make all the edges match through the whole outfit.

I liked the light color stitches as trim. My new 2 piece dress is more casual and fun. I wanted a cropped length little shirt but I also wanted a high waist on the skirt so no one could see my mom tummy. 

Thanks for reading along, now go make something fun for yourself. 
*Year End Note From Chickie- This outfit is fun and comfortable. It's still a go-to outfit.


Friday, February 18, 2022

Felted Wool Knot Bag

 Hello Readers. It is February and for me that means red and pink refashions all month in honor of Valentine's Day. Today's post is a felted wool bag made from a red jacket.

 
Before and after. 
 
 
This little red and black coat was cute but there was a lot of applique details on it and it felt like a little too much. 
 
I had an idea when I saw this jacket. I didn't want a jacket.  I wanted to make something else out of the wool material. To do that I first needed to wash it in hot water. I know what you are thinking. "You can't put wool in the washer! It will shrink!" Well, it will shrink but that was what I wanted.

The weave of the wool was thicker and tighter after I washed it. That was perfect. I wanted to cut it up. When you shrink wool like this it doesn't fray anymore. It is great to work with. It is like felt. They call it "felted" wool.
 
I cut the lining away and got just the wool.

I wanted to make a little red bag and this wool would be perfect. This style bag is commonly referred to online as a "Japanese Knot Bag". I could not find a lot of information about it's origins. There are a lot of free patterns online if you want to make your own.

I also cut the pockets off the coat. I was going to use those too. 

I put all my pieces together and sewed them all together. 

My new red bag was finished. It turned out so cute. Felted wool is really easy to work with. I like this bag because it does not need any hardware, The long handle slips into the short handle and that keeps it closed.
 
It goes with all the red refashions I have done this month. 
 
 I have made a bag from a felted wool sweater before. It is one of my favorite winter bags. The soft wool makes very comfortable shoulder straps. Thanks for reading along, now go make something fun for yourself. 
*Year End Note From Chickie- I liked this bag a lot. It isn't big enough for all the stuff I carry every day but I love it for when I only carry the basics.


Wednesday, February 16, 2022

Pom-pom Sweater

 Hello Readers. It is still February and I am still doing a series of red and pink refashions in honor of Valentine's Day. Today's post is about a fun and easy sweater refashion.

 Before and after. 

 This attached scarf seemed bulky and heavy. It just felt big and puffy. I loved the red color but not the big scarf. 


I decided to cut the scarf off. I just cut close to the sweater but tried to avoid cutting the sweater itself. Now I had to cover up those rough cut edges. They don't look good and they will fray.
 
I had this cute pompom trim in my sewing stash of stuff. I made sure my trim was long enough to cover all the edges of the sweater that I cut. This trim will cover the rough cut edges  sewing it on the cut areas will keep the sweater from fraying. 

I used a zigzag stitch to attach the trim to the sweater. It was easy as pie to put this together. The zigzag will keep those cut edges under control and the trim will hide all the cut edges really well.

 
I liked the pompoms. They were a lot of fun. They were also smaller and less bulky than the scarf was. 
 
My sweater was great with my refashioned jeans from my last post. Thanks for reading along, now go make something fun for yourself. 
*Year End Note From Chickie- I still like the pom poms. This was perfect for Christmas too.


Friday, February 11, 2022

Valentine Jeans

 Hello Readers. Do you like distressed Jeans? I love them... in warm weather. In the cold weather I am having in my part of the world lately, they are not great. It is too cold for exposed knees.

 
Before and after.

It is painfully cold where I live. Like it hurts my face when I go outside. These holes would cause me to freeze to death out in the cold. What can we do to fix that?

I thought it would be fun to fill in the holes with some red heart fabric. It would be cute for Valentine's Day but it would be great all year round too.

I started by turning the jeans inside out. I cut the red pieces large enough to cover the holes and extend out beyond them. I needed the red pieces to be bigger than the holes. I will use that extra fabric around the holes to secure it all together. I used pieces of Iron-on Hem Tape to keep the red pieces in place while I was working. I ironed the red pieces to the inside of the jeans.

It looked like this from the outside. The red fabric peeks out through the holes and covers the leg. That is just what I wanted. But I also wanted to do a little more to highlight the red fabric.

I wanted to do some visible mending. I started using red thread in my sewing machine and red embroidery thread by hand. I wanted a combination of different stitches. I thought it would be more fun that way. This stitching adds some color to my jeans but it also connects the red fabric to the jeans and makes them much stronger than the iron-on hem tape could alone. 

Here is a look at the different stitching. I stopped because I used all the red embroidery thread I had on hand. When I ran out of red thread I had to stop. I love the messy free form look of the mending. The pops of bright red are so fun.

I thought the end result was a fun casual look that was great for Valentine's Day and more. I will tell you all about that sweater next time. Thanks for reading along, now go make something fun for yourself. 
*Year End Note From Chickie- These were so fun but they got too tight through the year. Ugh, middle age weight gain is real.


Wednesday, February 9, 2022

Make a Belt for My Trenchcoat

 Hello Readers. I am in the middle my red and pink Valentine series for this month. I like red any time of year so let's take a look at this great red trench coat. 

 
Before and after.

This red trench coat was a really fun find at a recent clothes swap. I really like this color red and this trench coat was a petite! That means the sleeves fit me with out any alterations needed. I was super excited about that.The only problem was that the belt was missing. I really wanted a belt. And I wanted it to be a matching belt. I could have thrown a different belt on with this coat but that isn't really what I wanted.

I was going to have to make my own belt if I wanted one. I cut the coat about 3 inches shorter. I just cut the bottom off. This will make the coat a little shorter but I am OK with that. 
 
When I was done cutting the coat I had a piece of the outer fabric and a piece of the nylon lining. I didn't need the lining so I got rid of that. Let's focus on the outer fabric.

I ironed the long narrow piece of outer fabric. I folded it under 2 twice and pressed it down. That made sure the cut edge was hidden. It also made a thicker stronger belt for this coat.  

I stitched the belt along the edges so it would stay folded together forever. I wasn't trying to be creative or invent something never seen before. I was just trying to make a traditional looking belt. I think it worked.

Look at the color match! It is perfect because I used the same fabric. No other fabric would have matched this well. I hemmed the coat at the bottom edge where I had cut the belt fabric off. 

This trench coat was perfect for Valentine's Day. 
 
It was also a great match for my distressed Valentine t-shirt from a couple years ago. (Tutorial for this fun t-shirt here.) Thanks for reading along, now go make something fun for yourself. 
*Year End Note From Chickie- I love this red trench, I just wore this, it is a winner in my book.