Thursday, September 28, 2023

Resize a Knit Skirt in Minutes

 Hello Readers. I found this Marvel comic skirt when I was out thrifting. It was half price and I couldn't resist it. It was so colorful and fun. It was also stretchy so I thought it would be comfortable too. I knew the knit material would make it easy to alter and the stretch would make getting the size right easier too. This is an easy project for a beginner sewist.

Before and after.

I did love the Marvel movies and these graphics were really appealing. The semi-thick knit material would be easy to work with. (Extremely thin knits can be more difficult.)

I came home and washed this skirt. I tried it on and it just did not fit well. It was too loose at the waist. I liked the fit in the hips and I liked the length. I clipped and pinned the skirt so I could see where I needed to change it and how much I needed to change it. It is always best to try things on and see exactly how they fit.

I cut off the excess fabric on the sides. I left about 1/4 inch seam allowance. The waist needed about an inch removed from each side and I tapered the cut as I went down the sides of the skirt. I cut out a triangular shaped piece from each side. I made my cuts right at the existing side seams.

I used my serger to sew these new side seams. I like to use the serger because it sews very smoothly. 
If you do not have a serger you can still do this by using the zigzag stitch on your sewing machine. Let the machine do the work of moving the fabric through. Do not push or pull the fabric. This will give you the best results and the smoothest seam.

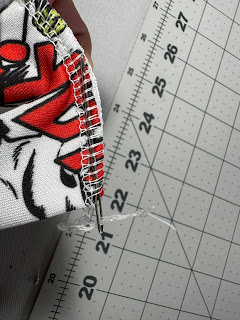
The serger leaves a tail of threads so I used a needle to tuck those threads back into the seam. I tucked the threads under the stitches to keep the seam nice and neat inside the skirt.
 
Here is a look at a side seam. It looks just like the original seam.
 
This skirt was done in no time. It only took me about 10-15 minutes to try it on, cut it, and sew new side seams. It is so fun and the fabric is so soft. I love it. Stretch fabric makes it easier to get a comfortable fit because it can give a little if it gets too tight.
 I couldn't wear this to work but I quit that job so I can wear whatever I want! I wore this and went to the library to check out some mystery books. Thanks for reading along, now go make something fun for yourself.

***Year End Update- This skirt is so fun. I love it. I wore it until cold weather.


Wednesday, September 27, 2023

Making the Garden Pretty in Day & Night

 Hello Readers. Fall is here and the trees will turn colors soon and look glorious but my flower garden looks dry, dead and depressing. I wanted to have something pretty to look at it the garden but what can survive the fall weather? What could look good like day and night? It might sound unusual but what about a vintage bike? Don't close out the tab! Let me show you what I mean.

 Day and night.

The current state of my flower garden is not good. There used to be tulips and daffodils, peonies and day lilies, a cherry tree and a butterfly bush. But now everything has gone dormant and it looks dead and empty.

This sad tired peony has seen better days. It won't look better until spring when it comes back and blooms.

The garden will never look pretty with all these dead looking plants.
 
I cut the stems down to ground level with some pruning shears.The cuttings can be composted over the winter. (My son's soccer goal was in my flower garden for some reason. I put that away too.)
 
  I used the kiddie pool to hold all the cuttings. It was easy to throw them all in there and drag the whole thing to the compost pile. It was a big help.
 
I hung a small string of solar powered lights I had from the low tree branches.
 
Using solar powered means I can put these lights anywhere. No electric outlets needed! I made sure to put this small solar panel at the end of the string in the sun. It needs to get the sunlight to charge itself everyday. (As you can see my lights are getting old but they still work great.)
 
I wrapped the string of lights around and between the branches so it would stay up in the tree even on a windy day. I know fall will blow in with some cold weather and I don't want to have to rehang this.
 
I found this vintage bike on the side of the road a long time ago. (It had a sign that said "FREE".)  It is going to make a really fun focal point in my garden.  Instead of a bike you could also use items like a child's wagon, a tree stump, or old outdoor chair or table. Anything to set the plants on or around.
 
I added a basket to the front of the bike. I wanted to put something pretty in the basket.
 
I had 2 ideas for flowers and I decided to show you both ideas. I put some artificial white flowers in a basket and put the basket into the bike basket. I know some people do not like to mess with real flowers. And I know fake flowers really bother serious gardeners. 

I put a rubber band around the end to hold the stems in a bouquet position. 

I separated the flowers to make the whole bouquet look big and full.
 
I also went to a farm stand and bought a real living white mum plant to go with arrangement.
 
I put both my floral choices on display. Make the floral choices that works best for you. I like the white combination and it fills in my empty garden nicely.

When the lights start to shine at dusk the whole arrangement looks very sweet. It is nice to have some soft lighting in the backyard at night too. I have to water the mum plant but otherwise I don't have to tend to this at all. Thanks for reading along, now go make something fun for yourself.

***Year End Update- I don't like gardening that much but I enjoy this lovely little spot.


Tuesday, September 26, 2023

Linen & Silk

 Hello Readers. I found these linen pants and silk top at a thrift store recently. I thought they would be perfect for work because it is really warm here. It doesn't cool down until late September or early October. Linen and silk breath and keep you cool when it's hot.

Before and after.

This shirt has a wide waist tie that made it really awkward to tuck the shirt in. I usually tuck things in. I thought I could just remove the 2 pieces from the sides. 
 
I sewed the 2 pieces together and made a small scarf. But it has a seam in the middle.

I stitched the center together into a tube to hide that seam in the middle. 

It turned into a fun accessory.

I added a little snap to the shirt to keep the neckline closed. It was a little too low for me. This was easy to add by hand.

I took the waist and hips of the pants in a little to keep them higher on my waist.

The whole outfit fits better and looks more put together. It would be perfect for work. But a weird thing happened. I quit my job before I even wore this. My husband's schedule changed and our childcare situation changed and so my schedule had to change too. That means more time for sewing, I hope. We just roll with it. Thanks for reading along, now go make something fun for yourself.
 
 ***Year End Update- I made this for work and quit my job. I love the outfit though.


Thursday, September 21, 2023

Friends Part 2

 Hello Readers. It has been a long time since the TV show 'Friends" was on TV. A famous joke from the show was a play on the words moot and moo. You can see the YouTube video clip here.

 
 The joke was funny, the shirt was great but the pants fit weird.


My daughter gave me the pants and shirt but the pants did not fit me well. The waist and hips were loose, the thighs fit, The calves and ankles were loose and the legs were just too long. They needed to be loose all over or fitted all over. 

I decided to make them fit everywhere. I took them in at the waist and hips. I also narrowed the calves and ankles. I made them shorter too. 

The t-shirt fit really well but I did cut the neckband off so I could open up the neckline a bit. 
 
Another t-shirt idea is cutting the sleeves. If you want more room in the sleeves cutting the hemmed end off will help. The edge won't fray and when you cut it off the sleeve will stretch a little more and give you more room. Just cut the end of the sleeve off and give the cut edge a soft stretch. It will be looser and more comfortable.
 
The pants fit better all over now. And I like the shirt with the neckline low enough to wear jewelry if I want. (I am going to want jewelry.) Thanks for reading along, now go make something fun for yourself.

***Year End Update- This was fun and irreverent and I love it.


Wednesday, September 20, 2023

Friends Part 1

 Hello Readers. If you ever saw the TV show "Friends" you might remember this t-shirt. It has been a long time since the the show was in prime time but I always liked the shirt. So, guess what I got as a hand-me-down? My own "Girls" t-shirt. 

Before and after.
 
This is the original shirt from the show.
 
This shirt was an XL. I could have kept it and just worn it loose and it would be fine. But I wanted a different look.
 
I took a little off each side of the shirt. I made a new side seam on each side. That helped a little. 
 
I also folded the shirt in half and made a seam down the back of the shirt so I could take out some excess fabric from that back of the shirt.
 
 Here is a look at the back seam. Lot's of shirts have seams down the back. It doesn't really stand out. And that is great. The front of the shirt is the fun part.
 
I wanted to wear this shirt with this skirt and I wanted a fitted look because I like it tucked in the skirt. Thanks for reading along, now go make something fun for yourself.
 
 ***Year End Update- This is a favorite outfit, love all of it so much.


Tuesday, September 19, 2023

Keep Kids From Falling Out Of The Bed With Pool Noodles

 Hello Readers. I know kids eventually grow out of falling out of the bed. I am waiting for that to happen with my youngest. He will just move around in his sleep and slowly go over the edge of the bed and fall over the side. It is very disruptive to his sleep. And honestly it is really disruptive to my sleep too. I have a solution. It's easy. You need 3 pool noodles and some strong tape.

It's time for bed. Let's find a way to stay in the bed.

I got my pool noodles from the local Dollar Tree. They had plenty out in the front of the store. 

I got 3 white noodles and some strong white tape. (One noodle is not enough. It will slide out of place. I have tried it.) I thought white would blend in with the mattress and mattress cover but the color doesn't really matter.

I cut a piece of tape that was long enough to go around all 3 noodles. I wanted the noodles to stay together and be strong so I wrapped the tape around and overlapped it a little. I didn't want this to come apart in the middle of one night.

I wrapped the tape around tight and made sure it was stuck to the noodles really well.

I taped the noodles at both ends and in the middle. 

When my noodles were all taped up I slid the whole thing under the mattress cover. The noodles will sit on the mattress and under the mattress cover. I pushed it up towards the top of the mattress where the pillows would go.

The 3 noodles will make quite a lump. That is what we want.

I put the sheets and blankets on the bed as usual. You can still see the big noodle lump. 

Here is a look at the bed with all the sheets, blankets, pillows and stuffed friends. The mattress cover and the sheet are very snug on the noodles. They stayed in place well for my child in real life sleeping.

Thanks for reading along. Sweet dreams to all of you. 

***Year End Update- It has been a few more months and my child id still staying in bed and not falling out. I am SO glad I made this!