Showing posts with label Sweatshirt. Show all posts

Tuesday, May 6, 2025

The Darth Vader Sweatshirt

Hello Readers. I am reposting this sweatshirt from 2017 in honor of Star Wars Day/May the Fourth Be With You/Revenge of the Sith/May 6th. If none of this is familiar to you it's all part of being a kid from the 80's who really loved Han Solo. 
 I loved this Darth Vader shirt. He is supposed to be so evil but really he just wants to share freshly baked cookies with everyone. How bad could he be if he has cookies for everyone? I am going to have to rethink my opinion of him. 

Before and after.

This shirt got hit with some bleach and it is looking a little worse for wear. Darth Vader is fine but he needs a new home.

I had this nice gray sweatshirt with black trim just hanging on my refashion rack. I could put these two shirts together couldn't I?

I cut the cute picture off the bleach stained T-shirt. After looking at it I decided to round the corners of the picture and make it smaller.

I wanted to stitch the picture onto the sweatshirt. I didn't want the fabric to move or pucker. To prevent that I pinned the picture onto the sweatshirt and then I basted the picture with a needle and thread to keep it even more secure. 
I used my machine to attach the picture to the sweatshirt and tried to sew slowly so I didn't mess the whole project up. (Darth is counting on me.)

The cashier liked this kinder gentler version of  Darth Vader too.
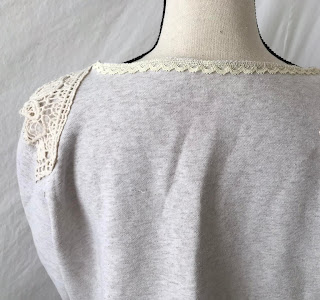
I am happy to say that the fabric and my sewing machine got along well and it turned out well. It isn't dressy or super sophisticated but sometimes a mom needs a sweatshirt. I even stopped at Starbucks for a latte. (Stereotypical suburban mom.)
Thanks for reading, now go make something fun for yourself.


Wednesday, October 4, 2023

Concentrated Awesome

 Hello Readers. I love athleisure style. I could be going to the gym, coming from yoga, watching a movie on the sofa or getting coffee. No one knows what I am doing...I can do anything!!!

Where am I going? No one knows.

This shirt spoke to me when I saw it at the thrift store. I am only 5' and being short has been an issue my whole life. (Do you remember the tiny girl in school that always had to sit in front and could not play sports well? Hi, it's me. I never grew out of it.)

This shirt was way too big. The sleeves were ridiculously long. These joggers were a hand-me-down from my daughter who is tall. (She is 5'8" How? How did I get a tall daughter? I can't explain it. It's amazing, she can reach all the high shelves.)
 
I decided to cut the sleeves off. The body of the shirt had a bit of the sleeve and I decided to keep that as a short sleeve. 
 
I took the shirt in on each side a little to make it fit better and that also made the short sleeve you see here.
 
The hem of the shirt was a serged edge. That gave me an idea to finish the new sleeves in the same way.
 
I used gray thread in my serger and serged around the cut edge of my new short sleeves.
 
I made the joggers a bit smaller on each side. I just sewed new side seams by following the original side seams. 
 

 My new outfit was comfy and cozy and perfect for me. 

This was perfect for going to the library with my youngest and we checked out some story books. (I am living life on the edge here.) Thanks you for reading along, now go make something fun for yourself.

***Year End Update- I wear the shirt and these joggers and lounge around doing nothing a lot.


Friday, January 28, 2022

Add Lace

Hello Readers. We have come to the end of January and I hope you were able to stay warm and cozy all month. This sweatshirt was warm and cozy but it was also plain and could use some fun and excitement. 

 
Before and after.

This sweatshirt is about as exciting as plain oatmeal. There just isn't anything fun about it.
 

When I saw this brown sweater I did not like it that much. It was not a pretty color and it looks like used coffee grounds. There was another problem. The placement of the lace made the whole shirt see-thru in places I would not want to be seen. I don't know who decided the shear lace should be on the chest of a woman's shirt but it just didn't work for me.

It had one thing I did like and that was the off-white lace. I could take all the pretty lace trim from this brown shirt and use it on my sweatshirt. I could use the pretty lace and also make sure my new shirt would cover what I thought it should cover. I only used the cotton lace. I left the cheap brow polyester lace behind with the used coffee grounds.

 
I also had some lace in my stash I could use.
 
 
I cut the neckband off and I used a small zigzag stitch and attached the lace around the neck. 
 
I used the lace as a collar. I also cut the wrist cuffs off the sweatshirt and added the lace to the ends of the sleeves.

I also added the narrow lace around the back of the neck. I had just enough.

 
 I was feeling monochromatic so I grabbed these super long tan pants. 
 
They came from the fence next to my dentist's office. They said "FREE", so I took them home. (This is a small town.)

They just needed to be shortened and hemmed. They were just my size but way too long
 
I did some cutting and some hemming. 

I was having a really VERY BIG hair day but the clothes came together really well. I liked the lace on the sweatshirt. It added interest and texture. Thanks for reading along, now go make something fun for yourself.
*Year End Note From Chickie- I still really love the lace added to this sweatshirt. Somehow it seems dressy but it's still just a cozy sweatshirt

Wednesday, January 26, 2022

Sweatshirt to Dress

 Hello Readers. I hope your January is cozy and warm. My theme this month was "Stay Cozy". This sweatshirt was cozy and soft and it made me look really pregnant. I knew I could do something with it that would not look so maternity.

 
Before and after.
 
 
This sweatshirt was super cute. Was it maternity? It sure fit like that. I am 49 years old y'all. I am not having a baby at this point. I would probably die if I tried it. I had a baby at 42. It was very difficult. Let's try for a different look.
 
 
I had a plan to make this sweatshirt into a mini dress. I was going to use this off-white shirt to help me.
 
 I cut the floral shirt because I just needed a few inches from the body of the shirt.
 
 
I cut the dress in half and wanted to put a piece of the floral shirt in the middle of the dress. The top of the dress would remain the same. 
 
There was going to be a band of floral fabric in the middle of the dress. The sweatshirt top and the floral shirt were almost the same exact size so they were easy to put together. I used my serger but a zigzag stitch would work too. I wanted to re-attach the skirt to the bottom of the floral fabric piece. This would make the dress longer and the floral fabric would add some interest. Almost like a belt.
 
 
The skirt was bigger than the floral piece. I needed to arrange the skirt so it was evenly distributed around the floral band of fabric. I used pins to hold it. I decided to fold the extra fabric down to make pleats. 
 
I folded the pleat down and pinned it where my thumb is pointing. It was easy to sew over the folded pleat when I attached the skirt to the rest of the dress.

I added an off-white shirt under my new dress for warmth and to cover my stomach a little more. The sheer floral fabric was such a cute addition to the plain sweatshirt. I love it. Thanks for reading along, now go make something fun for yourself. 
*Year End Note From Chickie- Love this dress. It's perfect over leggings and very cozy.


Friday, January 21, 2022

Mother Son Flannel

 It's been a rough week or so at my house. My youngest was sick. And then the older son got it. It's actually the perfect time for these cozy flannel clothes. 

 
Before and after.
 
We all need cozy clothes to wear at home while we eat chicken noodle soup, right?

 
These were men's flannel pajama pants so I had plenty of fabric to make some shorts for myself. I could have made pants but I wanted to make something else as well.

I used a pair of sweat pants to make my son a pair of plaid pajama pants.
 
I cut out 2 legs and put them together. 

I added some stretchy ribbing as a waistband. 
 
I told my son we had to take a picture of these pants. I offered candy as a bribe. Without any direction, he struck a casual yet professional pose.
 
I removed the Italia logo from the sweatshirt to see what I had left to work with. . 

Then I decided to cut the sweatshirt up the front so it would be open like a jacket. I replaced the logo with left over plaid fabric.

I had a matching casual pajama set that was perfect for being lazy and staying home with my son.He is sick but the fever is gone and he is back to playing with Legos all day. I hope y'all are well. Get plenty of fluids and rest. And go make something fun for yourself, if you are up to it. 
*Year End Note From Chickie- These matching jammies were fun and the open sweatshirt was actually nice to wear. It was better for taking on and off if I got too warm. 


Wednesday, November 10, 2021

The Sporty Sweater

 Hello Readers. You know already that I like to refashion clothing. I like to make it fun but usually I am trying to make the clothes fit better too. This sweater was a situation like that. 

My daughter gave me this sweater and I liked it. It was simple and white would match anything. But these sleeves! My hands have disappeared and the overall  length is a bit long on me.

I had some bits and pieces to help me refashion this white sweater.

I cut the cuffs and waistband off this blue sweatshirt. It was a little too short on me.

When I was ready to sew I cut about 3 inches off the sweater sleeve and put the blue cuff around the sleeve. I put the raw cut edges on top of each other. After I sewed around the sleeve edges I flipped the blue cuff down. (Don't cut the sweater until you are ready to add the cuffs on. The sweater will fray, you want to sew it right away.)

I used a wide zigzag stitch for this part. I wanted to connect the sweater and the wrist cuff and close those cut edges at the same time. A serger would work for this too. I don't know why I didn't use mine.

Here is the cuff connected to the sweater. The zigzag stitch on the edge will keep the cut sweater from fraying. It will also keep the whole cuff together.

Here is the cuff flipped down. This is how it will look when I wear it.

I attached the waistband in the same way that I attached the cuffs. You can top stitch these seams if you want. That would help make it lay flat. I just stitched right at the seam on the outside of the shirt. I used a straight stitch for this part. Sometimes this is called "stitch in the ditch". It can make a seam look better.

I attached the gray hood by sewing along the neck of the sweater. I didn't cut anything. I just stitched the hood on. I made sure the hood was inside the sweater and stitched over both of them.

My new sweater had shorter sleeves and a shorter body. I liked the little pops of color I added. It makes the sweater more fun and the hood has a sporty look.

This sweater could easily be cropped shorter if that is the look you want. That look isn't for me. 3 babies over 9 lbs came out of this stomach so, I am going to keep it all covered. But you do you!


Thanks for reading along, now go make something fun for herself. 

***Chickie's Year End Review-This sweater is a strong favorite from 2021.