Showing posts with label Fall Decor. Show all posts

Tuesday, November 12, 2024

Easy Felt Pie Decoration

 Hello Readers. Thanksgiving is my favorite holiday. It has all the warm fuzzy feelings and yummy foods.  It is November so that means Thanksgiving is coming to my part of the world soon. I wanted to decorate with that in mind and made this felt bunting to hang for the holiday. Pumpkin pie is a big part of Thanksgiving and fall in general. Let's celebrate with pie.  

 Pumpkin pie with whipped cream anyone?

Get out all your felt. Or go to the craft store and buy some felt pieces. You will need a lot of tan for the pie crust pieces. And orange for the pumpkin. You will want a bit of white for the whipped cream too. You can also make red-cherry, blue-blueberry or brown-chocolate pie. You can make whatever you like best.

 
I cut triangular pieces from the tan fabric for my pie crust. 
 
I wanted the tan pie crust pieces a bit larger than the colored "pie filling" pieces. That way the pie crust would peek out just a little.
 
I cut tan strips for the crimped crust around the edge of the pie. I cut these pieces about 1/2 inch wide and 6 inches long. It does not need to be exact, you can make it all fit when you glue the parts together. 

I used my hot glue gun to attach the triangles together. Hot glue guns can be very hot, mine is approximately the temperature of lava. Use caution. 

When I glued the crust to the edge of the pie piece I pinch or crimped it together as I glued it. I held it in place for a minute so the glue could set up. 

I traced and cut out some circles. 
 
 They were not very large, approximately 3 inches in diameter. These are going to make my whipped cream. 
 
I folded the white circles so that there was a point at the center. I glued the center of the circle to the piece of pie. You can use 2 circles to make a large sized dollop of whipped cream. 
 
When each piece of pie was done, I added them to one long string. 
 
I glued white ribbon across the back of each piece of pie.(Any ribbon or string will do.) I glued one after the other so that it would make a wide bunting to hang up. 
 
I added a bow in between each piece of pie because it seemed pretty. 
 
 The bows are just decorative. You can skip them if you want. 
 
The pie bunting is cute anywhere, over the mantel, in a classroom, in a kitchen window, or in this case in an office. Thank you for reading along, now go make something fun for yourself. 
***Year End Update***- I really liked this it was so fun.


Sunday, September 25, 2022

Decorating the Front Porch for Fall with Stuff you Already Have

 Hello Readers. That's right, it's fall, and you want to make the front porch look festive... Like you are in the spirit... Like you cared and tried just a little. But you don't want to spend your whole paycheck at Home Depot to buy more "stuff"? I completely understand. I spruced up my front porch with a bunch of stuff I already had. Read on and I will show you.

 
Fall decor ready!
 
My front porch was tired and dried out from summer and needed a lift.

Summer heat can be rough. The kids destroy stuff. Life happens. Let's get in the fall spirit. What can we use to decorate? Let's start with old clothes.

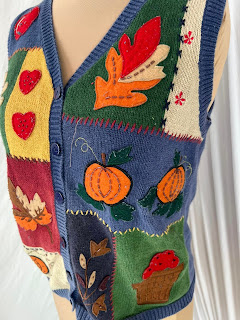
Go get the sweater vest Grandma Joyce gave you. You never wear it. It's just what we need. If you don't have a festive holiday sweater, try any shirt or sweater in a fall color.

You are not going to wear the sweater. You are going to put the sweater on a big basket. A large flower pot or even a cardboard box will work. Wrap the sweater around the basket and button it up the front. 

Tuck the excess sweater down into your container. You have an instant fall planter. 
 
You can put a new plant in or use something that survived the summer heat. It doesn't really matter, the decorated planter will make a fun fall decor piece.

Next we need some pumpkins. You can buy some or you can make some. That's right, you can make some. If you have kids, his is a fun project for them. You need a shirt. I had this orange shirt so I went with that.

The toilet paper is going to get wrapped with the shirt. You can stuff the excess down in the center and you get a pumpkin shape. 

If you need to, use a pencil or a stick to push the fabric down in the center.

You can make a stem for your pumpkin from brown paper. Let the kids help if you want.

Now really, which is cuter? The real pumpkin or the one we made?

This blue plaid rug was on my back porch but I realized it went better here. The doormat is from summer but it has some orange on it that matched the pumpkin we made. Can it work for fall? I think so. I did buy the giant mum because I saw a lady selling them from the back of a truck. And I like to support the local economy.
 
The final look.

Putting it all together. Happy Fall Y'all.
*Year End Note From Chickie- Total honesty, I forgot to water those mums and they died. Like, quickly too. It was sad.