Showing posts with label Easy Alterations. Show all posts

Tuesday, February 14, 2023

Simple Resizing Ideas

 Hello Readers. Sometimes our clothes get too small. And maybe sometimes too big? Life happens. Stress, cookies, illness, age, it can all change our weight and shape. Today's post is about some simple resizing techniques that I have used and that always work for me.

Before and after.

This outfit needed some help. I was loving the neutrals but the fit of the clothes was all wrong. The sweater was mine and got too small like 5 years ago. Pandemic snacking changed everything. The corduroys were such a nice warm camel color. I got them from a clothes swap and was determined to make them work.

I got to work on the pants first. The easiest way to make them smaller was to turn them inside out, try them on, and mark where I wanted them to fit. I sewed along the side seam and made a new seam. I only needed an inch or so off each side to make them fit better. I also had to hem them because I am short.

The sweater was going to take a little more work. But it wouldn't be hard to make the sweater a little bigger so I can wear it again. I am going to cut it open on the sides and fill in the gap with a ribbon.

I used my scissors and cut the seam open. 

I used a zigzag stitch to sew over the lace and I made sure I was stitching along the edge of the sweater where I had cut it open. I left some extra ribbon at the end so I could fold it under for a nicely finished edge at the wrist.

Here is the finished sweater. The sweater is bigger because the ribbon added 2 inches to each sleeve and 4 inches to the body of the sweater. You could use wider ribbon to add more space to it. The length of the sweater is unchanged.

My whole outfit fits so much better This picture turned out a little weird but it showed the lace added to the sweater so well, I decided to use it.
 The best thing about these methods to change the size is that you could use the same idea for making the sweater smaller and making the pants larger. Using the side seam as the guide for sewing new seams or adding something into the seam is an easy way to go. Thanks for reading along, now go make something fun for yourself.
 
***Year End Update- I love anything cashmere so I am still wearing this sweater all the time. It matches a lot and beige corduroy pants in winter are a go to item.


Wednesday, November 21, 2018

The Bathrobe Sweater

Hello Readers. I titled this post "The Bathrobe Sweater" because it originally looked like a robe on me. I love cozy robes but this wasn't working.


I don't remember where I got this long sweater but I love gray and black.
 I thought about making a dress out of this but it was too clingy to be worn as a dress. When it was buttoned it seemed to emphasis all the bumps and bulges that I wouldn't want to show. It needed something under it but it/I just looked lumpy. So it wasn't going to be a dress.


I decided to make a tunic length cardigan. It would look better on top of other clothes and layers are great in the cold weather. 
I shortened the sleeves and made the body of the sweater much shorter. It was quick and easy work.


I love this sweater when it is open and hangs loose. I wore it to work, just like this. When it is open it has a light flowy look. No lumps or bulges in sight.


Thanks for spending some of your time with me. If you are in the U.S. you might be preparing for Thanksgiving today. That is what I am doing today. I hope you have a wonderful day with family and friends.
If you aren't in the U.S., I wish you the same thing.

*Year end update- This is such a great sweater. How did I ever get along without it?

Friday, November 2, 2018

Making Tight Clothes Bigger and Bigger

Hello Readers. Do you have any clothes that have grown too tight? Is it just me? Life happens, aging happens, clothes get too tight. Read on to see how I made clothes "grow" to fit me.


This dress was soft and stretchy so I could technically get it on my body. You can see how tight the dress is on my dress form, and this dress form is a little smaller than I am.
 I couldn't wear it this tight.


 I decided to cut the bottom of this dress off and make a shirt. I cut along the seam and saved the lower part of the dress for later.


 I cut along the side seams to open the shirt. I cut the seams from the bottom, all the way up to the ends of the arms. I wanted the shirt completely open on the sides to insert extra fabric and make it bigger.


I also cut this black shirt up for material. I cut strips of the black fabric to put into the sides of my striped shirt and make the shirt wider. I thought 2 of these black strips, 1 on each side, would make the shirt big enough.
 (I was wrong. I underestimated, but that's OK. Read on.)


 The side pieces looked great but the shirt was still a little tighter than I wanted. I should have made the black pieces bigger.


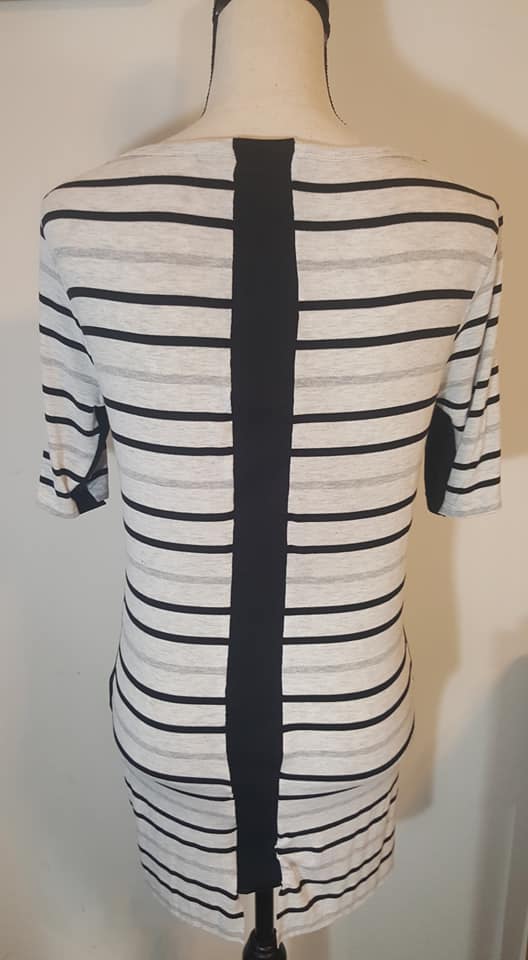
I could have taken the side pieces out and put in larger pieces. That would have been a lot more work. I decided to add a strip of black fabric down the middle of the back of this shirt. It added about 2 inches. That was just right.


Remember that piece of dress I cut off? I added some of it to the bottom as a waistband. I used the part with the hem already on it. It made the new shirt look more finished. And I really liked the contrast of horizontal and vertical stripes.


I kept the shirt long enough to tuck in but I also like it out so all the stripes show. I wore this to a kids birthday party last weekend. It was perfect. (Until I dropped red sauce on myself when I was pigging out on home-made spring rolls. Oops!)


Thanks for reading along, now go make something fun for yourself.

*Year end update- This shirt became an instant favorite. I am still loving it.

Wednesday, September 19, 2018

Fall Colors; Easy Alterations

Hello Readers. Are you ready for Fall weather? I really like the changing colors of the leaves. Today's post is about embracing the colors of fall. It's also about finding clothes I liked and making them work for me. These are easy alterations for a sewing beginner to do.


This red and gold shirt was simple in style but the colors were warm and deep. It was perfect for this time of year. My mom handed-it-down to me. (Thanks Mom!) It was just a little big and the neck was a little revealing. It just needed a little help to fit me.


The shirt needed a simple size adjustment. I used the side seams as a guide to make new side seams. I made the new seams about an inch inside the old seams. It was an easy way to change the size of the shirt without changing the shape or style of the shirt. Keep your new seam along the old seam and it is hard to mess up.


These pants were a great golden color. They had lots of pockets that actually worked and that's unusual in woman's pants. I hate pockets that are not real pockets. I have stuff to carry.
These pants are also a little too big. And a little too long. I wanted to take the sides in but there is a big pocket on the side of one leg. I would need to move that pocket out of my way if I was going to take the pants in on the sides.
(I could take the pants in on the inside of the legs but that wouldn't make the hips and waist any smaller. That wouldn't work here.)


I used a seam ripper and took the pocket off the leg and then did my sewing. I took the sides in and made the legs a little shorter. There were zippers at the bottom of each leg. I just removed them with the extra fabric. I didn't need ankle zippers. Again, following the existing seams will keep your new seams on track.


Once the sides were finished I reattached the pocket over my new side seam. There old stitch marks were still visible and easy to use as a guide for getting the pocket back in the right place.


I liked the new outfit. It was perfect for early fall. Alterations don't need to be scary. Try it.


Thanks for reading this post, now go make something fun for yourself.

*Year end update- This wasn't the most exciting outfit but I wear it to work a lot.


Friday, August 10, 2018

A Baggy Waistband

Hello Readers. Have you ever tried on a pair of jeans and had them fit everywhere except the waistband? Sometimes the waistband is too loose in the back, but it isn't difficult to fix.


These denim shorts had a lot going for them. The waistband was high enough. (I have had 3 kids and a low waistband isn't what my mom tummy needs at this point in my life.) The fit was great through the hips and thighs but the waistband was not working for me. The shorts were an awkward length for me too. I would fix that later.  


I started by taking the waistband in on the sides. I thought it would blend in really well with the existing side seam. I didn't want to alter the size anywhere but the waist. I put the shorts out on a table and cut a little triangle shape out of each side. You can see I stitched over the new seam 3-4 times so it will never come undone when I am out in public.A zigzag stitch or a serger would finish the raw edge.


 I wanted to shorten the length a little too. I cut the hemmed edge off the bottom of each leg.


I rolled the ends up twice to make a cuff. I liked the new length but I knew it wouldn't stay up by itself.


I tacked it down with a few stitches on the sides, front, and back. The rolled cuffs will stay where I want them. 


I love the new fit. They aren't tighter anywhere but the waist. I need to eat lunch and snacks. I need to breathe. Tight denim is not what I want.

  
They are great for lounging in the sun. Ha ha, just kidding, I am way too pale to sit in the sun. I hide from the sun.


Trust me, they are good in shade too. 


Thanks for reading this post, now go make something fun for yourself.

*Year end update- These were perfect for summer and got tons of wear.

Friday, June 22, 2018

Shortening Sleeves

Hello Readers. I really liked this pretty sweater. It is very thin and lightweight. It is barely a sweater really. I loved everything about it. Well, almost everything.


This little sweater is almost perfect. There is only one problem. Can you guess what it is? Yes, that's right. It is too long in the sleeves. I can't even push or roll the sleeves up because they are big bell sleeves. They are full cut and slide right back down my arms. I can't go around like this.


 I decided to cut the sleeves off. They were working against me so I cut them off. I kept the shoulder seam of the sweater intact so the arm holes didn't get stretched out. I stitched the sleeves from the inside of the sweater. The seam helped stabilize the knit material.
 I also removed that little string at the waist. I wasn't so sure I liked that either. The sweater was soft and stretchy around my tummy, the waist tie was not.


Here are the sleeves. I tried to make them shorter but keep the curved shape at the shoulder exactly the same. I was going to reattach them in a shorter length. I wanted to keep the chevron stripes so I took some fabric from the upper sleeve where it was solid black.


Here is my new sweater with 3/4 length sleeves. It looks almost exactly the same as it did before. It was very easy, probably because it was a knit. It was easy to manipulate the material and put back together.


Here is the dramatic change. I can safely and easily use my hands for all sorts of activities. That includes driving.


I like how this sweater turned it out. It does need a shirt under it but that's OK. It is a soft light layer to wear in the summer when the air conditioning is too cold.


Thanks for reading, now go make something fun for yourself.

       *Year end update- This sweater is a favorite for sure! I still love it.        

Thursday, April 5, 2018

Making Tight Shorts Fit

Hello Readers. I have been using up fabric scraps lately and today's post is no exception. I used some tiny pieces from my last refashion to expand the waistband on a pair of denim shorts.
 Do you ever have trouble finding pants that fit in the waist and the hips? It seems like they never work together to fit all of me. The hips might fit but the waist doesn't, and vice versa. This post is about making pants work for you.


I started a simple pair of denim shorts from the thrift store. This idea would work on a pair of jeans too. The waistband was too tight for my friend Abigail. She asked me to  fix them for her and she had an idea planned out.

The waist is so small, who can fit in here?

She wanted me to insert some extra fabric into the waist to make these shorts more comfortable. I agreed, it was a great idea and I wanted to see how it would work.
I cut the sides right at the existing seams. I am going to add fabric to both sides of the shorts right inside these cuts. 


I cut 2 triangular shapes from the leftover scraps from the denim dress I was working on recently.  I made them a bit larger than I needed so there was extra for a 1/4" seam allowance.


 I used my sewing machine to stitch these little denim triangles into the shorts. It was easy-peasy until.......


 My machine jammed up and it wouldn't budge. I was stuck and in need of a sewing machine doctor. 


 It's OK. I know a guy. If you need sewing machine repair, he can help. His website is on the bottom of the card. He had my machine back in shape in no time.


 I liked the dark denim with the lighter colored denim. I finished the shorts and got them to my friend Abigail.


She tried them on and they fit so well. They look really cool too. 


I hope this idea works for you. Let me know if you try it. Thanks for reading, now go make something fun for yourself.

*Year end update- These shorts were for someone else, but she really liked them when she got them.