Friday, April 8, 2022

Too Tight Floral Dress

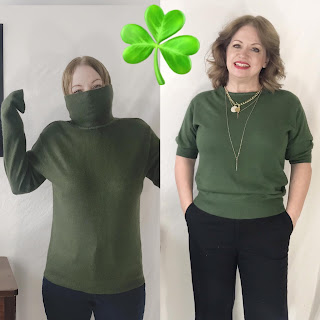
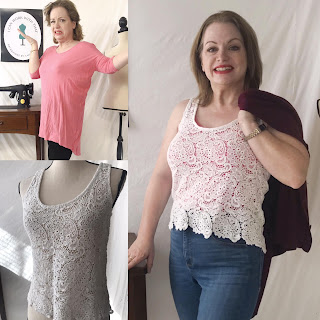
Hello Readers. Some of my clothes have gotten too tight. That's OK. It happens. And there is always a way to work with the clothes you have and make them usable.  

Before and after. 

I really liked this dress. It was a fake wrap dress. The knit fabric was pretty and had some stretch to make it comfortable. It was just a little (Or a lot!) too tight in the chest. I decided to save the bottom and wear it as just a skirt. 

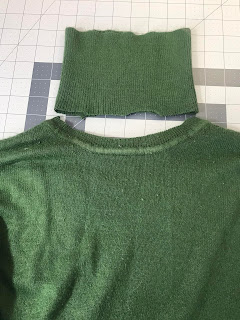
When I opened the dress I could see the seam that connected the top of the dress to the bottom. I cut the top of the dress off. I cut just above that seam. I kept the seam attached to the bottom of the skirt. That seam will keep the stretchy fabric from stretching out of shape.

Here is the new skirt from the front. In the upper right corner you can see the tie for the wrap skirt is still attached. That will be important later. I will need to use that tie to tie the wrap part of the skirt closed. 

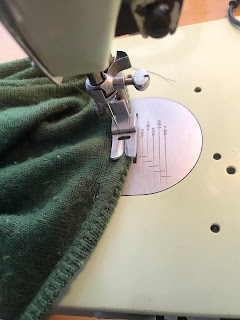
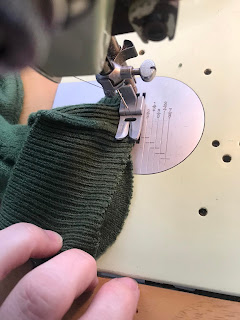
I used a zigzag stitch to keep that seam tucked into the skirt. This fabric won't fray. (Most knits don't fray.) I just wanted to tuck the seam around the waist in and under and stitch it down. I used a zigzag stitch so it will have a little give and stretch to it just like the knit fabric has give and stretch to it. 

Here is a close up look at the waist of the skirt. The tie still wraps around the waist and gives it that wrap look.

You and I know it is fake but the world will think it is a real wrap skirt.

This floral skirt will be great for spring.

Even in the wind, I will stay covered. Thanks for reading along, now go make something fun for yourself. 
*Year End Note From Chickie- I loved this skirt and I gave it to my daughter because I love her too.


Wednesday, April 6, 2022

Cherry Blossom Jeans

 Hello Readers. It is springtime. In my part of the world we lose our minds over the cherry blossoms in Washington DC. The trees were a gift from Japan and everyone loves them. There is a festival and a parade. The dates of peak bloom are announced in the news so people can plan to go see them. There are a lot of fun activities and it really is beautiful.

Before and after. 


In honor of those pretty blossoms, I made some jeans.

I grabbed some black acrylic paint and a thin brush and started painting branches on the sides of these jeans. I painted with a heavy hand. The paint will not wash out. It is permanent but it will fade a little. I want the black to be dark and visible after many washes. I let the black paint dry thoroughly. 

When the black paint was dry I started painting pink spots along the black branches. This does not have to be perfect. I even let my youngest help me. I just loaded the brush with paint and tapped it on the jeans. I did not let this dark pink paint dry.

I added some lighter pink paint onto the dark pink spots. I liked how the 2 colors blended in with each other a little. This also does not need to be perfect, orderly, neat or uniform. Just make some splotches on the jeans. It's fun. Don't over think it. 

Here is a look at my very low budget paint holder. I put the dark pink paint in this cup so my son could paint with me and then I added white paint to make a lighter shade of pink that I used second. You can use any pink acrylic paint you have or like. The paint I have is a mix of inexpensive paints from the craft store. 

If you look closely at the picture of the blossoms they have a dark pink center so I added a dot of magenta to the center of my spots. I wasn't trying to create really accurate paintings of blossoms. I am going for more of an impressionist style. 

You can see these blossoms are all different and imperfect, just like all the people that go see the blossoms. I love it that way.

I love the pop of pink. It's so fun, cheerful and perfect for spring. I made some jeans almost just like this about 4-5 years ago but they got too tight. It's OK, now I replaced them. 
 

Thanks for reading along, now go make something fun for yourself. 
*Year End Note From Chickie- These jeans were so fun! I know skinny jeans are not supposed to be in but if these are wrong, I don't want to be right.


Wednesday, March 9, 2022

The Tight Turtleneck

 Hello Readers. I am going to refashion all green pieces in March because it is going to be St. Patrick's Day this month. I am Irish so I am into it. I thought it would be a fun sewing challenge for myself. I had also collected a lot of green pieces in my stash so this is a good way to make sure I get some "new" green clothes for myself.

Before and after. 

This turtleneck was so small it was difficult to pull over my head. It was so tight it wiped all my make-up off. I don't like turtlenecks that much anyway. I knew this one would have to go.

I cut the turtle neck off. I left about 1/4 of an inch of fabric. This is important. I need the extra so I could sew it down later. 

I found a small hole in the sleeve and I thought short sleeves would be great for spring so...

I cut the sleeves into a short sleeve length. I made sure the hole was cut off when I cut the sleeves.

I also cut the wrist bands off and saved them for later. I will use them to finish the sleeves.

I got some matching thread and stitched the neck band down. I tucked that 1/4 of an inch of extra fabric under and into the sweater. I stitched on the outside of the neckline and from the outside it looks like a round shaped neckline was always there.

I used the wristbands at the ends of my new short sleeves. I put the right sides together and used a zigzag stitch to stitch the edges together. The sewing will be hidden inside. The zigzag stitch means the sleeves would have some give and stretch. That will make them more comfortable to wear. 

My new short sleeved NON-turtleneck sweater was ready to go. It could be worn anytime but it also works for St. Patrick's Day. Thanks for reading along, now go make something fun for yourself. 
*Year End Note From Chickie- This sweater is still a favorite even after a year. It worked for Christmas too.


Friday, March 4, 2022

Green T

 Hello Readers. What should I do with a green T shirt from a camp I never went to? I decided to refashion it into pajamas. I could have just worn it the way it was but it's more fun to refashion.

 
Before and after. 
 
This very basic camp t-shirt could use a makeover. I liked the green and St Patrick's Day is in March. Can I refashion all green items this month? It will be fun to try.

I cut the center out of the shirt. I cut away a pie shape to remove the logo.

I used that piece to cut out a replacement. I put the piece from the camp shirt on top of the lighter green shirt and cut a piece the same exact size. The light green shirt did not fit so I wanted to use it for something.

My new pajama shirt was easy to put together. I wanted some light green edging. 

 
I cut strips of light green t-shirt material for the trim. It curled up a lot and was annoying to work with. I folded each strip horizontally and stitched them onto the edges of my shirt.
 
 
The shirt was perfect for these pajama pants. The pants just needed to be a bit shorter and more narrow in the legs. I cut some excess from the inside of the legs so I could keep the pockets in place on the hips.

    My new pajamas were perfect to lounge around. I wasn't feeling well and I just wanted to be a a couch potato. Thanks for reading along, now go make something fun for yourself.


Friday, February 25, 2022

Pink T-shirt as Lining

 Hello Readers. I am refashioning all red and pink items this month because Valentine's Day was this month and it inspired my color theme for February. I like red and pink so it seemed like a great idea to me. This long pink shirt was perfect material for refashioning.

 
Before and after.
 
This pink shirt has some problems. It was thin and clingy. It was very big but it had tiny tight arm sleeves. (It made me think of this scene from "Meet the Robinsons".) The fit of it didn't make a lot of sense to me but the color was fabulous. Let's give it a new life. 

This tank top was made of such pretty lace. It is too sheer to wear alone but I had an idea. What if I gave it a lining? Like a pink lining? You see what I was thinking right?

I used the lace tank as a pattern and cut the pink shirt into a tank top shape. It did not need to be perfect because it would be inside the lace tank but I had to cut the big pink shirt down into a tank top shape.

My new tank was easy to cut out. I made new side seams so my pink tank was pretty close in size and shape to the lace tank top. 

I love how the lace looks over the pink. It looks like an old-fashioned lacey Valentine. 

I was able to connect the edges of the 2 tank tops together using a zigzag stitch. I simply stitched along edge of the neckline and the edge of the arm holes. It was easy and fast work. The lace tank hides any imperfections in the pink tank top I made. 
 
I could wear this tank alone or ... 
 
 I could wear it with a sweater. It will be great in spring and summer by itself, for now I need to stay warm with a sweater. Thanks for reading along, now go make something fun for yourself. 
*Year End Note From Chickie- This tank is so simple but I love it. The color is a great pink but it's not too much pink. It's one of my favorite refashions of the year.


Wednesday, February 23, 2022

Dress to 2 Piece Set

 Hello Readers. This red and black patterned dress seemed great for my red and pink theme in honor of Valentine's Day. It was a little long and frumpy on me but it was really nice fabric.

Before and after.

This dress was nice but not very flattering. We can do something more fun with this great dress.

I started cutting. I cut the top of the dress off. There was a built in waistband and I left that attached to the skirt.

I pinned the sides to get a better fit. I also made made 2 tucks in the front just under the bust. The tucks are just narrow triangles. Taking some of the excess from the sides and front of this little shirt will improve the fit.

This is what the tucks look like from the outside. The fit was better but I needed to finish the cut edges.

I used my serger on the edges to finish the edges and the light colored thread was perfect to break up the red patterned fabric a little. 

I added an elastic waistband to the inside of the waistband of the skirt. The elastic will keep the skirt up high on my waist. The skirt already had a waistband so I stitched the elastic to that waistband on the inside of the skirt.

You can see here how I cut the dress shorter and took the sides in to change the shape and style.

I didn't hem the skirt, I used the serger there too. 

I cut the edge of the neckline off the top so I could use the serger to make all the edges match through the whole outfit.

I liked the light color stitches as trim. My new 2 piece dress is more casual and fun. I wanted a cropped length little shirt but I also wanted a high waist on the skirt so no one could see my mom tummy. 

Thanks for reading along, now go make something fun for yourself. 
*Year End Note From Chickie- This outfit is fun and comfortable. It's still a go-to outfit.