Friday, July 9, 2021

Start Too Big

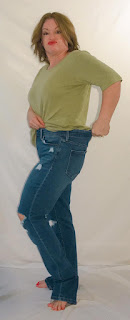
Hello Readers. Every summer people cut their pants into shorts. It may seem at first that the pants I am wearing are too baggy but they will make great shorts. I have found that starting with clothes that are too big and sizing down, I get the best fit.


If shorts that are too fitted they will ride up. I don't like that. It isn't comfortable. These loose cropped twill pants have enough room in the legs to make them fit well as shorts. This shirt is fine but a bit boxy. We can fix that.


 I started by trying on these pants and marking where I wanted to make new side seams. I needed to take the waist in so it would fit well and keep the shorts up higher on my waist. I like my pants and shorts to have a high waist. 

 
I made the waist a little smaller by making new side seams. You could use a zigzag stitch or a serger to make new side seams. This is the best way to get the fit you want. I did not make the legs smaller or tighter, I just made them shorter.
 

 I gave the shorts a quick hem and I was done. 


I also took the shirt is a little at the waist to make it look a little less boxy and shapeless. It was roomy enough through the shoulders and bustline and now the waist fits closer to the body as well. 


My outfit looks so much better now that it fits so much better. It was easy to start with roomy clothes and size down a little. 

Thanks for reading along, now go make something fun for yourself. 

***Chickie's Year End Review-These were great summer basics. Great for summer.

Wednesday, July 7, 2021

A Summer Bag

 Hello Readers. I was in the mood to make a summer bag. I had a lot of purse straps and handles that my mother-in-law gave me. I thought I should use some of them. I also had some of the fabric samples she gave me. Let's put them together.


I am not very good at bags so this was going to be very simple. The fabric was the real star of the show. I loved this orange and yellow fabric. It was so summery. It was thick cotton and it would make a great bag. I had some round and oval bamboo handles. After I took this picture I decided to use oval handles. These kinds of purse handles are available at fabric stores and on Amazon.


I cut a strip of fabric off the side. I needed to get this grommet out of the way. 


I used the strip and another I cut to make small pieces that I could use to attach the handles. I basically made small tubes about 4 inches long. Stay with me, it's going to make more sense as we go.


I made some fabric and handle sandwiches. There are 2 rectangles of the fabric with the right side facing the other right side. The small tubes are folded in half and open ends are sticking out out the sandwich. The handles are in the loops and in the sandwich. 

 Here is a peek inside the sandwich. you can see the handles in there. I stitched around the sides and the top where the little straps are sticking out. Then I flipped it right-side out. 

 This is what I made, these 2 identical pieces. Each one looks the same from front and back. I wanted to use this fabric everywhere for this bag.  The bottom of each piece is not sewn closed yet but that is OK. We will do that next. I stitched these 2 pieces to each other on the sides and the bottom and flipped them right-side out again.

Here is a peak inside. I connected the 2 pieces you saw above and flipped it inside out again. I did this so the fabric would be visible at the top of the bag. Doing this also made clean seams inside the bag.

This is a great little summer bag, I am loving the orange and yellow. 

Thanks for reading along, now go make something fun for yourself. 

***Chickie's Year End Review-Oh man! I love this yellow bag. I think it was one of my most popular post this year as well.


Friday, July 2, 2021

Refit

 Hello Readers. It is really summer now, It is hot, humid and also, did I mention hot? This was a good time to stay inside start learning to use my serger. I got the Brother 1034D. It is a really basic home use model. And it had good reviews for being easy to thread. 


 I liked the fit and length of these Old Navy jeans. Could I make my jeans fit the same as these?


The jeans I found at a swap were soft and broken in. They had a lot of stretch in them so the holes pulled together in a funny way. If I wore them tight, it wouldn't be a factor. But I don't want them tight. I want them to be looser in the legs. I had to do something with the holes of these jeans.


I decided to use this very simple outfit top play with my serger firstand see if I could use it. This shirt was a very soft knit. A serger would make better seams than a sewing machine. A sewing machine can pull and caust the new seams to pucker I cut the shirt down in size and then ...


I used this guy. 


 Look at this seam! It looks so good. I have never used a serger before and I loved it.


I wanted to make the waistband of the jeans in. I decided to try a new fix. I cut out wedges of fabric in the back of the jeans. 


I used my serger to connect the jeans back together. Would the serger be able to handle this project? They were a lot of layers and seams in the back of these jeans. The serger did get the job done, but faltered in a couple spots. The seams were tough to stitch through. I don't think I will try this again. My 1943 Singer sewing machine can handle these layered denim seams better. Its all steel and can just stitch through anything.


The end result was an outfit that fit a lot better and made me look a little taller. It's all an illusion, I am still short as heck! But I liked the clothes so much better, that is what matters. 


Thanks for reading along, now go make something fun for yourself. 

***Chickie's Year End Review-Not much excitement here. I still wear both these basic pieces though so that is a win to me.

Wednesday, June 30, 2021

The Denim Oops Skirt

 Hello Readers. I wanted to make a boxy denim dress out of these men's jeans. They were wide legged and there was a lot of good denim there. I ended up making some mistakes and barely was able to make this fitted denim skirt. That's how it goes sometimes.


I started with the jeans by cutting the legs off the jeans. I saved the rest for later.


I cut the legs open so I had 2 pieces of denim to work with. I didn't have as much denim as I thought I would. Why did I think it would be bigger? I don't know. I kept going. I thought I could make a fitted denim mini-dress. If you try this I recommend 3-4 leg sections to make a looser fitting dress.


I cut the back pockets off the jeans. I thought they would look cute somewhere on my dress. 


Let's just say, mistakes were made. I ended up with this mutant dress. I took a break and had a cup of tea. Maybe some cookies. Whatever.


Now I was mad and I was going to make something wear-able from this denim if it killed me. I cut the top of the dress off and decided to try and save this skirt. 


I had a front and back so that was good. I needed a waistband. I went back to those jeans. How could I use the original waistband?


I decided to cut the belt loops off, attach it to the skirt and actually tie it in the front. 


It looks like this. 


The fit at the back of the  waist would have been an issue but I made the waist of the skirt smaller in the back by pulling one side over the other and stitching it together and then sewing the waistband on to the skirt. This really helped with the fit of the skirt.


All the pieces I cut got a lovely fray on them after going through the wash. I thought that would happen. It made the skirt more casual and fun. You can see that the very front is not connected or sewn together at the center. That is so I can pull the skirt on and then tie it closed at the waist. 


The waistband was a cute element that also really kept the skirt closed. This denim had some stretch to it and this whole skirt would not work without the stretch. The skirt stretched enough to get on and off and it was comfortable to wear. 


In the end, I did not get what I thought I wanted but I liked what I got. Life lesson? Maybe. See you next time. 

***Chickie's Year End Review-I really had fun with this skirt. What a fun one-of-a-kind refashion.

Friday, June 25, 2021

Embellished Jeans

 Hello Readers. I like distressed denim but what do you do when the distressing is too much or too big or in a bad location? I decided to cover those spots with pieces of trim I liked. 


I wanted these simple denim jeans for everyday wear. But the waist was a little too big. This is a simple fix but it got more complicated.


I made new side seams and the small distressed spots ended up right at the new side seams. These jeans won't last long with holes at the seams. The seam would rip open and it would be really embarrassing. What if I used this floral trim to patch those distressed spots? That would fix the problem and be pretty too. I cut the ribbon into separate flower pieces. Basically, I made my own patches.


I used a zigzag stitch to attach the flower pieces to the jeans. This helped keep the edges of the flower together and keep it on the jeans when I wash and wear them. These spots are all in the hip area on both sides of the jeans. I added a flower at the upper pocket just for fun.


My jeans were done. I really liked the colors in this trim, I am so happy I was able to use these little pieces in such a fun way. 

Thanks for reading along, now go make something fun for yourself. 

***Chickie's Year End Review-I love and wear these jeans a lot. adding fun trim to clothes is one of my favorite things.

Wednesday, June 23, 2021

Orange Jeans Again?

 Hello Readers. I have a question for you? Do you like the color orange? I love it but how many pairs of orange jeans does one woman need? 


I know you are thinking who has orange jeans? And who would have more than one pair? Good questions. The pair I am holding is too tight thanks to Covid snacking. The pair I have on is a bit big and really long. But I really want them to fit so lets get to work. I also want to do something with this floral shirt.


The first thing I had to do was try on the big orange jeans and mark where I need to take them in. I usually try them on inside out and make marks in pencil. I mark the sides all down the hips and legs.  The pencil marks will wash out.


 With my marks to guide me I can make these orange jeans really fit me. Not the manufacturers idea of a human body, but me!


After I took a look at the jeans on he floor I panicked that maybe the legs were uneven. The right leg looked shorter in the picture above. I checked the jeans up close and they are even. I just did not lay them out straight.


My jeans are done so I can work on the shirt. I wanted to make a raglan sleeve shirt because I love that style. (And the arm holes are simple straight lines.) I used a shirt I love as a guide and cut the sleeves and shoulders off this floral shirt. 


I wanted a different color sleeve so I found this blue t-shirt. I didn't want the advertising but I could use the rest of the shirt. I also cut the hem off and saved it for later.


Here are my new sleeves/shoulder pieces. 


I attached the sleeve pieces to the shirt. It was pretty easy. I used that t-shirt hem as binding at the neckline and the ends of the sleeves. It works great for this and I know the color is a perfect match.


My shirt was finished! Hooray! And it was great with my jeans.


I wish I could say I went out on an adventure. I just went to work. 

Thanks for reading along, now go make something fun (And orange!) for yourself. 

***Chickie's Year End Review-This shirt is still a favorite and these jeans are so fun too. Love, love.